
Free Shipping on Domestic Orders $75+

Lenovo IdeaPad U310 Ram Replacement

What you need

  1. Lenovo IdeaPad U310 Ram  Replacement, RAM: step 1, image 1 of 1
    • Make sure device is turned off and disconnected from any power source before proceeding.

    • Flip the device over so the bottom panel is facing up.

    • Remove the rubber feet by pinching and pulling in an upward motion.

    • The rubber feet are missing from this photo, but will be located within the red markups.

    Ask FixBot

    Add Comment

  2. Lenovo IdeaPad U310 Ram  Replacement: step 2, image 1 of 1
    • Remove the 4 screws securing the bottom panel to the device.

    • The screws are missing from this device and are not pictured. They will be located under the rubber feet within the red markups.

    Ask FixBot

    Add Comment

  3. Lenovo IdeaPad U310 Ram  Replacement: step 3, image 1 of 2 Lenovo IdeaPad U310 Ram  Replacement: step 3, image 2 of 2
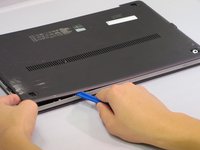
    • Place the plastic opening tool between the bottom panel and device.

    • Pry around the device's outer edge until the bottom panel is no longer attached.

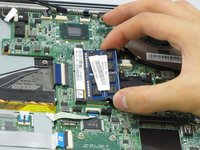
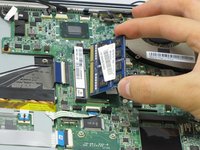
    • Lift the bottom panel up and away from device.

    Ask FixBot

    Add Comment

  4. Lenovo IdeaPad U310 Ram  Replacement: step 4, image 1 of 1
    • Pry the RAM's two holding clips in an outward motion.

    Ask FixBot

    Add Comment

  5. Lenovo IdeaPad U310 Ram  Replacement: step 5, image 1 of 2 Lenovo IdeaPad U310 Ram  Replacement: step 5, image 2 of 2
    • Continue to pry open the clips, and slip the RAM from its housing.

    Ask FixBot

    Add Comment

Conclusion

To reassemble your device, follow these instructions in reverse order.

Cancel: I did not complete this guide.

4 other people completed this guide.

0 Guide Comments

Add Comment

View Statistics:

Past 24 Hours: 0

Past 7 Days: 4

Past 30 Days: 45

All Time: 2,872