This translation was generated by a machine and has not been reviewed by a person yet. Speak this language? Review it.

Lego 3MP Digital Camera Replacement Battery Repair

H Fischer and one other contributor
Last updated on Sep 2, 2026
Views: 150
View statistics:
- Past 24 Hours:
- 2
- Past 7 Days:
- 19
- Past 30 Days:
- 68
- All Time:
- 150
Comments: 0
No one has left comments on this guide. Will you be first?
Go to guide commentsCompleted: 0 1
No one has marked this guide "completed." Will you be the first?
1 person has marked this guide "completed." It's you — great job!
Favorites: 0 1
No one has favorited (and subscribed to) this guide. Will you be the first?
1 person has favorited (and subscribed to) this guide — and that's you!
Community-Contributed Guide
An awesome member of our community made this guide. It was not created by iFixit staff.
Introduction
Go to step 1 ↓This 2009 Lego LGPIX3MP camera is completely useless nowadays, but iconic. I happened to find mine on eBay; it was defective, and my assumption (which was confirmed) was: a dead replacement battery.
The swollen replacement battery had forced parts of the housing apart, and that has remained the case even after the replacement. But the camera works again and will soon be going to a Lego nerd :-)
Description of the camera here:
What you need
-
-
-
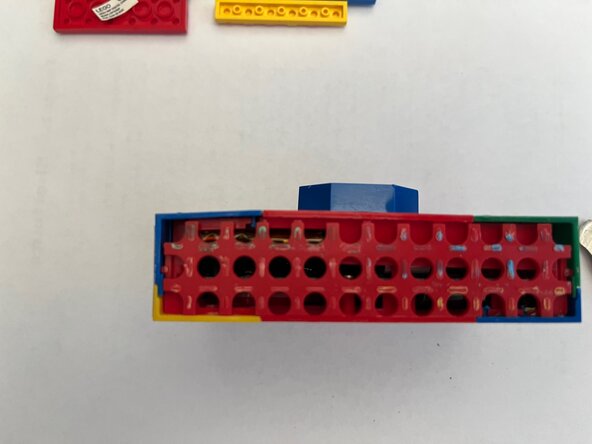
I started the disassembly from the bottom; this gives you access to the "panelling" of the walls.
-
The floor sections are attached with plastic adhesive, which can be released piece by piece by inserting a flat, thin metal strip. A watch case opener can also be helpful.
 Ask FixBot
-
-
-
You can already see the replacement battery in the upper left of the image, and that it has warped the housing slightly.
-
-
-
Now we will work our way up the sides, step by step. This "cladding" is also glued, and in some places, snapped into place.
-
The blue strips that run from front to back on the right and left sides act as a kind of clip. The material is quite elastic, but work carefully nonetheless!
-
-
-
The last "layer" is removed here. Now the green stone at the very top still needs to be removed.
-
-
-
It is recommended to organize the many parts as you remove them, as this will make reassembly easier later.
-
-
-
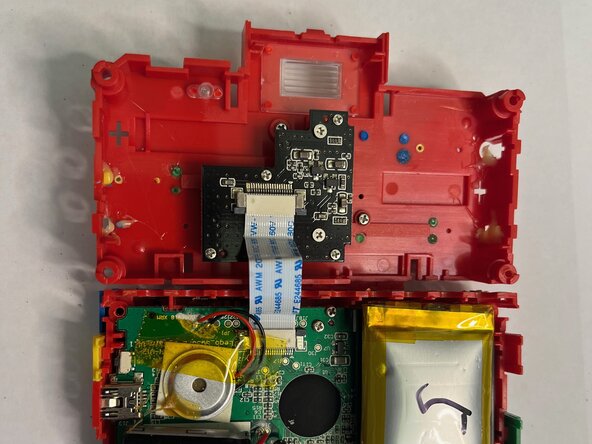
Now release the four Phillips screws connecting the rear cover to the front, and press down the retaining tab located at the very top above the flash, then the housing can be opened.
-
-
-
The logic board is secured to the rear panel with 4 Phillips screws.
-
The ribbon cables between the housing halves and to the display can be released by sliding the locking mechanism away from the connector.
-
-
-
The replacement battery is adhered to the black plate on the left below the flash and can be pried off with a flat tool.
-
The leads of the replacement battery are soldered to the bezel of the logic board. The solder points are easily accessible.
-
-
-
-
The Li-ion replacement battery measures 41 mm x 30 mm and has a capacity of 550 mAh.
-
By pure coincidence, I had a perfectly fitting replacement battery from a Garmin Edge 820 cycling computer, manufacturer part no. 361-0043-00, with 600 mAh. The connection wires are slightly shorter and had to be extended using wire remnants from the old replacement battery.
-
-
-
I secured the replacement battery using the remains of the adhesive pad underneath.
-
-
-
Reassembly is basically the same as disassembly:
-
- Connect the ribbon cables, insert the logic board, and screw it into place.
-
- Put the housing halves together and drive in the 4 screws.
-
- Attach the side trim parts. The two blue clips hold on their own; I secured the rest with B-7000 glue (hoping that it won't dissolve the plastic further, as plastic glue would).
-
- Glue the flat components at the bottom and top into place as well.
-
- Charge the replacement battery via USB cable (takes approx. 2 hours).
-
- Enjoy the power-on logo :-)
-
-





Follow the steps in reverse order to reassemble your device.

