Free Shipping on Domestic Orders $75+

Large Animal Water Nipple Replacement

Views: 773

View statistics:

Past 24 Hours:
2
Past 7 Days:
15
Past 30 Days:
83
All Time:
773
Comments: 0

No one has left comments on this guide. Will you be first?

Go to guide comments
Completed: 0

No one has marked this guide "completed." Will you be the first?

Favorites: 0

No one has favorited (and subscribed to) this guide. Will you be the first?

Time Required: 15 minutes
Difficulty: Easy
Large Animal Water Nipple Replacement

Introduction

Go to step 1 ↓

This is a replacement of a large animal water nipple, this will provide them access to water without them making a huge mess. This guide has ten easy to follow steps to ensure the replacement is done properly.

What you need

Tools

    1. Large Animal Water Nipple Replacement, Large Animal Water Nipple: step 1, image 1 of 1
      • Empty the container of all water.

      Ask FixBot

      Add Comment

    2. Large Animal Water Nipple Replacement: step 2, image 1 of 1
      • With an adjustable wrench, unscrew the nut on the inside located near the base on the backside of the nipple.

      Ask FixBot

      Add Comment

    3. Large Animal Water Nipple Replacement: step 3, image 1 of 1
      • Pull the mechanism out from the front.

      Ask FixBot

      Add Comment

    4. Large Animal Water Nipple Replacement: step 4, image 1 of 1
      • Ensure there is no damage to the hole that needs to be patched.

      • Cracks or fractures are easily made due to sun damage or forcing the mechanism in or out.

      Ask FixBot

      Add Comment

    5. Large Animal Water Nipple Replacement: step 5, image 1 of 1
      • Use Teflon tape to line the threads of the new nipple.

      Ask FixBot

      Add Comment

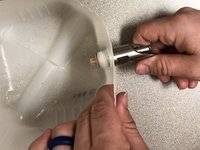
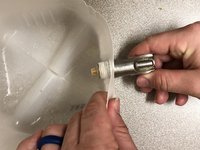
    6. Large Animal Water Nipple Replacement: step 6, image 1 of 2 Large Animal Water Nipple Replacement: step 6, image 2 of 2
      • Place the new nipple in the hole with the peg on top.

      Ask FixBot

      Add Comment

    7. Large Animal Water Nipple Replacement: step 7, image 1 of 1
      • Fill the container slightly to ensure that there are no leaks. Tighten the washer or pull out to see if a crack has formed while replacing.

      • Tighten the washer to see if that is the source of the leak. If not, pull out to see if a crack has formed while replacing.

      • This is a leak in the seal.

      Ask FixBot

      Add Comment

    8. Large Animal Water Nipple Replacement: step 8, image 1 of 1
      • If there is a leak try placing some more Teflon tape. If this does not fix the issue continue reading this step. If there is no longer a leak, move on.

      • Leaking from cracks are easily filled with caulking if the container is small. This would only be a temporary fix on a larger container. Due to the weight of the water, the barrel or bucket would need to be replaced.

      Ask FixBot

      Add Comment

    9. Large Animal Water Nipple Replacement: step 9, image 1 of 1
      • Place and thread the nut on the inside of the container on the backside of the nipple.

      Ask FixBot

      Add Comment

    10. Large Animal Water Nipple Replacement: step 10, image 1 of 1
      • Finally, place the container in the designated place and fill completely.

      Ask FixBot

      Add Comment

Finish Line

Cancel: I did not complete this guide.

0 Guide Comments

Add Comment

View Statistics:

Past 24 Hours: 2

Past 7 Days: 15

Past 30 Days: 83

All Time: 773