
LG env2 vx9100 Back Panel Replacement

Reed Williston and 10 other contributors
Last updated on Jan 14, 2026
Views: 1.2K
View statistics:
- Past 24 Hours:
- 1
- Past 7 Days:
- 6
- Past 30 Days:
- 40
- All Time:
- 1,208
Comments: 0
No one has left comments on this guide. Will you be first?
Go to guide commentsCompleted: 2 3
2 people have marked this guide "completed." Will you be next?
3 people have marked this guide "completed." Including you — great job!
Favorites: 0 1
No one has favorited (and subscribed to) this guide. Will you be the first?
1 person has favorited (and subscribed to) this guide — and that's you!
Incorrect Tools
Help make this guide better by using the correct tools in images and/or text.
Introduction
Go to step 1 ↓In this guide you will be removing the back panel from the rest of the phone.
What you need
Tools
-
Spudger4.9


-
-
-
Place the phone face down on the table.
-
Pull down the tab below the battery with your fingernail or an opening tool.
-
Lift the battery out.
 Ask FixBot
-
-
-
-
-
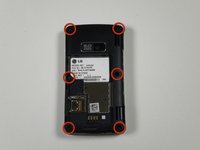
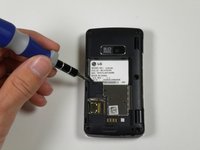
Use a metal spudger to remove the five rubber covers and expose the screws underneath.
-
-
-
-
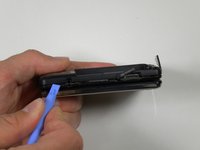
Insert a plastic opening tool into the seam and gently pry to release the tabs.
-
Work around the phone until all tabs are released.
-
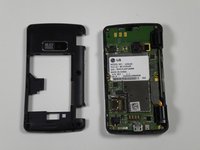
Remove the back panel.
-
-




To reassemble your device, follow these instructions in reverse order.
Cancel: I did not complete this guide.
2 other people completed this guide.

Team

Cal Poly, Team 16-55, Forte Fall 2012 Member of Cal Poly, Team 16-55, Forte Fall 2012
CPSU-FORTE-F12S16G55
5 Members
84 Guides authored
