Free Shipping on Domestic Orders $75+

Kyocera Hydro Life Rear-Facing Camera Replacement

What you need

    1. Kyocera Hydro Life Rear-Facing Camera Replacement, Rear-Facing Camera: step 1, image 1 of 1
      • Flip the phone so that the screen is facing down.

      • Gently remove the back cover with the grip at the bottom of the phone.

      Ask FixBot

      Add Comment

    2. Kyocera Hydro Life Rear-Facing Camera Replacement: step 2, image 1 of 3 Kyocera Hydro Life Rear-Facing Camera Replacement: step 2, image 2 of 3 Kyocera Hydro Life Rear-Facing Camera Replacement: step 2, image 3 of 3
      • Use the tab marked "PULL" to remove the battery from its enclosure.

      Ask FixBot

      Add Comment

    3. Kyocera Hydro Life Rear-Facing Camera Replacement: step 3, image 1 of 2 Kyocera Hydro Life Rear-Facing Camera Replacement: step 3, image 2 of 2
      • Remove the six Phillips #00 screws from the back of the enclosure.

      • Use a plastic opening tool to gently remove the plastic piece surrounding the back of the phone enclosure.

      Ask FixBot

      Add Comment

    4. Kyocera Hydro Life Rear-Facing Camera Replacement: step 4, image 1 of 1
      • Remove the white sticker.

      Ask FixBot

      Add Comment

    5. Kyocera Hydro Life Rear-Facing Camera Replacement: step 5, image 1 of 2 Kyocera Hydro Life Rear-Facing Camera Replacement: step 5, image 2 of 2
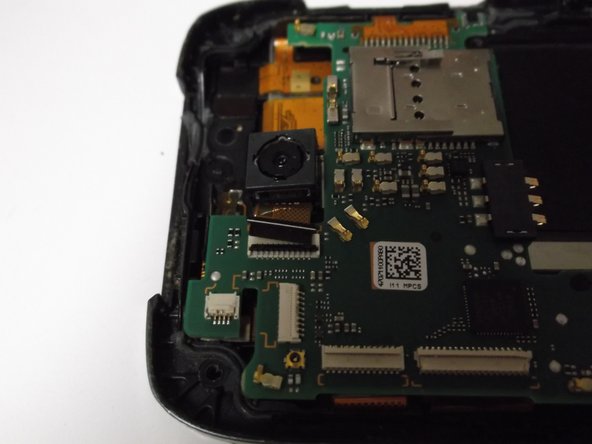
      • Using a pair of pliers, gently pry open the camera ribbon slot.

      • This will not take much pressure to open.

      Ask FixBot

      Add Comment

    6. Kyocera Hydro Life Rear-Facing Camera Replacement: step 6, image 1 of 1
      Tool used on this step:
      Tweezers
      $4.99
      Buy
      • Gently remove the camera ribbon.

      • Be very careful not to rip the ribbon. Use tweezers if needed.

      Ask FixBot

      Add Comment

    7. Kyocera Hydro Life Rear-Facing Camera Replacement: step 7, image 1 of 2 Kyocera Hydro Life Rear-Facing Camera Replacement: step 7, image 2 of 2
      • Using a plastic prying tool, gently loosen all 4 corners of the motherboard.

      • Lift the motherboard away from the phone enclosure.

      Ask FixBot

      Add Comment

    8. Kyocera Hydro Life Rear-Facing Camera Replacement: step 8, image 1 of 1
      • Remove the black sticker.

      • Be careful when removing the sticker. The sticker will need to be replaced after replacing the camera.

      Ask FixBot

      Add Comment

    9. Kyocera Hydro Life Rear-Facing Camera Replacement: step 9, image 1 of 1
      • Remove the camera from the motherboard.

      • This step requires breaking metal.

      • Only cut along the camera square.

      Ask FixBot

      Add Comment

Conclusion

To reassemble your device, follow these instructions in reverse order.

Cancel: I did not complete this guide.

Morgan Marshall

Member since: 09/21/18

277 Reputation

2 Guides authored

0 Guide Comments

Add Comment

View Statistics:

Past 24 Hours: 1

Past 7 Days: 5

Past 30 Days: 25

All Time: 539