Free Shipping on Domestic Orders $75+

Kindle Paperwhite 1st Generation Motherboard Replacement

What you need

  1. Kindle Paperwhite 1st Generation Motherboard Replacement, Case: step 1, image 1 of 2 Kindle Paperwhite 1st Generation Motherboard Replacement, Case: step 1, image 2 of 2
    • Using a spudger or plastic opening tool, gently pry the bezel from the screen. It is easier to start in the corners and work your way around the bezel.

    • Do not insert the spudger too far under the bezel; it could easily damage the screen.

    Ask FixBot

    Add Comment

  2. Kindle Paperwhite 1st Generation Motherboard Replacement: step 2, image 1 of 3 Kindle Paperwhite 1st Generation Motherboard Replacement: step 2, image 2 of 3 Kindle Paperwhite 1st Generation Motherboard Replacement: step 2, image 3 of 3
    • Remove the eleven 3.0 mm Phillips screws surrounding the midframe.

    • At the top of the display, a strip of black tape covers one screw.

    Ask FixBot

    Add Comment

  3. Kindle Paperwhite 1st Generation Motherboard Replacement: step 3, image 1 of 1
    • Lift the midframe out of the case.

    • If the midframe is stuck, slide it to the left first, and then lift it out.

    Ask FixBot

    Add Comment

  4. Kindle Paperwhite 1st Generation Motherboard Replacement, Battery: step 4, image 1 of 2 Kindle Paperwhite 1st Generation Motherboard Replacement, Battery: step 4, image 2 of 2
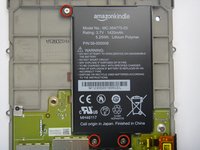
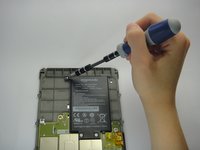
    • Turn over the midframe to locate the battery.

    • Remove the three Phillips 3.0 mm screws securing the battery to the midframe.

    Ask FixBot

    Add Comment

  5. Kindle Paperwhite 1st Generation Motherboard Replacement: step 5, image 1 of 1
    • Gently lift the battery from the bottom, and slide it out of the midframe.

    Ask FixBot

    Add Comment

  6. Kindle Paperwhite 1st Generation Motherboard Replacement, Motherboard: step 6, image 1 of 3 Kindle Paperwhite 1st Generation Motherboard Replacement, Motherboard: step 6, image 2 of 3 Kindle Paperwhite 1st Generation Motherboard Replacement, Motherboard: step 6, image 3 of 3
    • With the case and battery removed from the midframe, begin removing all cables attached to the motherboard.

    • Place the device so the midframe's backside faces up. Start with the cable on the bottom left corner.

    • Use a spudger to lift up the white locking cable tensioner and slide the flex cable out.

    • Proceed counterclockwise to the next cable and repeat. Small flex cable on the bottom won't need cable tensioner lifted, just carefully pull out.

    Ask FixBot

    Add Comment

  7. Kindle Paperwhite 1st Generation Motherboard Replacement: step 7, image 1 of 2 Kindle Paperwhite 1st Generation Motherboard Replacement: step 7, image 2 of 2
    • Remove the white flex cable by gently lifting the yellow plastic connector.

    Ask FixBot

    Add Comment

  8. Kindle Paperwhite 1st Generation Motherboard Replacement: step 8, image 1 of 3 Kindle Paperwhite 1st Generation Motherboard Replacement: step 8, image 2 of 3 Kindle Paperwhite 1st Generation Motherboard Replacement: step 8, image 3 of 3
    • Remove the yellow anti-static tape from the display ribbon cable connector.

    • Use a spudger to lift up and disconnect the cable tensioner.

    Ask FixBot

    Add Comment

  9. Kindle Paperwhite 1st Generation Motherboard Replacement: step 9, image 1 of 2 Kindle Paperwhite 1st Generation Motherboard Replacement: step 9, image 2 of 2
    • Use a Philips screwdriver to remove the seven 3.0 mm Phillips screws securing the motherboard:

    • Three silver screws with silver washers

    • Two silver screws with no washers

    • One black screw with a golden washer

    • One black screw with a square washer

    Ask FixBot

    Add Comment

  10. Kindle Paperwhite 1st Generation Motherboard Replacement: step 10, image 1 of 1
    • Remove the motherboard.

    Ask FixBot

    Add Comment

Conclusion

To reassemble your device, follow these instructions in reverse order.

Cancel: I did not complete this guide.

6 other people completed this guide.

Isabelle Burgess

Member since: 01/23/13

1,657 Reputation

2 Guides authored

Team

Cal Poly, Team 3-33, Amido Winter 2013 Member of Cal Poly, Team 3-33, Amido Winter 2013

CPSU-AMIDO-W13S3G33

4 Members

19 Guides authored

2 Guide Comments

Not sure if this is an error, but on the 3G paperwhite, we needed to use a #0 Phillips, not a #2. Great guide otherwise!

Caleb Begly - Reply Share

Please suggest what type of controller is used and the model and flash memory in the Kindle Paperwhite 1st Generation?

ven 1949, div 0004

Elecrash - Reply Share

Add Comment

View Statistics:

Past 24 Hours: 2

Past 7 Days: 18

Past 30 Days: 122

All Time: 22,651