
Free Shipping on Domestic Orders $75+

JBL Xtreme Bass Radiator Replacement

What you need

  1. JBL Xtreme Bass Radiator Replacement, Cover: step 1, image 1 of 2 JBL Xtreme Bass Radiator Replacement, Cover: step 1, image 2 of 2
    • Locate the seams next to the 'feet' on the bottom side of the device.

    Ask FixBot

    Add Comment

  2. JBL Xtreme Bass Radiator Replacement: step 2, image 1 of 3 JBL Xtreme Bass Radiator Replacement: step 2, image 2 of 3 JBL Xtreme Bass Radiator Replacement: step 2, image 3 of 3
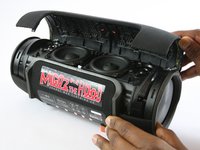
    • Use the metal spudger to gently pry and lift the edge of the seam. The cover is held in place with plastic snaps that will make a popping noise when disengaged. !!Start with the back half, this will expose TWO Screws that need to be removed before lifting the front half.

    Ask FixBot

    Add Comment

  3. JBL Xtreme Bass Radiator Replacement: step 3, image 1 of 2 JBL Xtreme Bass Radiator Replacement: step 3, image 2 of 2
    • For the first part of the case: gently pull back the edges of the case rotating along the hinge opposite the opening seam illustrated in the second photo. Plastic snaps hold the cover in place.

    • For the second part of the case: there are 2 screws to be removed at the seam. Once removed, the case will come off completely without forcing.

    Ask FixBot

    Add Comment

  4. JBL Xtreme Bass Radiator Replacement, Bass Radiator: step 4, image 1 of 3 JBL Xtreme Bass Radiator Replacement, Bass Radiator: step 4, image 2 of 3 JBL Xtreme Bass Radiator Replacement, Bass Radiator: step 4, image 3 of 3
    • Unscrew the six 9.75mm Phillips head screws holding the bass radiator in place.

    • Three of the five outer screws are indicated in the first image and the sixth inner screw is indicated in the second image.

    Ask FixBot

    Add Comment

  5. JBL Xtreme Bass Radiator Replacement: step 5, image 1 of 3 JBL Xtreme Bass Radiator Replacement: step 5, image 2 of 3 JBL Xtreme Bass Radiator Replacement: step 5, image 3 of 3
    • Once the screws have been removed, the bass radiator will easily lift free.

    • Both radiators are identical. Repeat the above steps on the opposite radiator if necessary.

    Ask FixBot

    Add Comment

Conclusion

To reassemble your device, follow these instructions in reverse order.

Cancel: I did not complete this guide.

12 other people completed this guide.

Benny Huynh

Member since: 02/15/17

2,118 Reputation

4 Guides authored

Team

USF Tampa, Team 1-1, Sullivan Spring 2017 Member of USF Tampa, Team 1-1, Sullivan Spring 2017

USFT-SULLIVAN-S17S1G1

4 Members

28 Guides authored

0 Guide Comments

Add Comment

View Statistics:

Past 24 Hours: 2

Past 7 Days: 33

Past 30 Days: 90

All Time: 22,874