
JBL Speaker Tweeter Replacement

Sage Kizer and one other contributor
Last updated on Aug 10, 2026
Views: 282
View statistics:
- Past 24 Hours:
- 8
- Past 7 Days:
- 37
- Past 30 Days:
- 114
- All Time:
- 282
Comments: 0
No one has left comments on this guide. Will you be first?
Go to guide commentsCompleted: 0 1
No one has marked this guide "completed." Will you be the first?
1 person has marked this guide "completed." It's you — great job!
Favorites: 0 1
No one has favorited (and subscribed to) this guide. Will you be the first?
1 person has favorited (and subscribed to) this guide — and that's you!
Introduction
Go to step 1 ↓Does your JBL JRX212 Speaker sound off?
Is there a complete lack of those high frequencies in songs, distortion, static, or crackling noises? It could be for a variety of reasons, but with a broken tweeter, your audio may begin to sound dull due to a lack of the high frequencies that the tweeter emits.
This guide will help you through the simple steps of disconnecting your tweeter from your speaker and testing it to see if it needs replacement. A multimeter is needed to test the tweeter. For instruction on how to use a multimeter, refer to the How to Use a Multimeter guide.
Before beginning, unplug the speaker and place it on a clean, clear workspace. You will be working inside the speaker and handling internal wires.
What you need
Parts
Tools


-
-
-
Put your speaker on its side.
-
Use a Phillips #2 screwdriver to remove the eight 25.4 mm screws from the mesh screen.
 Ask FixBot
-
-
-
Remove the mesh grille from the front of the speaker.
-
Locate the rectangular horn under the grille.
-
-
-
-
Gently wiggle and pull upward on each metal connector to remove both cables from their terminal.
-
-
-
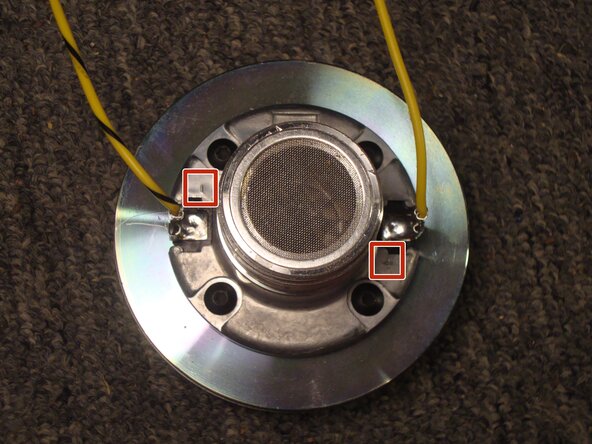
Place one multimeter probe on each solder tab of the metal tweeter terminal, with one probe on each tab.
-
Turn your multimeter to read resistance and test the tweeter.
-
-




To reassemble your device, and with your new tweeter part, follow these instructions in reverse order. Take your e-waste to an R2 or e-Stewards certified recycler.
Team

Austin Community College, Team 34-7, Kapoor Summer 2026 Member of Austin Community College, Team 34-7, Kapoor Summer 2026
AUSTINCC-KAPOOR-SU26S34G7
1 Member
12 Guides authored
