Free Shipping on Domestic Orders $75+

Iomega Z100S2 Disk Reader Replacement

What you need

  1. Iomega Z100S2 Disk Reader Replacement, Case: step 1, image 1 of 2 Iomega Z100S2 Disk Reader Replacement, Case: step 1, image 2 of 2
    • Push in the plastic tab that can be seen through cracks in the front left corner using a spudger.

    Ask FixBot

    Add Comment

  2. Iomega Z100S2 Disk Reader Replacement: step 2, image 1 of 1
    • Move down the same side and push in the plastic tab.

    Ask FixBot

    Add Comment

  3. Iomega Z100S2 Disk Reader Replacement: step 3, image 1 of 1
    • Move to the front right side and once again push in the plastic tab.

    • There is not a fourth tab to push in after this one.

    Ask FixBot

    Add Comment

  4. Iomega Z100S2 Disk Reader Replacement: step 4, image 1 of 2 Iomega Z100S2 Disk Reader Replacement: step 4, image 2 of 2
    • Grab the cover by the front side and pull upwards.

    • You might encounter some resistance. Pull firmly, but don't yank it.

    Ask FixBot

    Add Comment

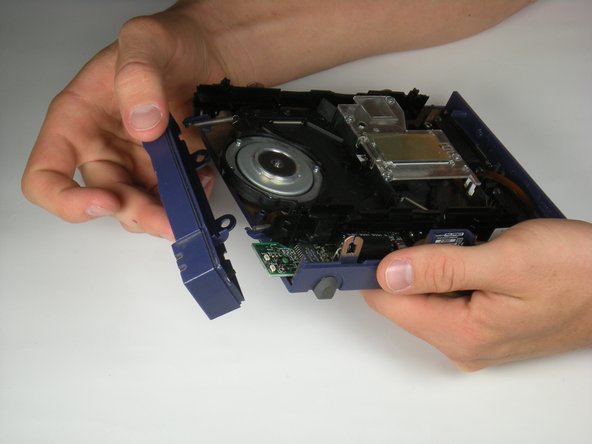
  5. Iomega Z100S2 Disk Reader Replacement: step 5, image 1 of 2 Iomega Z100S2 Disk Reader Replacement: step 5, image 2 of 2
    • Tilt the front case down until the pegs detach from the bottom of the case.

    • Lift up and outward.

    • The motherboard will be loose at this point.

    Ask FixBot

    Add Comment

  6. Iomega Z100S2 Disk Reader Replacement, Disk Reader: step 6, image 1 of 2 Iomega Z100S2 Disk Reader Replacement, Disk Reader: step 6, image 2 of 2
    • Unhook the two springs from the front plastic hooks.

    • The black side rails of the reader should easily slide forward and off.

    Ask FixBot

    Add Comment

  7. Iomega Z100S2 Disk Reader Replacement: step 7, image 1 of 1
    • There is a white tab connected to the motherboard. Pull it upward by gently rocking it back and forth.

    • Potential for device damage. The tab does not come completely out, it only slides up slightly, so don't rip it out!

    Ask FixBot

    Add Comment

  8. Iomega Z100S2 Disk Reader Replacement: step 8, image 1 of 2 Iomega Z100S2 Disk Reader Replacement: step 8, image 2 of 2
    • Grab the reader by its sides and gently pull it upward.

    • There are two wires still connected to the bottom of the reader that haven't been detached.

    Ask FixBot

    Add Comment

  9. Iomega Z100S2 Disk Reader Replacement: step 9, image 1 of 1
    Tool used on this step:
    Tweezers
    $4.99
    Buy
    • Disconnect the white wires by using tweezers to gently pull the bottom connector toward you.

    Ask FixBot

    Add Comment

  10. Iomega Z100S2 Disk Reader Replacement: step 10, image 1 of 2 Iomega Z100S2 Disk Reader Replacement: step 10, image 2 of 2
    • Disconnect the thin ribbon wire by using tweezers to gently pull the connector at the bottom toward you.

    Ask FixBot

    Add Comment

  11. Iomega Z100S2 Disk Reader Replacement: step 11, image 1 of 1
    • Lift the reader up and out from the device.

    Ask FixBot

    Add Comment

Conclusion

To reassemble your device, follow these instructions in reverse order.

Cancel: I did not complete this guide.

5 other people completed this guide.

Ezery Kennedy

Member since: 10/05/10

288 Reputation

2 Guides authored

Team

Cal Poly, Team 7-53, Amido Fall 2010 Member of Cal Poly, Team 7-53, Amido Fall 2010

CPSU-AMIDO-F10S7G53

4 Members

6 Guides authored

2 Guide Comments

Great guide exactly what I was looking for.

Jim Schmidt - Reply Share

Zip disks were awesome, and they still are they fit that niche between needing something small in capacity but not large enough for a USB flash drive.

Trevor Rawlinson - Reply Share

Add Comment

View Statistics:

Past 24 Hours: 4

Past 7 Days: 17

Past 30 Days: 68

All Time: 7,101