
InFocus IN35W Lamp Replacement

Grace Hubert and 5 other contributors
Last updated on Jan 4, 2022
Views: 474
View statistics:
- Past 24 Hours:
- 1
- Past 7 Days:
- 12
- Past 30 Days:
- 72
- All Time:
- 474
Comments: 0
No one has left comments on this guide. Will you be first?
Go to guide commentsCompleted: 1 2
1 person has marked this guide "completed." Will you be next?
2 people have marked this guide "completed." Including you — great job!
Favorites: 0 1
No one has favorited (and subscribed to) this guide. Will you be the first?
1 person has favorited (and subscribed to) this guide — and that's you!
Featured Student Guide
This guide has been the hard work of our awesome students and is found to be exceptionally cool by the iFixit staff.
Introduction
Go to step 1 ↓The projector lamp is the most essential part of your InFocus IN35W projector because it creates the light that shines through the DLP or LCD system and makes clear, bright, vivid images your projector displays. The lamp could be the reason why your picture isn’t coming out as clear anymore. Follow these steps to learn how to access the lamp and how to replace it if needed.
What you need
Tools

-
-
-
Flip the projector on its backside and lay it on a flat surface.
-
Remove the lamp door gently with your hands or a plastic opening tool.
 Ask FixBot
-
-
-


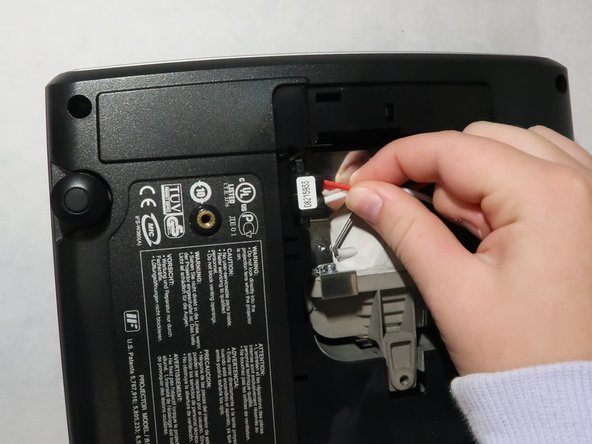

To reassemble your device, follow these instructions in reverse order.
Cancel: I did not complete this guide.
One other person completed this guide.

Team

UMass Dartmouth, Team 1-2, Simcock Fall 2021 Member of UMass Dartmouth, Team 1-2, Simcock Fall 2021
UMASSD-SIMCOCK-F21S1G2
4 Members
60 Guides authored
