Free Shipping on Domestic Orders $75+

Impuls LED Alarm Clock Radio Disassembly

What you need

  1. Impuls LED Alarm Clock Radio Disassembly, Impuls LED Alarm Clock Radio Disassembly: step 1, image 1 of 1
    • Unscrew the 4 base screws at the bottom with the Phillips 1 screwdriver.

    Ask FixBot

    Add Comment

  2. Impuls LED Alarm Clock Radio Disassembly: step 2, image 1 of 2 Impuls LED Alarm Clock Radio Disassembly: step 2, image 2 of 2
    • Open the top and remove the transparent plastic cap.

    Ask FixBot

    Add Comment

  3. Impuls LED Alarm Clock Radio Disassembly: step 3, image 1 of 1
    • Remove the 4 screws from the PCB.

    • It is desirable to use 3 hands because you have to do 3 jobs: screw, hold the top and hold the bottom.

    Ask FixBot

    Add Comment

  4. Impuls LED Alarm Clock Radio Disassembly: step 4, image 1 of 2 Impuls LED Alarm Clock Radio Disassembly: step 4, image 2 of 2
    • Remove/unclick 4 plastic buttons.

    • There are 4 different types of buttons.

    Ask FixBot

    Add Comment

  5. Impuls LED Alarm Clock Radio Disassembly: step 5, image 1 of 2 Impuls LED Alarm Clock Radio Disassembly: step 5, image 2 of 2
    • Unscrew 2 screws of the radio tuning system.

    Ask FixBot

    Add Comment

  6. Impuls LED Alarm Clock Radio Disassembly: step 6, image 1 of 1
    • Remove the gear that protects the cap.

    Ask FixBot

    Add Comment

  7. Impuls LED Alarm Clock Radio Disassembly: step 7, image 1 of 1
    • Lift up the small gear.

    Ask FixBot

    Add Comment

  8. Impuls LED Alarm Clock Radio Disassembly: step 8, image 1 of 1
    • Lift up the flexible pin rack.

    Ask FixBot

    Add Comment

  9. Impuls LED Alarm Clock Radio Disassembly: step 9, image 1 of 1
    • Remove the flexible pin rack holder.

    Ask FixBot

    Add Comment

  10. Impuls LED Alarm Clock Radio Disassembly: step 10, image 1 of 1
    • Remove 3 screws of the big PCB.

    Ask FixBot

    Add Comment

  11. Impuls LED Alarm Clock Radio Disassembly: step 11, image 1 of 1
    • Remove the backside of the casing.

    Ask FixBot

    Add Comment

  12. Impuls LED Alarm Clock Radio Disassembly: step 12, image 1 of 1
    • Remove the grey double gear.

    Ask FixBot

    Add Comment

  13. Impuls LED Alarm Clock Radio Disassembly: step 13, image 1 of 1
    • Remove the switch casing.

    Ask FixBot

    Add Comment

  14. Impuls LED Alarm Clock Radio Disassembly: step 14, image 1 of 2 Impuls LED Alarm Clock Radio Disassembly: step 14, image 2 of 2
    • Flip the big PCB.

    Ask FixBot

    Add Comment

  15. Impuls LED Alarm Clock Radio Disassembly: step 15, image 1 of 1
    • Unscrew 2 screws on the back of the PCB the black gear house.

    Ask FixBot

    Add Comment

  16. Impuls LED Alarm Clock Radio Disassembly: step 16, image 1 of 1
    • Remove the black gear housing.

    Ask FixBot

    Add Comment

  17. Impuls LED Alarm Clock Radio Disassembly: step 17, image 1 of 1
    • Unscrew 2 screws of the electro magnet.

    Ask FixBot

    Add Comment

  18. Impuls LED Alarm Clock Radio Disassembly: step 18, image 1 of 1
    • Lift up the electro magnet.

    Ask FixBot

    Add Comment

  19. Impuls LED Alarm Clock Radio Disassembly: step 19, image 1 of 1
    • Unscrew the cap of the POT meter.

    Ask FixBot

    Add Comment

  20. Impuls LED Alarm Clock Radio Disassembly: step 20, image 1 of 1
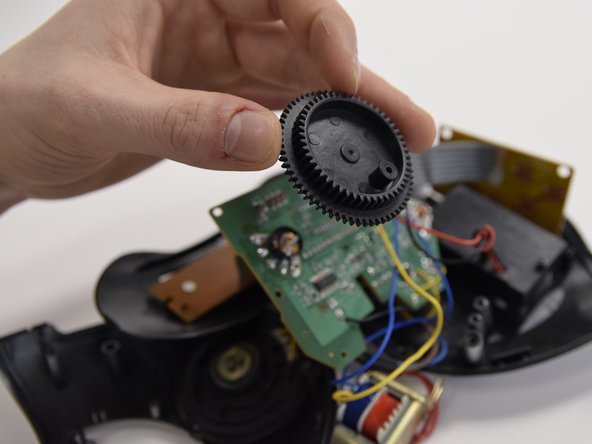
    • Remove the big black double gear.

    Ask FixBot

    Add Comment

  21. Impuls LED Alarm Clock Radio Disassembly: step 21, image 1 of 1
    • Remove the hot glue of the antenna.

    Ask FixBot

    Add Comment

  22. Impuls LED Alarm Clock Radio Disassembly: step 22, image 1 of 1
    • Remove all the electrical components by desoldering.

    Ask FixBot

    Add Comment

Conclusion

To reassemble your device, follow these instructions in reverse order.

Cancel: I did not complete this guide.

0 Guide Comments

Add Comment

View Statistics:

Past 24 Hours: 0

Past 7 Days: 4

Past 30 Days: 38

All Time: 1,085