Free Shipping on Domestic Orders $75+

IT-8800 -8500 Footrest Disassembly

Views: 418

View statistics:

Past 24 Hours:
1
Past 7 Days:
13
Past 30 Days:
74
All Time:
418
Comments: 0

No one has left comments on this guide. Will you be first?

Go to guide comments
Completed: 0

No one has marked this guide "completed." Will you be the first?

Favorites: 0

No one has favorited (and subscribed to) this guide. Will you be the first?

Time Required: 1 hour
Difficulty: Difficult
Community-Contributed Guide

An awesome member of our community made this guide. It was not created by iFixit staff.

IT-8800 -8500 Footrest Disassembly

Introduction

Go to step 1 ↓

All Screws in here will be color coded , example : Red and Orange on the same step means there are 2 different types of screws on that step.

What you need

Tools

    1. IT-8800 -8500 Footrest Disassembly, Footrest: step 1, image 1 of 1
      • Remove 8 screws marked in red .

      • NOTE: THERE IS 2 PIECES THAT ACT AS ONE COVER. DO NOT SLIDE OR PRY THESE PIECES APART FROM EACH OTHER IT WILL RESULT IN DAMAGE.

      • Remove 3 screws marked in Orange

      Ask FixBot

      Add Comment

    2. IT-8800 -8500 Footrest Disassembly: step 2, image 1 of 1
      • Remove the 4 bolts and lock washers.

      Ask FixBot

      Add Comment

    3. IT-8800 -8500 Footrest Disassembly: step 3, image 1 of 1
      • From here the lower piece will be free from the frame .

      • Air hose will then be disconnected from the nozzle marked with an arrow. Then unplug the three wires from the relay PCB.

      • Mounted here will be a screw threaded through 2 plastic holders . remove the screw and don't lose the plastic holders.

      Ask FixBot

      Add Comment

    4. IT-8800 -8500 Footrest Disassembly: step 4, image 1 of 1
      • Unzip the the zipper marked with a red line. This will completely disconnect the upper assembly from the lower assembly.

      • Note in this photo the frame has been completely removed . NO need to do that for this repair.

      Ask FixBot

      Add Comment

    5. IT-8800 -8500 Footrest Disassembly: step 5, image 1 of 1
      • Remove 2 screws and 2 washers for each foot pad.

      • EACH OF THESE FOOT PADS HAVE 2 WASHERS ON ONE END , THIS SERVES A PURPOSE . DON'T FORGET THIS DURING REASSEMBLY

      Ask FixBot

      Add Comment

    6. IT-8800 -8500 Footrest Disassembly: step 6, image 1 of 1
      • Unzip the the leather from the bottom

      • The zippers sometimes don't have a zipper handle, please use a large paper clip.

      • Once leather is unzipped this is what you should see . Go ahead and remove the entire leather cover .

      Ask FixBot

      Add Comment

    7. IT-8800 -8500 Footrest Disassembly: step 7, image 1 of 1
      • Remove the 6 screws on the top cover .

      • This foam is glued to the plastic . Do your best not to rip it , use a sharp blade to avoid any tearing.

      • Pro Tip: No need to peel this entire piece off . Just peel the edges and leave center glued .

      Ask FixBot

      Add Comment

    8. IT-8800 -8500 Footrest Disassembly: step 8, image 1 of 1
      • Remove the 6 screws.

      • This cover will not come off until the top cover is removed first. Additionnally follow the same rule , keep the middle glued and peel back the edges

      Ask FixBot

      Add Comment

    9. IT-8800 -8500 Footrest Disassembly: step 9, image 1 of 1
      • Remove the 4 bolts .

      • RECOMMENDED: USE A MAGNETIC TIP SCREW DRIVER FOR THIS STEP. OTHERWISE THOSE BOLTS CAN AND WILL FALL INTO THE HOLLOW FRAME PIECE

      Ask FixBot

      Add Comment

    10. IT-8800 -8500 Footrest Disassembly: step 10, image 1 of 1
      • Remove the 4 bolts in each corner .

      • RECOMMENDED: USE A MAGNETIC TIP SCREW DRIVER FOR THIS STEP. OTHER WISE THOSE BOLTS CAN AND WILL FALL INTO THE HOLLOW FRAME PIECE

      Ask FixBot

      Add Comment

    11. IT-8800 -8500 Footrest Disassembly: step 11, image 1 of 2 IT-8800 -8500 Footrest Disassembly: step 11, image 2 of 2
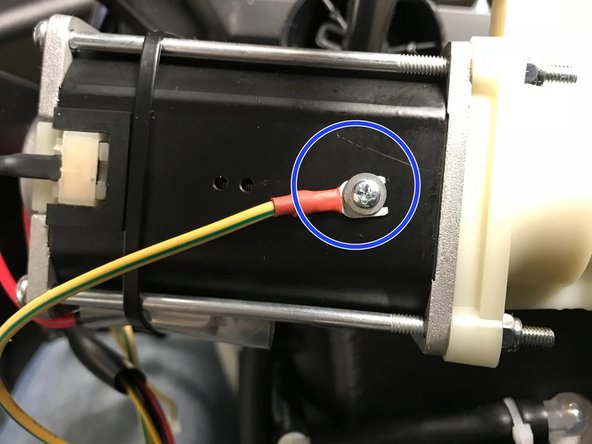
      • unplug motor wire.

      • Unscrew grounding wire. Be sure to reuse this screw and washer if new assembly did not include one.

      Ask FixBot

      Add Comment

    12. IT-8800 -8500 Footrest Disassembly: step 12, image 1 of 1
      • YOU ARE DONE

      Ask FixBot

      Add Comment

Conclusion

To reassemble your device, follow these instructions in reverse order.

PLEASE REMEMBER THE FOLLOWING DURING REASSEMBLY:

- When gluing the foam to the plastic DON'T over do it , just spray for a second on the desired area and press foam onto glue.

- When Gluing the foam be sure your edges are smooth and everything is secured , other wise you will get bumps in the leather .

- There will be wrinkles on the leather when its re stretched , this is normal . They usually dissipate over time.

- If the Bolts from step 2 will not go on use a utility knife and cut X shaped holes on the leather until you can physically see the thread .

- When attaching the 3 wires and 1 hose from step 3 BE SURE these are not getting pinched between the upper and lower portion. Otherwise you will get no air to the feet area.

Good Luck .

Cancel: I did not complete this guide.

Nick

Member since: 05/30/17

2,764 Reputation

16 Guides authored

0 Guide Comments

Add Comment

View Statistics:

Past 24 Hours: 1

Past 7 Days: 13

Past 30 Days: 74

All Time: 418