Free Shipping on Domestic Orders $75+

IINE Retro Pocket Joystick Replacement

What you need

  1. IINE Retro Pocket Joystick Replacement, Remove the screws: step 1, image 1 of 3 IINE Retro Pocket Joystick Replacement, Remove the screws: step 1, image 2 of 3 IINE Retro Pocket Joystick Replacement, Remove the screws: step 1, image 3 of 3
    • Set the controller down on your working surface.

    • Flip the controller over so the back of the controller is facing up, with the shoulder buttons facing away from you.

    • Use a Phillips #1 screwdriver to remove the four black 7.5mm screws from the corners of the back plate.

    Ask FixBot

    Add Comment

  2. IINE Retro Pocket Joystick Replacement, Remove the back plate: step 2, image 1 of 3 IINE Retro Pocket Joystick Replacement, Remove the back plate: step 2, image 2 of 3 IINE Retro Pocket Joystick Replacement, Remove the back plate: step 2, image 3 of 3
    • Use the tip of an opening pick to separate the back plate. Start at the bottom corner, and pry downwards.

    • As you make your way toward the center, you will eventually disengage the retaining clips located on either side of the status LED array.

    • Be careful not to damage the retaining clips. they're small and thin, and may break easily.

    • Lift the back plate up and away from you, and set it aside.

    Ask FixBot

    Add Comment

  3. IINE Retro Pocket Joystick Replacement: step 3, image 1 of 1
    • Once the back plate is removed, you now have access to the internals of the controller.

    Ask FixBot

    Add Comment

  4. IINE Retro Pocket Joystick Replacement, Disconnect the battery: step 4, image 1 of 3 IINE Retro Pocket Joystick Replacement, Disconnect the battery: step 4, image 2 of 3 IINE Retro Pocket Joystick Replacement, Disconnect the battery: step 4, image 3 of 3
    • For safety and to prevent damage, disconnect the battery before continuing.

    • Locate the battery connector.

    • Use a pair of tweezers to carefully push on the notches of the battery connector and disconnect it from the socket.

    • Do not pull on the wires!

    Ask FixBot

    Add Comment

  5. IINE Retro Pocket Joystick Replacement, Disconnect the right joystick: step 5, image 1 of 3 IINE Retro Pocket Joystick Replacement, Disconnect the right joystick: step 5, image 2 of 3 IINE Retro Pocket Joystick Replacement, Disconnect the right joystick: step 5, image 3 of 3
    • Locate the ZIF connector of the right joystick.

    • Use a pair of tweezers to flip up the black flap of the ZIF connector and unlock it.

    • Disconnect the joystick cable by carefully pulling it straight out of the connector.

    Ask FixBot

    Add Comment

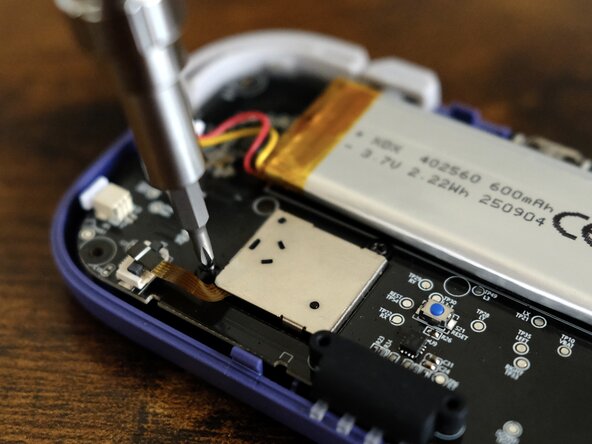
  6. IINE Retro Pocket Joystick Replacement, Unscrew the right joystick: step 6, image 1 of 2 IINE Retro Pocket Joystick Replacement, Unscrew the right joystick: step 6, image 2 of 2
    • Use a Phillips #00 screwdriver to remove the two black 3.5mm screws that secure the right joystick.

    Ask FixBot

    Add Comment

  7. IINE Retro Pocket Joystick Replacement, Remove the right joystick: step 7, image 1 of 2 IINE Retro Pocket Joystick Replacement, Remove the right joystick: step 7, image 2 of 2
    • Lift up the joystick module and set it aside.

    Ask FixBot

    Add Comment

  8. IINE Retro Pocket Joystick Replacement, Disconnect the left joystick: step 8, image 1 of 3 IINE Retro Pocket Joystick Replacement, Disconnect the left joystick: step 8, image 2 of 3 IINE Retro Pocket Joystick Replacement, Disconnect the left joystick: step 8, image 3 of 3
    • Locate the ZIF connector of the left joystick.

    • Use a pair of tweezers to flip up the black flap of the ZIF connector and unlock it.

    • Disconnect the joystick cable by carefully pulling it straight out of the connector.

    Ask FixBot

    Add Comment

  9. IINE Retro Pocket Joystick Replacement, Unscrew the left joystick: step 9, image 1 of 2 IINE Retro Pocket Joystick Replacement, Unscrew the left joystick: step 9, image 2 of 2
    • Use a Phillips #00 screwdriver to remove the two black 3.5mm screws that secure the left joystick.

    Ask FixBot

    Add Comment

  10. IINE Retro Pocket Joystick Replacement, Remove the left joystick: step 10, image 1 of 2 IINE Retro Pocket Joystick Replacement, Remove the left joystick: step 10, image 2 of 2
    • Lift up the joystick module and set it aside.

    Ask FixBot

    Add Comment

Conclusion

To reassemble your device, follow these instructions in reverse order.

Once the controller is fully reassembled, connect it to your Nintendo Switch and calibrate the new joystick.

Cancel: I did not complete this guide.

2 other people completed this guide.

Aardimus

Member since: 04/30/26

315 Reputation

2 Guides authored

0 Guide Comments

Add Comment

View Statistics:

Past 24 Hours: 3

Past 7 Days: 13

Past 30 Days: 82

All Time: 252