Free Shipping on Domestic Orders $75+

Huawei Ascend G610 Digitizer Replacement

    1. Huawei Ascend G610 Digitizer Replacement, Digitizer: step 1, image 1 of 1
      • This is a touchscreen with shattered glass.

      Ask FixBot

      Add Comment

    2. Huawei Ascend G610 Digitizer Replacement: step 2, image 1 of 1
      • Remove the outer cover.

      Ask FixBot

      Add Comment

    3. Huawei Ascend G610 Digitizer Replacement: step 3, image 1 of 1
      • Remove the battery.

      Ask FixBot

      Add Comment

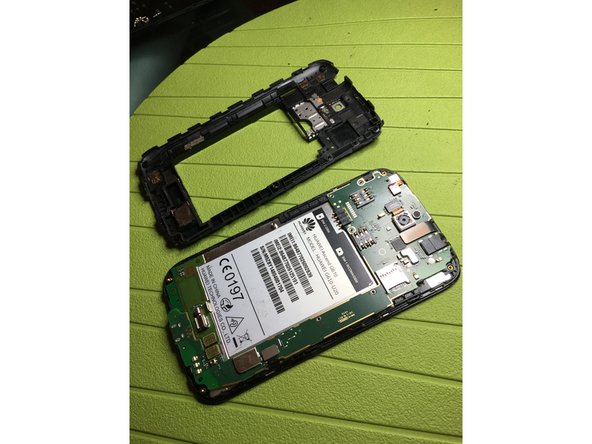
    4. Huawei Ascend G610 Digitizer Replacement: step 4, image 1 of 1
      • With the help of a heat source and a cross-head screwdriver, remove the 9 screws along the sides of the phone . One screw is covered by an adhesive label.

      • Remove the shortest screw that secures the center of the body, located next to the SIM card.

      Ask FixBot

      Add Comment

    5. Huawei Ascend G610 Digitizer Replacement: step 5, image 1 of 2 Huawei Ascend G610 Digitizer Replacement: step 5, image 2 of 2
      • With the help of thin tool, unhinge the joints between the outer cover and the internal frame of the display.

      • Remove the outer cover.

      Ask FixBot

      Add Comment

    6. Huawei Ascend G610 Digitizer Replacement: step 6, image 1 of 2 Huawei Ascend G610 Digitizer Replacement: step 6, image 2 of 2
      • Unplug the touchscreen connector.

      Ask FixBot

      Add Comment

    7. Huawei Ascend G610 Digitizer Replacement: step 7, image 1 of 3 Huawei Ascend G610 Digitizer Replacement: step 7, image 2 of 3 Huawei Ascend G610 Digitizer Replacement: step 7, image 3 of 3
      • If the glass is broken, apply Scotch tape to avoid further damage.

      • Use a heat source to heat the edge of the glass.

      • With a thin tool

      • Insert translation here

      Ask FixBot

      Add Comment

    8. Huawei Ascend G610 Digitizer Replacement: step 8, image 1 of 2 Huawei Ascend G610 Digitizer Replacement: step 8, image 2 of 2
      • Once the touch screen has been removed, proceed with the cleaning of the remaining double-sided adhesive tape

      • Apply the new double-sided adhesive and the new touch screen

      • To reassemble the device follow all the steps in reverse order

      Ask FixBot

      Add Comment

Conclusion

To reassemble the device, follow these instructions in reverse order.

Cancel: I did not complete this guide.

3 other people completed this guide.

Special thanks to these translators:

it en

100%

These translators are helping us fix the world! Want to contribute?
Start translating ›

Smilzo

Member since: 11/09/13

12,359 Reputation

39 Guides authored

0 Guide Comments

Add Comment

View Statistics:

Past 24 Hours: 1

Past 7 Days: 5

Past 30 Days: 23

All Time: 1,246