Free Shipping on Domestic Orders $75+

How to Tie a Tie: Trinity

Views: 1.8K

View statistics:

Past 24 Hours:
6
Past 7 Days:
63
Past 30 Days:
279
All Time:
1,825
Comments: 0

No one has left comments on this guide. Will you be first?

Go to guide comments
Completed: 3

3 people have marked this guide "completed." Will you be next?

Favorites: 1

1 person has favorited (and subscribed to) this guide. Will you be next?

Time Required: 3 - 8 minutes
Difficulty: Difficult
Community-Contributed Guide

An awesome member of our community made this guide. It was not created by iFixit staff.

How to Tie a Tie: Trinity

Introduction

Go to step 1 ↓

Active End: The end of the tie that will be used to tie the knot. This can be either the wide end or narrow end of the tie depending on the tie knot.

Shirt Collar: A band of material around the neck of a shirt that can either be folded or unfolded.

Neck Loop: The loop of the tie that goes around the collar.

The Trinity: A more complicated knot for people with more experience. This knot ends with a shorter, wider end, better suited for people wearing suits or vest.

What you need

Parts

    1. How to Tie a Tie: Trinity, Preparation: step 1, image 1 of 1
      • Fold the collar of your shirt up.

      Ask FixBot

      Add Comment

    2. How to Tie a Tie: Trinity: step 2, image 1 of 1
      • Wrap the tie around the back of your neck with the wide end on the left side of your body and the narrow end on the right side.

      • The narrow end of the tie will be your active end.

      • Note: The wide end of the tie should be around the height of your belly button or a little higher. It may need to adjusted for personal height.

      Ask FixBot

      Add Comment

    3. How to Tie a Tie: Trinity, Tying: step 3, image 1 of 1
      • Take the active end and it cross over the wide end, so it is pointing to the left.

      • Note: be sure that the tie always lays flat so that there are no twists in the fabric.

      • Note: Be sure to keep this wrap and all subsequent wraps tight against one another.

      Ask FixBot

      Add Comment

    4. How to Tie a Tie: Trinity: step 4, image 1 of 2 How to Tie a Tie: Trinity: step 4, image 2 of 2
      • Wrap active end under the left side and up through the neck loop, so that it points up.

      Ask FixBot

      Add Comment

    5. How to Tie a Tie: Trinity: step 5, image 1 of 2 How to Tie a Tie: Trinity: step 5, image 2 of 2
      • Wrap the active end over the left side again, so that it now points down.

      Ask FixBot

      Add Comment

    6. How to Tie a Tie: Trinity: step 6, image 1 of 1
      • Wrap the active end under the wide end of the tie, so that it now points towards the right.

      Ask FixBot

      Add Comment

    7. How to Tie a Tie: Trinity: step 7, image 1 of 1
      • Wrap the active end over the knot, so that it now points up.

      Ask FixBot

      Add Comment

    8. How to Tie a Tie: Trinity: step 8, image 1 of 1
      • Wrap the active end down through the neck loop, and pull to the left side, so that it now points left.

      Ask FixBot

      Add Comment

    9. How to Tie a Tie: Trinity: step 9, image 1 of 1
      • Wrap the active end over the wide end of your tie.

      • Note: leave this wrap a little loose as it will be used in step 11.

      Ask FixBot

      Add Comment

    10. How to Tie a Tie: Trinity: step 10, image 1 of 1
      • Wrap the active end under the right side and up through the neck loop, so that it points up.

      Ask FixBot

      Add Comment

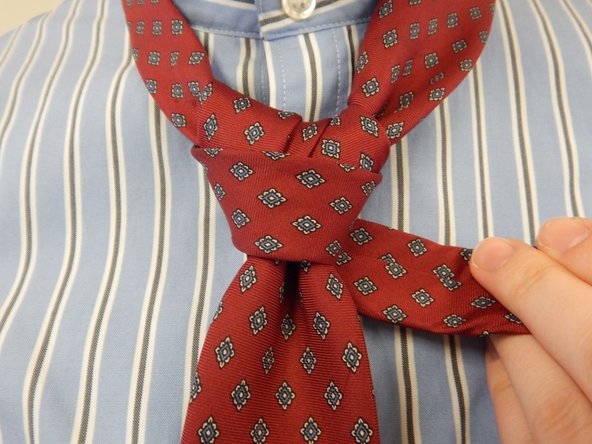
    11. How to Tie a Tie: Trinity: step 11, image 1 of 2 How to Tie a Tie: Trinity: step 11, image 2 of 2
      • Pull the active end down through the wrap you made in step 9 (see picture 2). Then pull the active end so that it points left.

      • Note: leave this new wrap a little loose as it will be used in step 13.

      Ask FixBot

      Add Comment

    12. How to Tie a Tie: Trinity: step 12, image 1 of 2 How to Tie a Tie: Trinity: step 12, image 2 of 2
      • Wrap the active end under the wide tie to the right, so that the active end is pointing right.

      • Note: be sure that is tucked completely behind the wide end.

      Ask FixBot

      Add Comment

    13. How to Tie a Tie: Trinity: step 13, image 1 of 3 How to Tie a Tie: Trinity: step 13, image 2 of 3 How to Tie a Tie: Trinity: step 13, image 3 of 3
      • Wrap active end over the knot and pull through the diagonal wrap you made in step 11 (see picture 3).

      Ask FixBot

      Add Comment

    14. How to Tie a Tie: Trinity, Finishing: step 14, image 1 of 1
      • Tighten the neck knot by holding the knot and pulling on the narrow end of the tie away from you.

      Ask FixBot

      Add Comment

    15. How to Tie a Tie: Trinity: step 15, image 1 of 1
      • Tighten the neck loop by pulling down on the wide end of the tie and sliding the knot up toward your neck.

      Ask FixBot

      Add Comment

    16. How to Tie a Tie: Trinity: step 16, image 1 of 3 How to Tie a Tie: Trinity: step 16, image 2 of 3 How to Tie a Tie: Trinity: step 16, image 3 of 3
      • Tuck the rest of the narrow end into your collar and fold your collar down.

      Ask FixBot

      Add Comment

Conclusion

Congratulations! You've successful tied the Trinity knot!

Cancel: I did not complete this guide.

3 other people completed this guide.

Electric Warthogs

Member since: 03/19/17

827 Reputation

3 Guides authored

Team

The Electric Warthogs Member of The Electric Warthogs

Community

3 Members

60 Guides authored

0 Guide Comments

Add Comment

View Statistics:

Past 24 Hours: 6

Past 7 Days: 63

Past 30 Days: 279

All Time: 1,825