
Free Shipping on Domestic Orders $75+

How to Replace a Kick-Down Doorstop

What you need

  1. How to Replace a Kick-Down Doorstop, Kick-down Doorstop: step 1, image 1 of 3 How to Replace a Kick-Down Doorstop, Kick-down Doorstop: step 1, image 2 of 3 How to Replace a Kick-Down Doorstop, Kick-down Doorstop: step 1, image 3 of 3
    • Place a drop cloth on the floor beneath your work area to keep the area clean.

    • Use a screwdriver to remove the screws securing the old doorstop to the door.

    • Remove the old doorstop.

    • Measure the old doorstop to ensure you have purchased the right size for your replacement.

  2. How to Replace a Kick-Down Doorstop: step 2, image 1 of 3 How to Replace a Kick-Down Doorstop: step 2, image 2 of 3 How to Replace a Kick-Down Doorstop: step 2, image 3 of 3
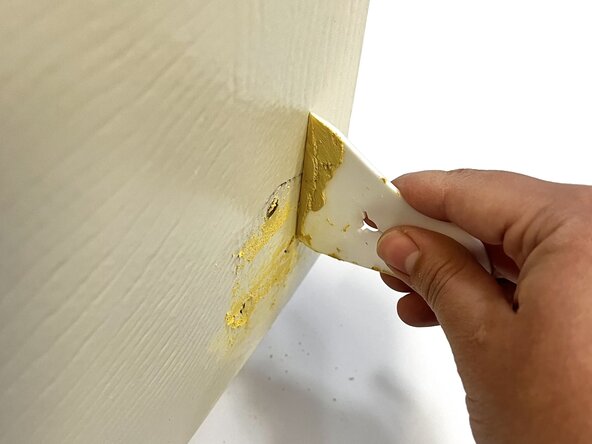
    • Use a plastic putty knife to apply a small amount of wood filler over the old screw holes.

    • Spread the filler in both vertical and horizontal directions until the holes are completely filled.

    • Gently scrape the plastic putty knife over the surface to remove any excess wood filler from the door surface.

    • Let the wood putty set for at least 20 minutes to dry.

  3. How to Replace a Kick-Down Doorstop: step 3, image 1 of 2 How to Replace a Kick-Down Doorstop: step 3, image 2 of 2
    • Use a paintbrush to cover the area with paint matching the door.

    • Place one coat of paint over the holes left by the old kick stop.

    • Let the paint dry for approximately 15-30 minutes.

    • In the photograph, white wood paint is applied. Use a wood paint color that most closely matches your door's current color.

  4. How to Replace a Kick-Down Doorstop: step 4, image 1 of 3 How to Replace a Kick-Down Doorstop: step 4, image 2 of 3 How to Replace a Kick-Down Doorstop: step 4, image 3 of 3
    • Place the new kick-down doorstop against the door.

    • Open the door to about 90 degrees, then adjust it to the position where the doorstop will hold the door securely in the open position.

    • Use a pencil to mark where the screws will be inserted into the door.

  5. How to Replace a Kick-Down Doorstop: step 5, image 1 of 3 How to Replace a Kick-Down Doorstop: step 5, image 2 of 3 How to Replace a Kick-Down Doorstop: step 5, image 3 of 3
    • Turn the screwdriver clockwise to install the kick-down doorstop screws, starting at the bottom and working upward.

    • Drive the screws in firmly, but do not fully tighten them at this stage.

  6. How to Replace a Kick-Down Doorstop: step 6, image 1 of 1
    • Once you have all three screws into the door about two-thirds of the way, turn your screwdriver clockwise and tighten them completely.

    • Do not overtighten the screws. This can strip the wood and make the screws come loose.

  7. How to Replace a Kick-Down Doorstop: step 7, image 1 of 1
    • Check that your new doorstop works.

    • Push the door back 90 degrees and set the kick-down doorstop down against the floor.

    • If the door stays open and the doorstop rests firmly on the floor, the installation is successful.

    • You're all finished! Admire your work and enjoy your new doorstop.

Conclusion

Replacing an old door's kick stop made simple by follow each of these steps in order.

0 Guide Comments

Add Comment

View Statistics:

Past 24 Hours: 2

Past 7 Days: 8

Past 30 Days: 11

All Time: 47