Free Shipping on Domestic Orders $75+

How to Replace MSI P65 Creator Fan Assembly

What you need

    1. How to Replace MSI P65 Creator Fan Assembly, Fan Assembly: step 1, image 1 of 2 How to Replace MSI P65 Creator Fan Assembly, Fan Assembly: step 1, image 2 of 2
      • Power down the laptop and unplug the power adapter.

      • Flip the laptop upside down.

      Ask FixBot

      Add Comment

    2. How to Replace MSI P65 Creator Fan Assembly: step 2, image 1 of 3 How to Replace MSI P65 Creator Fan Assembly: step 2, image 2 of 3 How to Replace MSI P65 Creator Fan Assembly: step 2, image 3 of 3
      • Use a Phillips #1 screwdriver to remove the twelve 3 mm screws that secure the bottom panel.

      • Firmly grasp and lift the bottom panel to remove it completely.

      • If there is resistance, check again if all the screws have been removed. There should be no resistance.

      Ask FixBot

      Add Comment

    3. How to Replace MSI P65 Creator Fan Assembly: step 3, image 1 of 3 How to Replace MSI P65 Creator Fan Assembly: step 3, image 2 of 3 How to Replace MSI P65 Creator Fan Assembly: step 3, image 3 of 3
      Tool used on this step:
      Tweezers
      $4.99
      Buy
      • Unplug the battery cable connector from the motherboard with tweezers.

      • Do not pull on the wires.

      • Unscrew the five Phillips 4. mm screws that secure the battery.

      • Remove the battery.

      Ask FixBot

      Add Comment

    4. How to Replace MSI P65 Creator Fan Assembly: step 4, image 1 of 2 How to Replace MSI P65 Creator Fan Assembly: step 4, image 2 of 2
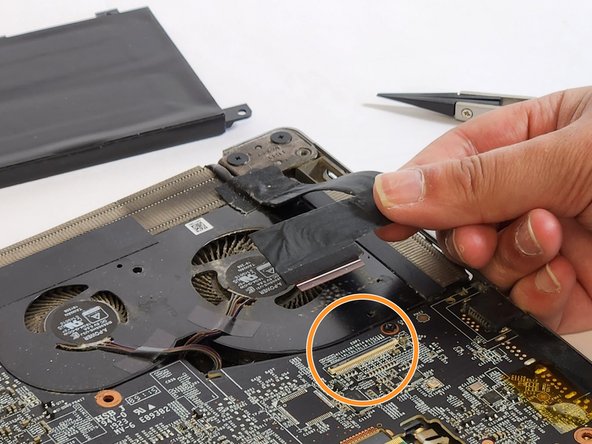
      • Gently unplug all the connected ribbon cables from the motherboard. Four are blue-tipped and one is black tipped.

      • Flip up the ZIF (zero insertion force) lockbar on the display cable. Then disconnect the display cable.

      • Do not pull on the LCD cable. Pull the tab found on the clamp upwards to release the cable.

      Ask FixBot

      Add Comment

    5. How to Replace MSI P65 Creator Fan Assembly: step 5, image 1 of 1
      • Unscrew the single 4.0 mm screw holding the wireless card with a Phillips #1 screwdriver.

      • Unplug the two connected antenna cables.

      • Remove the wireless card.

      Ask FixBot

      Add Comment

    6. How to Replace MSI P65 Creator Fan Assembly: step 6, image 1 of 3 How to Replace MSI P65 Creator Fan Assembly: step 6, image 2 of 3 How to Replace MSI P65 Creator Fan Assembly: step 6, image 3 of 3
      • Remove all of the 6.0 mm screws on the motherboard.

      • Lift the motherboard off the laptop frame.

      • Double check that all cables are detached from the motherboard before taking off the motherboard.

      Ask FixBot

      Add Comment

    7. How to Replace MSI P65 Creator Fan Assembly: step 7, image 1 of 1
      • Remove the four silver 4.0 mm screws from the motherboard.

      • Remove the four all black 6.0 mm screws from the motherboard.

      • Use a flashlight or work in good lighting to easily see all the black screws.

      Ask FixBot

      Add Comment

    8. How to Replace MSI P65 Creator Fan Assembly: step 8, image 1 of 2 How to Replace MSI P65 Creator Fan Assembly: step 8, image 2 of 2
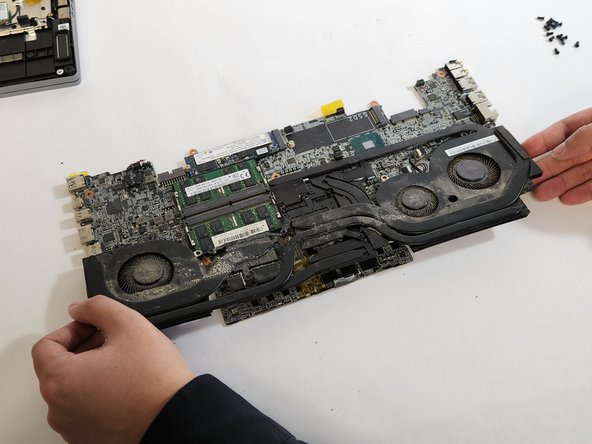
      • Disconnect the PSU cables connected to the fans. Each fan has one connecting cable.

      • The cables may be stuck! Gently but firmly pull the white connector straight out of the clamp.

      • Lift the fan assembly off the motherboard.

      Ask FixBot

      Add Comment

    9. How to Replace MSI P65 Creator Fan Assembly: step 9, image 1 of 1
      • Insert the new fan assembly.

      Ask FixBot

      Add Comment

    10. How to Replace MSI P65 Creator Fan Assembly: step 10, image 1 of 2 How to Replace MSI P65 Creator Fan Assembly: step 10, image 2 of 2
      • Reassemble the fan component to the motherboard and reassemble the entire laptop, following these instructions in reverse order.

      Ask FixBot

      Add Comment

Conclusion

Congrats! Your laptop should no longer make any strange or alarming noises due to fan malfunction.

Cancel: I did not complete this guide.

One other person completed this guide.

Tia Fong

Member since: 01/31/23

193 Reputation

1 Guide authored

Team

UC Davis, Team 4-6, Andersen Winter 2023 Member of UC Davis, Team 4-6, Andersen Winter 2023

UCD-ANDERSEN-W23S4G6

4 Members

12 Guides authored

1 Guide Comment

there are several flaws with this steps.

screws that aren’t being mentioned, it doesn’t mention the thermal compound on the fan assembly and it also fails to mention a ribbon cable at the top and a small conector close to the wifi antena.

there is a lot of tape that need to be removed and should ideally be replaced

Luis Rivero - Reply Share

Add Comment

View Statistics:

Past 24 Hours: 3

Past 7 Days: 24

Past 30 Days: 69

All Time: 2,618