Free Shipping on Domestic Orders $75+

Honda EU2200IT A2 Stator Replacement

What you need

    1. Honda EU2200IT A2 Stator Replacement, Honda EU2200IT A2 Safety Precautions: step 1, image 1 of 1
      • Before you begin, make sure the generator is switched off and the generator is cool to the touch.

      Ask FixBot

      Add Comment

    2. Honda EU2200IT A2 Stator Replacement, Disconnect the spark plug: step 2, image 1 of 2 Honda EU2200IT A2 Stator Replacement, Disconnect the spark plug: step 2, image 2 of 2
      • Lift and remove the spark plug cover.

      Ask FixBot

      Add Comment

    3. Honda EU2200IT A2 Stator Replacement: step 3, image 1 of 2 Honda EU2200IT A2 Stator Replacement: step 3, image 2 of 2
      • Grab the plastic housing at the end of the spark plug wire.

      • Pull firmly to disconnect the wire from the spark plug.

      Ask FixBot

      Add Comment

    1. Honda EU2200IT A2 Stator Replacement, Remove the maintenance cover: step 4, image 1 of 1
      • Use a Phillips #2 screwdriver to loosen the screw holding the maintenance cover in place.

      Ask FixBot

      Add Comment

    2. Honda EU2200IT A2 Stator Replacement: step 5, image 1 of 3 Honda EU2200IT A2 Stator Replacement: step 5, image 2 of 3 Honda EU2200IT A2 Stator Replacement: step 5, image 3 of 3
      • Swing the top of the maintenance cover out.

      • Remove the maintenance cover.

      Ask FixBot

      Add Comment

    1. Honda EU2200IT A2 Stator Replacement, Drain the engine oil: step 6, image 1 of 2 Honda EU2200IT A2 Stator Replacement, Drain the engine oil: step 6, image 2 of 2
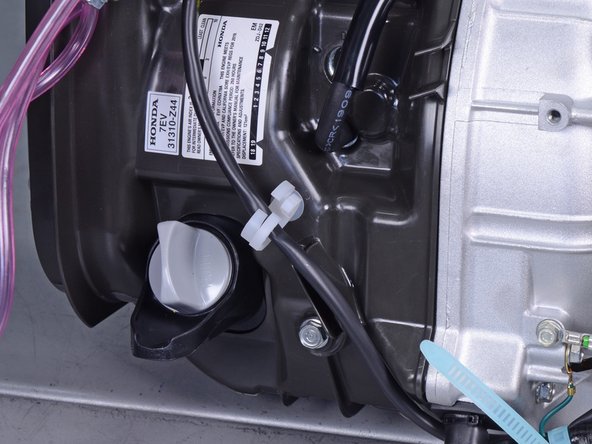
      • Unscrew and remove the oil filler cap.

      Ask FixBot

      Add Comment

    2. Honda EU2200IT A2 Stator Replacement: step 7, image 1 of 2 Honda EU2200IT A2 Stator Replacement: step 7, image 2 of 2
      • Place an oil pan below the fill port to catch the engine oil.

      • Carefully tilt the generator towards the oil pan to drain the oil.

      Ask FixBot

      Add Comment

    3. Honda EU2200IT A2 Stator Replacement: step 8, image 1 of 1
      • During reassembly, be sure to refill the engine oil:

      • If you recently resealed the crankcase cover with liquid sealant, wait at least 20 minutes before adding oil.

      • Use SAE 10W-30 oil, up to 0.46 US quarts.

      • Add oil until the dipstick is almost completely submerged.

      Ask FixBot

      Add Comment

    1. Honda EU2200IT A2 Stator Replacement, Drain the carburetor fuel bowl: step 9, image 1 of 1
      • Place a container below the drain tube to catch the excess fuel.

      Ask FixBot

      Add Comment

    2. Honda EU2200IT A2 Stator Replacement: step 10, image 1 of 2 Honda EU2200IT A2 Stator Replacement: step 10, image 2 of 2
      • The carburetor drain screw is located at the bottom of the carburetor.

      • Use a flathead screwdriver to loosen the fuel drain screw until fuel begins to drain out of the carburetor.

      • Once you drain the fuel bowl, re-tighten the fuel drain screw.

      Ask FixBot

      Add Comment

    1. Honda EU2200IT A2 Stator Replacement, Back Cover: step 11, image 1 of 1
      • Remove the four Phillips screws securing the back cover.

      Ask FixBot

      Add Comment

    2. Honda EU2200IT A2 Stator Replacement: step 12, image 1 of 2 Honda EU2200IT A2 Stator Replacement: step 12, image 2 of 2
      • Remove the back cover.

      Ask FixBot

      Add Comment

    1. Honda EU2200IT A2 Stator Replacement, Loosen the front cover: step 13, image 1 of 3 Honda EU2200IT A2 Stator Replacement, Loosen the front cover: step 13, image 2 of 3 Honda EU2200IT A2 Stator Replacement, Loosen the front cover: step 13, image 3 of 3
      • Remove the four screws securing the front cover:

      • Two Phillips screws

      • Two Phillips screws (one on each side)

      Ask FixBot

      Add Comment

    2. Honda EU2200IT A2 Stator Replacement: step 14, image 1 of 3 Honda EU2200IT A2 Stator Replacement: step 14, image 2 of 3 Honda EU2200IT A2 Stator Replacement: step 14, image 3 of 3
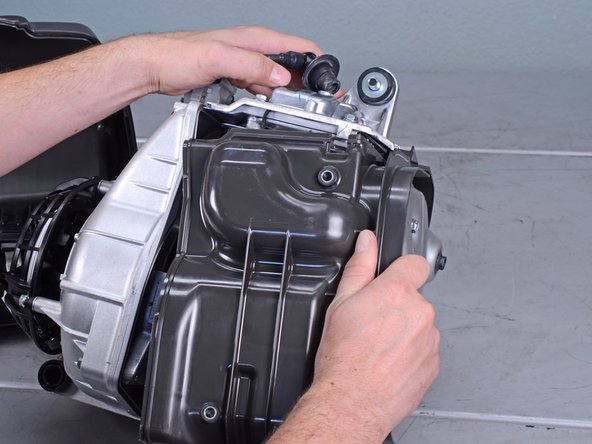
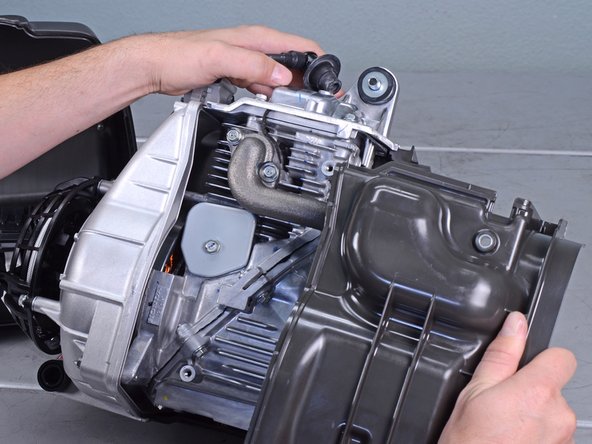
      • Swing the top edge of the front cover away from the generator.

      • Pull the front cover away slightly away.

      • The front cover still has many wires connected to it. Be careful not to strain any wires.

      Ask FixBot

      Add Comment

    3. Honda EU2200IT A2 Stator Replacement, Remove the left cover: step 15, image 1 of 3 Honda EU2200IT A2 Stator Replacement, Remove the left cover: step 15, image 2 of 3 Honda EU2200IT A2 Stator Replacement, Remove the left cover: step 15, image 3 of 3
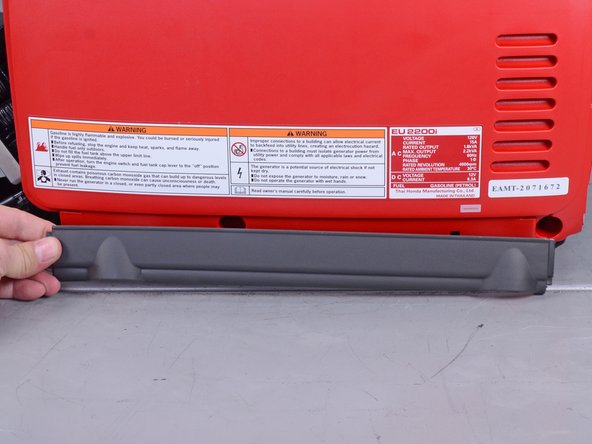
      • Remove the lower gray plates from both sides of the generator.

      • During reassembly, be sure to reinstall the gray plate with the air vent cutout onto the right (access-side) cover.

      Ask FixBot

      Add Comment

    4. Honda EU2200IT A2 Stator Replacement: step 16, image 1 of 2 Honda EU2200IT A2 Stator Replacement: step 16, image 2 of 2
      • Remove the fasteners securing the left (non-access) cover:

      • Two Phillips screws

      • Two 10 mm bolts

      Ask FixBot

      Add Comment

    5. Honda EU2200IT A2 Stator Replacement: step 17, image 1 of 2 Honda EU2200IT A2 Stator Replacement: step 17, image 2 of 2
      • Remove the left (non-access) cover.

      Ask FixBot

      Add Comment

    6. Honda EU2200IT A2 Stator Replacement, Remove the right cover: step 18, image 1 of 3 Honda EU2200IT A2 Stator Replacement, Remove the right cover: step 18, image 2 of 3 Honda EU2200IT A2 Stator Replacement, Remove the right cover: step 18, image 3 of 3
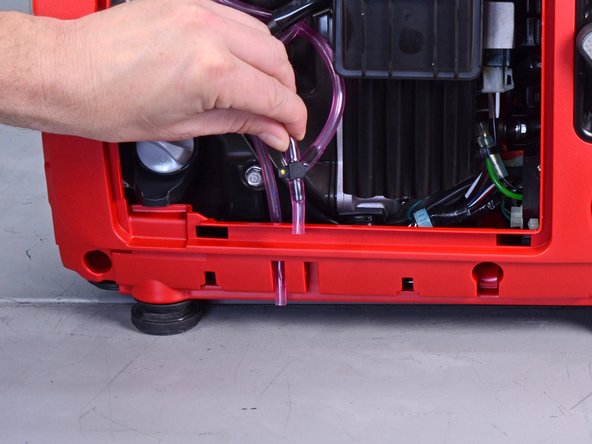
      • Slide the vent and drain tubes out of their cover ports along the bottom of the right cover.

      Ask FixBot

      Add Comment

    7. Honda EU2200IT A2 Stator Replacement: step 19, image 1 of 1
      • Remove the Phillips screw securing the starter rope port.

      Ask FixBot

      Add Comment

    8. Honda EU2200IT A2 Stator Replacement: step 20, image 1 of 2 Honda EU2200IT A2 Stator Replacement: step 20, image 2 of 2
      • Thread the starter rope handle through the port's cutout.

      Ask FixBot

      Add Comment

    9. Honda EU2200IT A2 Stator Replacement: step 21, image 1 of 2 Honda EU2200IT A2 Stator Replacement: step 21, image 2 of 2
      • Remove the right (access-side) cover.

      Ask FixBot

      Add Comment

    1. Honda EU2200IT A2 Stator Replacement, Fuel Tank: step 22, image 1 of 3 Honda EU2200IT A2 Stator Replacement, Fuel Tank: step 22, image 2 of 3 Honda EU2200IT A2 Stator Replacement, Fuel Tank: step 22, image 3 of 3
      • If you are replacing only the fuel tank, you can skip the next six steps.

      • Use a screwdriver to pry and loosen the diaphragm tube from the fuel pump.

      • Disconnect the diaphragm tube from the fuel pump.

      Ask FixBot

      Add Comment

    2. Honda EU2200IT A2 Stator Replacement: step 23, image 1 of 2 Honda EU2200IT A2 Stator Replacement: step 23, image 2 of 2
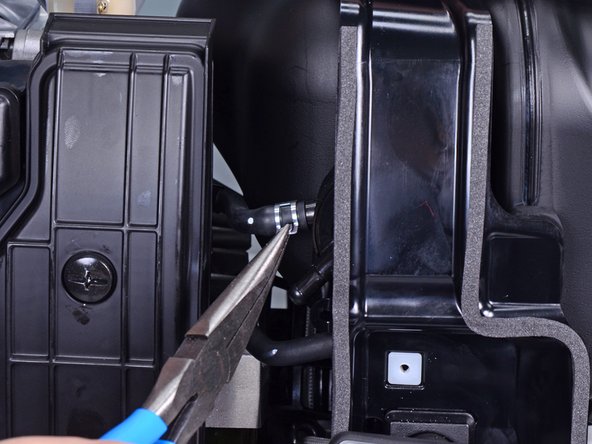
      • Use a pair of pliers to squeeze and slide the spring clip off the fuel pump port.

      Ask FixBot

      Add Comment

    3. Honda EU2200IT A2 Stator Replacement: step 24, image 1 of 2 Honda EU2200IT A2 Stator Replacement: step 24, image 2 of 2
      • Residual fuel may leak out of this hose. Be ready to contain any spillage.

      • Disconnect the fuel hose from the fuel pump.

      Ask FixBot

      Add Comment

    4. Honda EU2200IT A2 Stator Replacement: step 25, image 1 of 2 Honda EU2200IT A2 Stator Replacement: step 25, image 2 of 2
      • Pull and disconnect the engine stop switch connector from its socket.

      Ask FixBot

      Add Comment

    5. Honda EU2200IT A2 Stator Replacement: step 26, image 1 of 1
      • Remove the Phillips screw securing the starter rope guide.

      Ask FixBot

      Add Comment

    6. Honda EU2200IT A2 Stator Replacement: step 27, image 1 of 2 Honda EU2200IT A2 Stator Replacement: step 27, image 2 of 2
      • Feed the starter rope handle and guide through the panel cutout.

      Ask FixBot

      Add Comment

    7. Honda EU2200IT A2 Stator Replacement, Remove the fuel tank: step 28, image 1 of 2 Honda EU2200IT A2 Stator Replacement, Remove the fuel tank: step 28, image 2 of 2
      • Any residual fuel in the tank will leak. Be ready to contain any spillage.

      • Use a pair of pliers to squeeze and slide the spring clip off the fuel tank port.

      Ask FixBot

      Add Comment

    8. Honda EU2200IT A2 Stator Replacement: step 29, image 1 of 2 Honda EU2200IT A2 Stator Replacement: step 29, image 2 of 2
      • Disconnect the fuel line and filter from the fuel tank.

      Ask FixBot

      Add Comment

    9. Honda EU2200IT A2 Stator Replacement: step 30, image 1 of 1
      • Remove the Phillips screw securing the left (non-access) frame assembly.

      Ask FixBot

      Add Comment

    10. Honda EU2200IT A2 Stator Replacement: step 31, image 1 of 2 Honda EU2200IT A2 Stator Replacement: step 31, image 2 of 2
      • Remove the left (non-access) frame assembly.

      Ask FixBot

      Add Comment

    11. Honda EU2200IT A2 Stator Replacement: step 32, image 1 of 2 Honda EU2200IT A2 Stator Replacement: step 32, image 2 of 2
      • Lift and remove the fuel tank.

      Ask FixBot

      Add Comment

    1. Honda EU2200IT A2 Stator Replacement, Remove the under-cover: step 33, image 1 of 1
      • Use a flathead screwdriver to pry up the blue wire harness from the under-cover.

      Ask FixBot

      Add Comment

    2. Honda EU2200IT A2 Stator Replacement: step 34, image 1 of 3 Honda EU2200IT A2 Stator Replacement: step 34, image 2 of 3 Honda EU2200IT A2 Stator Replacement: step 34, image 3 of 3
      • Use a mallet and punch to tap out the front collar (closest to the electrical panel) securing the motor assembly to the under-cover.

      Ask FixBot

      Add Comment

    3. Honda EU2200IT A2 Stator Replacement: step 35, image 1 of 1
      • Use a 10 mm socket to remove the two bolts securing the motor rear to the under-cover.

      Ask FixBot

      Add Comment

    4. Honda EU2200IT A2 Stator Replacement: step 36, image 1 of 3 Honda EU2200IT A2 Stator Replacement: step 36, image 2 of 3 Honda EU2200IT A2 Stator Replacement: step 36, image 3 of 3
      • The motor assembly is heavy. Follow safe lifting practices when you lift the assembly.

      • Lift the motor assembly off the under-cover and set it aside.

      Ask FixBot

      Add Comment

    5. Honda EU2200IT A2 Stator Replacement, Remove the left shroud: step 37, image 1 of 1
      • Use a 10 mm socket to remove the two bolts securing the left shroud.

      Ask FixBot

      Add Comment

    6. Honda EU2200IT A2 Stator Replacement: step 38, image 1 of 2 Honda EU2200IT A2 Stator Replacement: step 38, image 2 of 2
      • Begin separating the left shroud from the engine assembly by pulling it away from the assembly.

      • The shroud sits in a groove on the engine assembly and may take some force to pull out.

      Ask FixBot

      Add Comment

    7. Honda EU2200IT A2 Stator Replacement: step 39, image 1 of 3 Honda EU2200IT A2 Stator Replacement: step 39, image 2 of 3 Honda EU2200IT A2 Stator Replacement: step 39, image 3 of 3
      • Pull along the edge of the shroud until you separate the shroud from the engine assembly.

      • Remove the shroud.

      Ask FixBot

      Add Comment

    8. Honda EU2200IT A2 Stator Replacement, Remove the air filter housing: step 40, image 1 of 2 Honda EU2200IT A2 Stator Replacement, Remove the air filter housing: step 40, image 2 of 2
      • Remove the Phillips screw securing the filter cover.

      • During reassembly, be sure to tighten the screw to at least 1.7 ft-lb to prevent it from loosening during operation.

      • Remove the filter cover.

      Ask FixBot

      Add Comment

    9. Honda EU2200IT A2 Stator Replacement: step 41, image 1 of 2 Honda EU2200IT A2 Stator Replacement: step 41, image 2 of 2
      • Remove the air filters from the filter box.

      • To clean the filters:

      • Clean the filters in warm soapy water

      • Allow the filters to dry thoroughly

      • Dip the filters in clean engine oil, and squeeze out excess oil

      Ask FixBot

      Add Comment

    10. Honda EU2200IT A2 Stator Replacement: step 42, image 1 of 2 Honda EU2200IT A2 Stator Replacement: step 42, image 2 of 2
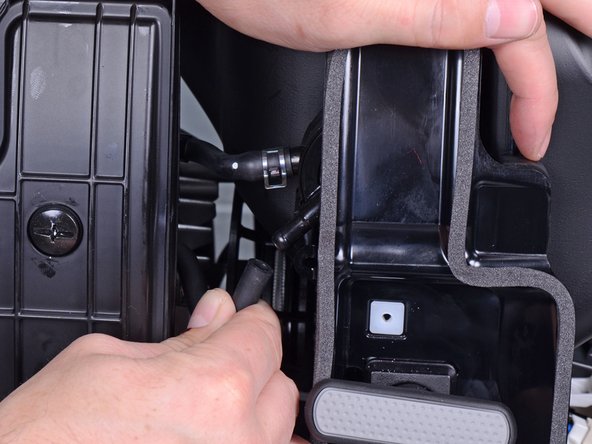
      • Disconnect the breather tube from the air cleaner housing.

      Ask FixBot

      Add Comment

    11. Honda EU2200IT A2 Stator Replacement: step 43, image 1 of 1
      • Remove the following fasteners securing the housing:

      • Two 8 mm nuts

      • During reassembly, tighten these to 3.6 ft-lb.

      • One 8 mm bolt

      Ask FixBot

      Add Comment

    12. Honda EU2200IT A2 Stator Replacement: step 44, image 1 of 2 Honda EU2200IT A2 Stator Replacement: step 44, image 2 of 2
      • Remove the air filter housing.

      Ask FixBot

      Add Comment

    13. Honda EU2200IT A2 Stator Replacement: step 45, image 1 of 1
      • During reassembly, replace the air intake gasket if it shows signs of wear.

      Ask FixBot

      Add Comment

    14. Honda EU2200IT A2 Stator Replacement: step 46, image 1 of 1
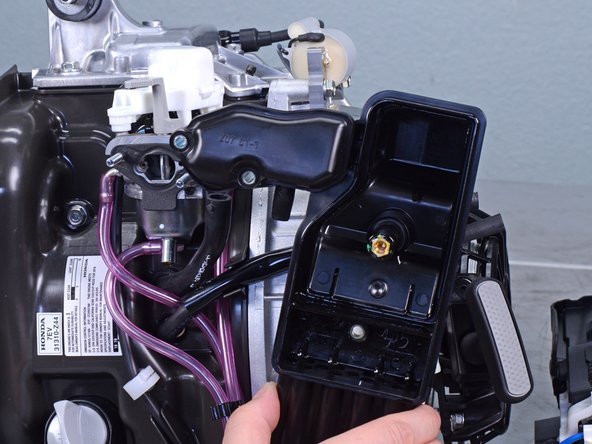
      • During reassembly, use this photo as a reference for how to route the hoses.

      Ask FixBot

      Add Comment

    15. Honda EU2200IT A2 Stator Replacement: step 47, image 1 of 3 Honda EU2200IT A2 Stator Replacement: step 47, image 2 of 3 Honda EU2200IT A2 Stator Replacement: step 47, image 3 of 3
      • Unclip the fuel and air hoses from the side of the motor assembly.

      Ask FixBot

      Add Comment

    16. Honda EU2200IT A2 Stator Replacement: step 48, image 1 of 2 Honda EU2200IT A2 Stator Replacement: step 48, image 2 of 2
      • Pull the breather tube straight out of its port.

      Ask FixBot

      Add Comment

    17. Honda EU2200IT A2 Stator Replacement: step 49, image 1 of 2 Honda EU2200IT A2 Stator Replacement: step 49, image 2 of 2
      • Use a flathead screwdriver to unclip the carburetor wires from the side of the motor assembly.

      Ask FixBot

      Add Comment

    18. Honda EU2200IT A2 Stator Replacement: step 50, image 1 of 2 Honda EU2200IT A2 Stator Replacement: step 50, image 2 of 2
      • Slide the carburetor off its two bolt rails.

      Ask FixBot

      Add Comment

    19. Honda EU2200IT A2 Stator Replacement: step 51, image 1 of 1
      • During reassembly, replace the carburetor seal if it shows signs of wear.

      Ask FixBot

      Add Comment

    20. Honda EU2200IT A2 Stator Replacement: step 52, image 1 of 1
      • Use an 8 mm socket to remove the two bolts securing the carburetor insulator.

      • During reassembly, tighten these bolts to 2.2 ft-lb.

      Ask FixBot

      Add Comment

    21. Honda EU2200IT A2 Stator Replacement: step 53, image 1 of 2 Honda EU2200IT A2 Stator Replacement: step 53, image 2 of 2
      • Remove the carburetor insulator along with the two bolt rails.

      Ask FixBot

      Add Comment

    22. Honda EU2200IT A2 Stator Replacement: step 54, image 1 of 1
      • During reassembly, replace the insulator gasket if it shows signs of wear.

      Ask FixBot

      Add Comment

    23. Honda EU2200IT A2 Stator Replacement: step 55, image 1 of 1
      • Use a 10 mm socket to remove the bolts securing the right shroud.

      Ask FixBot
      Add Comment

    24. Honda EU2200IT A2 Stator Replacement: step 56, image 1 of 2 Honda EU2200IT A2 Stator Replacement: step 56, image 2 of 2
      • Begin separating the right shroud from the engine assembly by pulling it away from the assembly.

      Ask FixBot

      Add Comment

    25. Honda EU2200IT A2 Stator Replacement: step 57, image 1 of 3 Honda EU2200IT A2 Stator Replacement: step 57, image 2 of 3 Honda EU2200IT A2 Stator Replacement: step 57, image 3 of 3
      • Pull the shroud away along the edge. Use a flathead screwdriver to pry it out of the engine assembly groove.

      Ask FixBot

      Add Comment

    26. Honda EU2200IT A2 Stator Replacement: step 58, image 1 of 2 Honda EU2200IT A2 Stator Replacement: step 58, image 2 of 2
      • Remove the right shroud from the engine assembly.

      Ask FixBot

      Add Comment

    1. Honda EU2200IT A2 Stator Replacement, Disconnect the wires: step 59, image 1 of 2 Honda EU2200IT A2 Stator Replacement, Disconnect the wires: step 59, image 2 of 2
      • Use an 8 mm socket to remove the bolt securing the light green ground wire to the engine assembly.

      Ask FixBot

      Add Comment

    2. Honda EU2200IT A2 Stator Replacement: step 60, image 1 of 2 Honda EU2200IT A2 Stator Replacement: step 60, image 2 of 2
      • Use an 8 mm socket to remove the bolt securing the dark green ground wire to the engine assembly.

      Ask FixBot

      Add Comment

    3. Honda EU2200IT A2 Stator Replacement: step 61, image 1 of 2 Honda EU2200IT A2 Stator Replacement: step 61, image 2 of 2
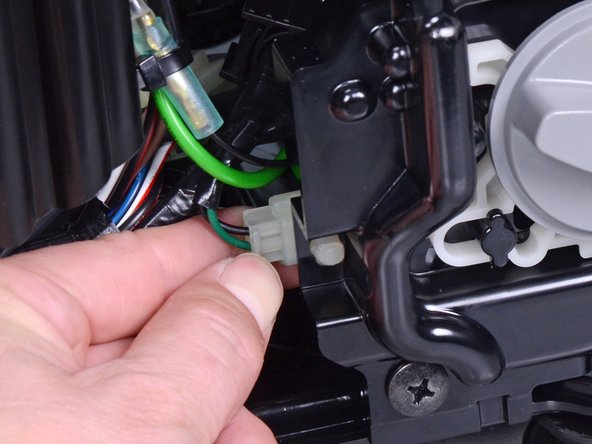
      • Disconnect the wiring harness from the rectifier socket.

      Ask FixBot

      Add Comment

    4. Honda EU2200IT A2 Stator Replacement: step 62, image 1 of 1
      • Cut the zip tie securing the coil ignition wire to the harness.

      Ask FixBot

      Add Comment

    5. Honda EU2200IT A2 Stator Replacement: step 63, image 1 of 2 Honda EU2200IT A2 Stator Replacement: step 63, image 2 of 2
      • Disconnect the coil ignition wire from the harness by pulling it apart from both ends.

      Ask FixBot

      Add Comment

    6. Honda EU2200IT A2 Stator Replacement, Remove the coil ignition assembly: step 64, image 1 of 1
      • Use a 10 mm socket to remove the two bolts securing the coil ignition assembly.

      Ask FixBot

      Add Comment

    7. Honda EU2200IT A2 Stator Replacement: step 65, image 1 of 2 Honda EU2200IT A2 Stator Replacement: step 65, image 2 of 2
      • Unroute the coil ignition wire from the engine assembly.

      Ask FixBot

      Add Comment

    8. Honda EU2200IT A2 Stator Replacement: step 66, image 1 of 1
      • Remove the coil ignition assembly.

      Ask FixBot

      Add Comment

    9. Honda EU2200IT A2 Stator Replacement, Remove the fan cover: step 67, image 1 of 1
      • Use a 10 mm socket to remove the three bolts securing the fan cover.

      Ask FixBot

      Add Comment

    10. Honda EU2200IT A2 Stator Replacement: step 68, image 1 of 1
      • Pull the fan cover off the engine assembly.

      Ask FixBot

      Add Comment

    11. Honda EU2200IT A2 Stator Replacement, Reassembly tip: step 69, image 1 of 2 Honda EU2200IT A2 Stator Replacement, Reassembly tip: step 69, image 2 of 2
      • During reassembly, make sure that the cable strain relief sits properly in its fan cover cutout.

      Ask FixBot

      Add Comment

    12. Honda EU2200IT A2 Stator Replacement, Remove the cooling fan: step 70, image 1 of 1
      • Use a 10 mm socket to remove the two bolts securing the cooling fan.

      Ask FixBot

      Add Comment

    13. Honda EU2200IT A2 Stator Replacement: step 71, image 1 of 2 Honda EU2200IT A2 Stator Replacement: step 71, image 2 of 2
      • Remove the cooling fan, fan set plate, and starter pulley.

      Ask FixBot

      Add Comment

    14. Honda EU2200IT A2 Stator Replacement, Remove the rotor: step 72, image 1 of 1
      • Use a 19 mm socket to remove the nut securing the rotor.

      • This nut is heavily bolted on. Use an impact wrench to loosen it, or use a breaker bar with a strap wrench to break it free.

      • During reassembly, tighten this nut to 66 lb-ft.

      Ask FixBot

      Add Comment

    15. Honda EU2200IT A2 Stator Replacement: step 73, image 1 of 2 Honda EU2200IT A2 Stator Replacement: step 73, image 2 of 2
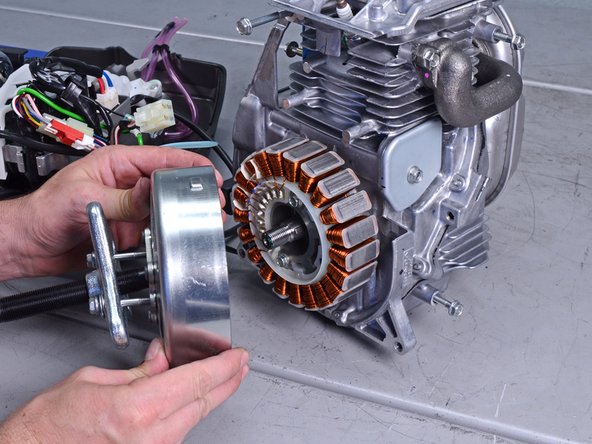
      • Attach a flywheel puller to the rotor and attach the collar bolts to the marked holes.

      • Use the flywheel puller to loosen the rotor from the axle.

      Ask FixBot

      Add Comment

    16. Honda EU2200IT A2 Stator Replacement: step 74, image 1 of 3 Honda EU2200IT A2 Stator Replacement: step 74, image 2 of 3 Honda EU2200IT A2 Stator Replacement: step 74, image 3 of 3
      • Remove the rotor.

      • Reassembly tip: When you replace the rotor, make sure the rotor aligns to the key on the shaft.

      Ask FixBot

      Add Comment

    1. Honda EU2200IT A2 Stator Replacement, Remove the pulse sensor: step 75, image 1 of 1
      • Use an 8 mm socket to remove the two bolts securing the pulse sensor.

      Ask FixBot

      Add Comment

    2. Honda EU2200IT A2 Stator Replacement: step 76, image 1 of 2 Honda EU2200IT A2 Stator Replacement: step 76, image 2 of 2
      • Remove the pulse sensor from the engine assembly.

      • Reassembly tip: Be sure to route the stator wiring harness underneath the pulse sensor.

      Ask FixBot

      Add Comment

    3. Honda EU2200IT A2 Stator Replacement: step 77, image 1 of 1
      • Use an 8 mm socket to remove the two bolts securing the stator.

      Ask FixBot

      Add Comment

    4. Honda EU2200IT A2 Stator Replacement: step 78, image 1 of 3 Honda EU2200IT A2 Stator Replacement: step 78, image 2 of 3 Honda EU2200IT A2 Stator Replacement: step 78, image 3 of 3
      • Pull and remove the stator away from the engine assembly.

      • Be careful not to lose the key on the drive shaft.

      Ask FixBot

      Add Comment

    5. Honda EU2200IT A2 Stator Replacement: step 79, image 1 of 3 Honda EU2200IT A2 Stator Replacement: step 79, image 2 of 3 Honda EU2200IT A2 Stator Replacement: step 79, image 3 of 3
      • Pull up and disconnect the two stator plugs from their sockets.

      Ask FixBot

      Add Comment

    6. Honda EU2200IT A2 Stator Replacement: step 80, image 1 of 1
      • Only the stator remains.

      Ask FixBot

      Add Comment

Conclusion

To reassemble your device, follow these instructions in reverse order.

Cancel: I did not complete this guide.

3 other people completed this guide.

Arthur Shi

Member since: 01/03/18

350,850 Reputation

938 Guides authored

Team

iFixit Member of iFixit

Staff

122 Members

72,401 Guides authored

3 Guide Comments

Great video, with good clear pictures.

Randall Iwanaga - Reply Share

Well done - this also applies about 99% to the non-USA version the EU22i.

Michael Coggins - Reply Share

Excellent flow chart. I needed this to change my stator on my EU22i genset yesterday. I however struggled to get the flywheel off even with the puller and damaged the threads. I needed to fit nuts inside the flywheel to pull from the inside as such and it came loose

Mike Ferguson - Reply Share

Add Comment

View Statistics:

Past 24 Hours: 4

Past 7 Days: 24

Past 30 Days: 84

All Time: 2,748