Introduction
Use this guide to replace a damaged or faulty trackpad in your HP ProBook 640 G4 laptop.
The trackpad allows you to control the cursor and interact with your laptop without an external mouse. If your trackpad is unresponsive, lagging, physically damaged, or registering incorrect movements or clicks, it may need to be replaced.
Before starting, try updating or reinstalling your touchpad drivers and test with an external mouse to confirm the issue isn’t software related.
Make sure to power off your laptop and disconnect it from any power source before beginning the repair.
What you need
-
-
-
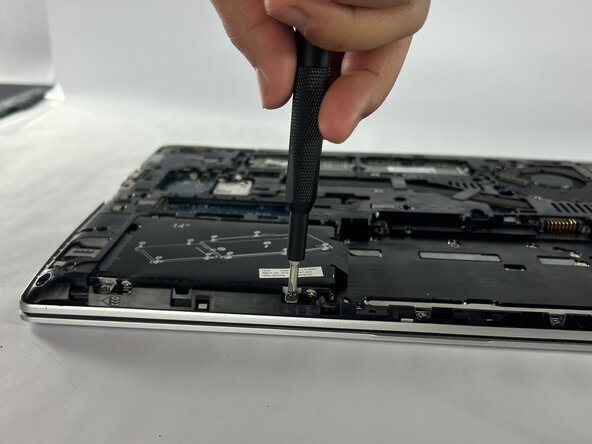
Loosen the eight 2.5 mm-long Phillips captive screws securing the lower case.
 Ask FixBot
-
-
-
Insert an opening pick into the seam between the lower case and chassis, and twist it to create a gap.
-
Insert an opening tool into the gap.
-
Use the opening tool to pry around the entire perimeter of the device until the lower case fully releases.
-
Remove the lower case.
-
-
-
-
-
Use a Phillips screwdriver to loosen the six 2.5 mm-long captive screws securing the battery.
-
Slide and lift the battery out.
-
-
-
-
-
Loosen the four captive 2.5 mm-long Phillips screws securing the SSD.
-
Grip the SSD and slide it out while lifting up.
-
-
-
-
-
-
Two clips secure each RAM module in place, one on each side. Using your fingers, spread the clips away from the RAM module.
-
Repeat for the other RAM module.
-
Remove each of the two RAM modules.
-
-
-
-
-
Remove 5 2.5 mm Phillips head screws.
-
Remove 12 6 mm Torx head screws.
-
Remove 2 2.5 mm Phillips head screws.
-
Loosen 4 2.5 mm Phillips head screws.
-
Loosen 4 2.5 mm Phillips head screws.
-
-
-
-
-
Loosen the four 2.5 mm-long Phillips screws securing the heat sink.
-
Loosen the four 2.5 mm-long Phillips screws securing the fan.
-
-
-
-
-
Remove the 2 mm-long Phillips screw.
-
Remove the 2.5 mm-long Phillips screw.
-
-
-
Disconnect the ZIF connector by gently lifting the hinged locking flap on the connector's top edge until it's vertical, then carefully slide the ZIF connector straight out.
-
Lift the motherboard at an angle making sure to slide the ports out the casing.
-
-
-
-
-
Remove the nine 3.4 mm screws using a Phillips #000 screwdriver.
-
Lift and take out the trackpad.
-
-




To reassemble your device, follow these instructions in reverse order.

Team

Austin Community College, Team 1-3, Caverte Spring 2026 Member of Austin Community College, Team 1-3, Caverte Spring 2026
AUSTINCC-CAVERTE-S26S1G3
3 Members
36 Guides authored
