Introduction
his guide will walk you through carefully removing and replacing the Wi-Fi card in your HP ProBook 640 G3. This repair is likely needed if your device is having trouble accessing the internet connection or cannot seem to connect at all. The process is rated as Moderate in difficulty, is in progress, and is estimated to take between 5 and 10 minutes to complete.
A critical safety caution before starting is to ensure the device is completely powered down and not connected to any charging sources; also make sure the laptop is not still hot if it was recently used. This guide requires the removal of the battery first, and the tools you will need include a Phillips #00 Screwdriver, Plastic prying tools, an Opening Pick, and Tweezers. To help with reassembly, it is a good idea to separate your screws into groups based on the device part they came from.
What you need
-
-
Remove the eight 6 mm-long Phillips screws securing the lower case.
-
Insert an opening pick into the seam between the lower case and chassis.
-
Slide the pick around the entire perimeter of the device until the lower case releases.
-
Remove the lower case.
 Ask FixBot
-
-
-
Use a Phillips screwdriver to loosen the seven 6 mm-long captive screws securing the battery.
-
-
-
-
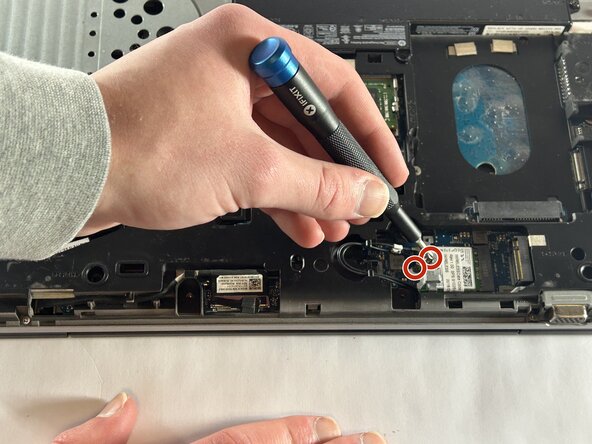
Use a Phillips screwdriver to remove the two 6 mm-long screws on the metal piece holding down the Wi-Fi card. One screw will be on top, and the other will be just next to the wires holding it in.
-
Carefully remove the little metal piece from where it was resting.
-
-
-
The only thing holding the Wi-Fi card will be two small wires. These can easily be taken off by the use of your hands or helpful tweezers.
-
Gently remove the card by pulling it out of its slot.
-


To reassemble your device, follow the above steps in reverse order.
Take your e-waste to an R2 or e-Stewards certified recycler.
Repair didn’t go as planned? Try some basic troubleshooting or ask our Answers community for help.
Team

UMass Dartmouth, Team 1-7, Botvin Fall 2025 Member of UMass Dartmouth, Team 1-7, Botvin Fall 2025
UMASSD-BOTVIN-F25S1G7
3 Members
6 Guides authored