Introduction
Use this guide to replace a faulty charging port in your HP Mobile Thin Client mt41.
The charging port is the portal into which the charging cable is inserted. If the charging port is faulty or damaged, the computer may not charge, or may only charge if constant pressure is applied to the charging cable.
Before using this guide, follow our troubleshooting guide to ensure that the problem is not caused by a faulty battery or an old or damaged charging cable. Ensure the charging cable is completely plugged in and test the computer with a second charging cable to rule out the charging cable as the culprit. If the HP Mobile Thin Client still does not charge with the new charging cable, it is likely time to replace the charging port.
Before beginning, disconnect the device from any external power sources and power it down.
What you need
-
-
-
Locate the two slots on the bottom of the laptop to unlock the battery.
 Ask FixBot
-
-
-
Pull on both slots outwards as shown in the images to unlock the battery. The battery will not come out if the slots are locked. The battery should easily slide out without much force.
-
-
-
-
-
Remove the nine screws that keep the back cover secured using the T5 Torx screwdriver.
-
-
-
-
Pop the back cover off from its latches by separating the two parts along their seam using the iFixit opening tool.
-
-
-
-
Tool used on this step:Tweezers$4.99
-
Use the T5 Torx screwdriver to remove the screw securing the charging port.
-
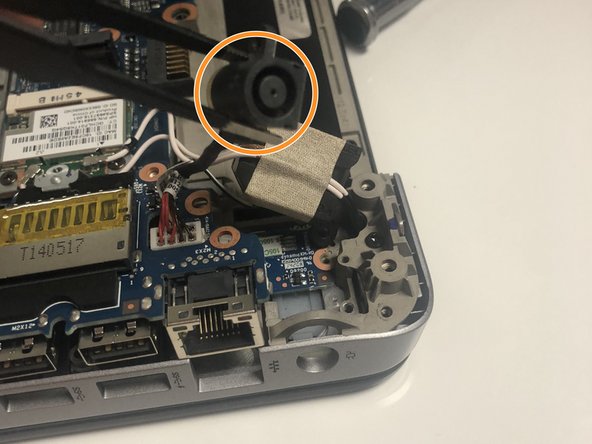
Remove the charging port with a pair of tweezers. Gently pull it away from the computer base.
-
-
-
Just below the charging port, you will find a connector with a white base and a bundle of wires.
-
Using your fingers, pull the cable directly up and away from the computer base. This should be the same direction that the wires are facing.
-




To reassemble your device, follow these instructions in reverse order.

Team

University of North Texas, Team S2-G5, Thomas Spring 2018 Member of University of North Texas, Team S2-G5, Thomas Spring 2018
UNT-THOMAS-S18S2G5
5 Members
72 Guides authored
