
Free Shipping on Domestic Orders $75+

HP Envy M6-1205DX Screen Replacement

What you need

  1. HP Envy M6-1205DX Screen Replacement, Battery: step 1, image 1 of 1
    • Lay the device face down to begin.

    Ask FixBot

    Add Comment

  2. HP Envy M6-1205DX Screen Replacement: step 2, image 1 of 1
    • Slide the release mechanism to the left to release the battery.

    Ask FixBot

    Add Comment

  3. HP Envy M6-1205DX Screen Replacement: step 3, image 1 of 2 HP Envy M6-1205DX Screen Replacement: step 3, image 2 of 2
    • Remove the battery.

    Ask FixBot

    Add Comment

  4. HP Envy M6-1205DX Screen Replacement, Touchpad: step 4, image 1 of 1
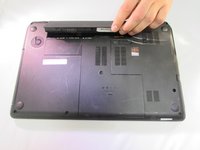
    • Using a Phillips #1, remove the 8 10.6mm screws.

    • Also using a Phillips #1, remove the 8.6mm screw.

    Ask FixBot

    Add Comment

  5. HP Envy M6-1205DX Screen Replacement: step 5, image 1 of 1
    • Slide the center panel down to remove it.

    Ask FixBot

    Add Comment

  6. HP Envy M6-1205DX Screen Replacement: step 6, image 1 of 1
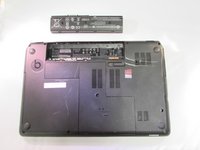
    • Using a Phillips #1, remove the 3.5mm screw.

    • Our computer did not come with a hard drive so you should have one in the empty hole. We have marked where we believe the screws will be in orange.

    • Using a Phillips #1, remove the four 10.6mm screws.
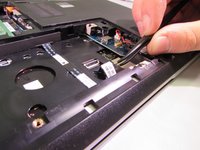
    Ask FixBot

    Add Comment

  7. HP Envy M6-1205DX Screen Replacement: step 7, image 1 of 1
    • Pull the disk drive out to remove it.

    Ask FixBot

    Add Comment

  8. HP Envy M6-1205DX Screen Replacement: step 8, image 1 of 2 HP Envy M6-1205DX Screen Replacement: step 8, image 2 of 2
    • Using a Phillips #1, remove the two 2.4mm screws.

    Ask FixBot

    Add Comment

  9. HP Envy M6-1205DX Screen Replacement: step 9, image 1 of 2 HP Envy M6-1205DX Screen Replacement: step 9, image 2 of 2
    Tool used on this step:
    Tweezers
    $4.99
    Buy
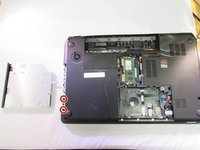
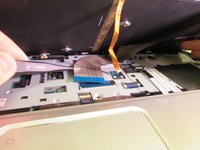
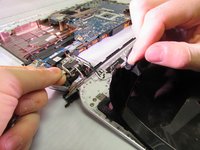
    • Flip the black tab up on the clamp that holds the ribbon cable in place.

    • Pull the cable back with your fingers or a pair of tweezers.

    Ask FixBot

    Add Comment

  10. HP Envy M6-1205DX Screen Replacement: step 10, image 1 of 2 HP Envy M6-1205DX Screen Replacement: step 10, image 2 of 2
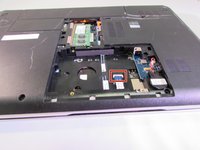
    • Flip the computer back over

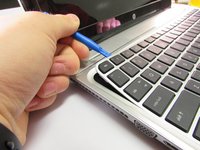
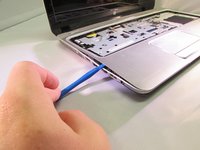
    • Use the plastic opening tool to pry the keyboard up .

    Ask FixBot

    Add Comment

  11. HP Envy M6-1205DX Screen Replacement: step 11, image 1 of 3 HP Envy M6-1205DX Screen Replacement: step 11, image 2 of 3 HP Envy M6-1205DX Screen Replacement: step 11, image 3 of 3
    • Carefully lift the keyboard up.

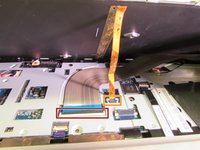
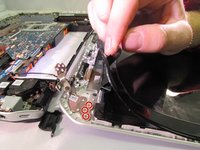
    • Flip up the black tab holding the large ribbon cable down.

    • Push both sides of the small white tab forward to release the small ribbon cable.

    • Pull both the cables out to remove them.

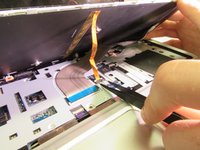
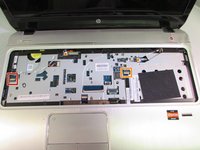
    • Remove the keyboard.

    Ask FixBot

    Add Comment

  12. HP Envy M6-1205DX Screen Replacement: step 12, image 1 of 3 HP Envy M6-1205DX Screen Replacement: step 12, image 2 of 3 HP Envy M6-1205DX Screen Replacement: step 12, image 3 of 3
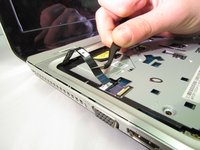
    • Flip the small white tab up to release the ribbon cable.

    • Pull to remove.

    • Repeat the same steps for the other cable.

    Ask FixBot

    Add Comment

  13. HP Envy M6-1205DX Screen Replacement: step 13, image 1 of 1
    • Using a Phillips #1, remove the four 5.6mm silver screws.

    Ask FixBot

    Add Comment

  14. HP Envy M6-1205DX Screen Replacement: step 14, image 1 of 2 HP Envy M6-1205DX Screen Replacement: step 14, image 2 of 2
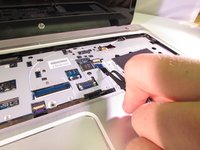
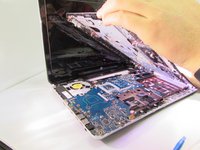
    • Use the plastic opening tool to pry the face plate off the rest of the frame.

    • Once you pry all of the snaps up lift the face plate off.

    Ask FixBot

    Add Comment

  15. HP Envy M6-1205DX Screen Replacement, Hinges: step 15, image 1 of 2 HP Envy M6-1205DX Screen Replacement, Hinges: step 15, image 2 of 2
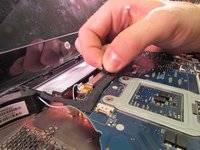
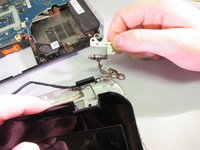
    • Pull up on the black tab to unplug the cable that goes into the screen

    • The cable will be stuck onto the motherboard and will need to be pulled off. The adhesive is very weak and the cable will stick back down when you are finished.

    Ask FixBot

    Add Comment

  16. HP Envy M6-1205DX Screen Replacement: step 16, image 1 of 1
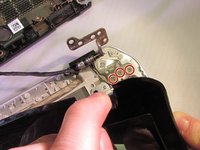
    • Using a Phillps #1, remove the two 5.6mm silver screws from the base of the first hinge.

    Ask FixBot

    Add Comment

  17. HP Envy M6-1205DX Screen Replacement: step 17, image 1 of 1
    • Also using a Phillips #1, remove the two 5.6mm silver screws from the base of the second hinge.

    Ask FixBot

    Add Comment

  18. HP Envy M6-1205DX Screen Replacement: step 18, image 1 of 1
    • Using a plastic opening tool, carefully start prying the frame of the screen up

    Ask FixBot

    Add Comment

  19. HP Envy M6-1205DX Screen Replacement: step 19, image 1 of 1
    • When prying the screen frame off be careful around the top edge as your webcam will be there. It is a safe idea to move it out of the way like am I doing now.

    Ask FixBot

    Add Comment

  20. HP Envy M6-1205DX Screen Replacement: step 20, image 1 of 1
    • Remove the three 1.9mm silver screws from the base of the screen frame using the Phillips 00 screwdriver.

    • If you are doing this guide as a prerequisite to replace the screen, stop here and skip ahead to step 23

    Ask FixBot

    Add Comment

  21. HP Envy M6-1205DX Screen Replacement: step 21, image 1 of 2 HP Envy M6-1205DX Screen Replacement: step 21, image 2 of 2
    • Carefully pry the edge of the frame up to expose the other half of the first hinge.

    • Using a Phillips #1, remove the three 2.8mm silver screws.

    • Pull the hinge out.

    Ask FixBot

    Add Comment

  22. HP Envy M6-1205DX Screen Replacement: step 22, image 1 of 2 HP Envy M6-1205DX Screen Replacement: step 22, image 2 of 2
    • Care full pry up the other corner of the frame

    • Using a Phillips #1, remove the three 2.8mm silver screws

    • Pull the hinge out.

    Ask FixBot

    Add Comment

  23. HP Envy M6-1205DX Screen Replacement, Screen: step 23, image 1 of 2 HP Envy M6-1205DX Screen Replacement, Screen: step 23, image 2 of 2
    • Using a Phillips #00, remove the four 2.3 mm black screws.

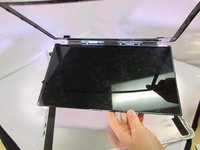
    • Lift the screen and frame out of the computer body.

    Ask FixBot

    Add Comment

  24. HP Envy M6-1205DX Screen Replacement: step 24, image 1 of 1
    • Flip the screen over

    • There is a black cable that is connected to the screen through the frame.

    • Pull back the tape that holds the cable in

    • Pull the cable out to remove it.

    Ask FixBot

    Add Comment

  25. HP Envy M6-1205DX Screen Replacement: step 25, image 1 of 1
    • Pull the black tape that is attached to the frame off of the screen

    Ask FixBot

    Add Comment

Conclusion

To reassemble your device, follow these instructions in reverse order.

Cancel: I did not complete this guide.

5 other people completed this guide.

1 Guide Comment

Pueden decirme qué modelos de pantalla son compatibles con la Envy m6 1205dx? necesito cambiar el mio y veo varios para Envy m6 diferentes

jt6288 - Reply Share

Add Comment

View Statistics:

Past 24 Hours: 1

Past 7 Days: 7

Past 30 Days: 21

All Time: 2,501