
Free Shipping on Domestic Orders $75+

HP Envy 4-1105dx Keyboard Replacement

What you need

  1. HP Envy 4-1105dx Keyboard Replacement, Battery: step 1, image 1 of 1
    • Power off the device before beginning disassembly. Disconnect all external devices.

    • Flip the device on its back.

    Ask FixBot

    Add Comment

  2. HP Envy 4-1105dx Keyboard Replacement: step 2, image 1 of 1
    • Unscrew and remove the one 7.5 mm Phillips-head screw using Phillips #1 screwdriver.

    Ask FixBot

    Add Comment

  3. HP Envy 4-1105dx Keyboard Replacement: step 3, image 1 of 1
    • Unscrew twelve 6.0 mm Phillips-head screws using Phillips #1 screwdriver.

    Ask FixBot

    Add Comment

  4. HP Envy 4-1105dx Keyboard Replacement: step 4, image 1 of 1
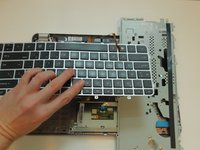
    • Use the plastic opening tool (which is short and has a thin end for prying open device parts) to pry open the back case of the device.

    Ask FixBot

    Add Comment

  5. HP Envy 4-1105dx Keyboard Replacement: step 5, image 1 of 1
    • Once the device is open, move the ribbon cable to the side.

    Ask FixBot

    Add Comment

  6. HP Envy 4-1105dx Keyboard Replacement: step 6, image 1 of 1
    • Use the flat end of a plastic spudger to disconnect the battery cable from its socket in the motherboard.

    Ask FixBot

    Add Comment

  7. HP Envy 4-1105dx Keyboard Replacement: step 7, image 1 of 1
    • Unscrew and remove the three 4.0 mm Phillips-head screws that hold the battery in place, using a Phillips #1 screwdriver.

    Ask FixBot

    Add Comment

  8. HP Envy 4-1105dx Keyboard Replacement: step 8, image 1 of 1
    • Lift the battery up and remove.

    • Removing the battery can dislodge the touchpad bracket. Place the battery carefully over the alignment pins.

    Ask FixBot

    Add Comment

  9. HP Envy 4-1105dx Keyboard Replacement, Hard Drive: step 9, image 1 of 2 HP Envy 4-1105dx Keyboard Replacement, Hard Drive: step 9, image 2 of 2
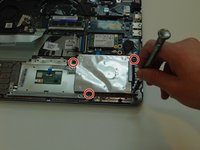
    • Remove the four 4.0 mm screws that hold down the hard drive case using a Philips #1 Screwdriver.

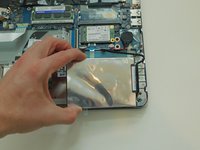
    • Move the hard drive case and hard drive so that you can easily reach the hard drive cable.

    Ask FixBot

    Add Comment

  10. HP Envy 4-1105dx Keyboard Replacement: step 10, image 1 of 3 HP Envy 4-1105dx Keyboard Replacement: step 10, image 2 of 3 HP Envy 4-1105dx Keyboard Replacement: step 10, image 3 of 3
    • Use the plastic spudger tool to loosen the hard drive SATA cable connection by pushing it away from the motherboard.

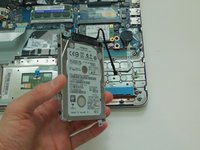
    • Once it is loose, pull the hard drive out of the socket.

    • Remove the hard drive from the device.

    Ask FixBot

    Add Comment

  11. HP Envy 4-1105dx Keyboard Replacement: step 11, image 1 of 3 HP Envy 4-1105dx Keyboard Replacement: step 11, image 2 of 3 HP Envy 4-1105dx Keyboard Replacement: step 11, image 3 of 3
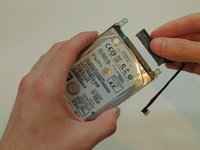
    • Pull out the hard drive cable from the hard drive, and set it aside.

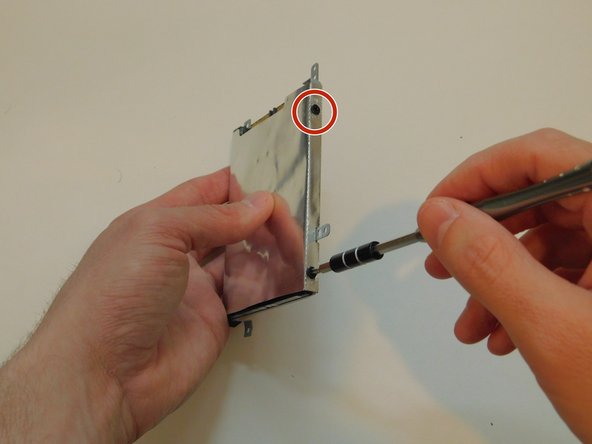
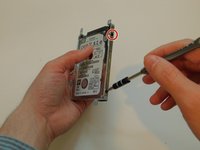
    • Remove the four 3.0 mm screws that attach the hard drive case to the hard drive using a Philips #1 Screwdriver. If the screwdriver is too big, try #0 sized screwdriver.

    Ask FixBot

    Add Comment

  12. HP Envy 4-1105dx Keyboard Replacement: step 12, image 1 of 1
    • Remove the hard drive from the hard drive case.

    Ask FixBot

    Add Comment

  13. HP Envy 4-1105dx Keyboard Replacement, Motherboard: step 13, image 1 of 1
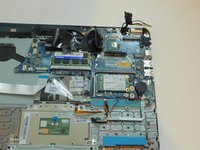
    • Prepare to disconnect the motherboard from any components you have not already removed, including the screen, touchpad, and keyboard.

    • In its original factory configuration, the motherboard is connected to 10 components.

    • Take notes or photographs to help you remember which connections went to which components.

    • Components do not have to be disconnected in the order shown.

    • Whenever possible, use plastic tools rather than metal ones, and don't touch connection points.

    Ask FixBot

    Add Comment

  14. HP Envy 4-1105dx Keyboard Replacement: step 14, image 1 of 2 HP Envy 4-1105dx Keyboard Replacement: step 14, image 2 of 2
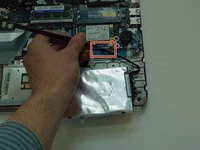
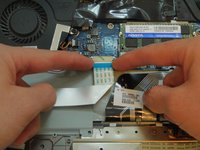
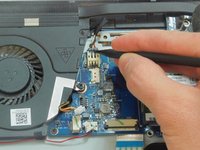
    • Remove the ribbon cable running from under the motherboard by undoing the latch mechanism with your fingernail, and pulling out on the edge of the connector. (This is the keyboard cable).

    Ask FixBot

    Add Comment

  15. HP Envy 4-1105dx Keyboard Replacement: step 15, image 1 of 2 HP Envy 4-1105dx Keyboard Replacement: step 15, image 2 of 2
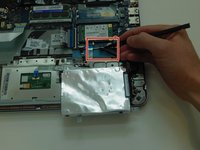
    • Flip up the black connector with your fingernail or using the plastic spudger.

    • Unplug the trackpad by pulling up on the touchpad board cable.

    Ask FixBot

    Add Comment

  16. HP Envy 4-1105dx Keyboard Replacement: step 16, image 1 of 2 HP Envy 4-1105dx Keyboard Replacement: step 16, image 2 of 2
    • Use the plastic spudger to gently pry out the small chip next to the touchpad.

    • The metal spudger has been used in the photograph, but the plastic spudger is a better choice because it is ESD safe.

    Ask FixBot

    Add Comment

  17. HP Envy 4-1105dx Keyboard Replacement: step 17, image 1 of 2 HP Envy 4-1105dx Keyboard Replacement: step 17, image 2 of 2
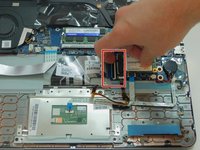
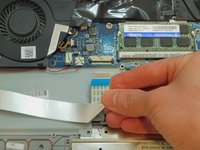
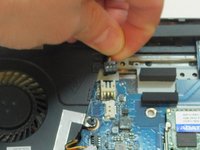
    • Disconnect the ribbon cable running to the ports on the right-hand side of the laptop.

    Ask FixBot

    Add Comment

  18. HP Envy 4-1105dx Keyboard Replacement: step 18, image 1 of 3 HP Envy 4-1105dx Keyboard Replacement: step 18, image 2 of 3 HP Envy 4-1105dx Keyboard Replacement: step 18, image 3 of 3
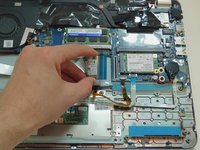
    • Disconnect the two small ribbon cables in front of the hard drive. The larger one is the touchpad board cable, and the smaller one is the keyboard light cable.

    Ask FixBot

    Add Comment

  19. HP Envy 4-1105dx Keyboard Replacement: step 19, image 1 of 2 HP Envy 4-1105dx Keyboard Replacement: step 19, image 2 of 2
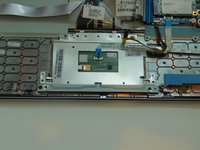
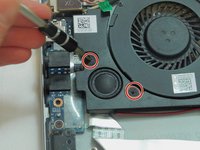
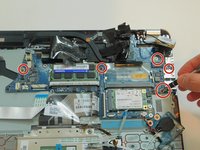
    • Using a Phillips #0 screwdriver, remove the two 3.0 mm screws holding the speaker and motherboard to the plastic frame.

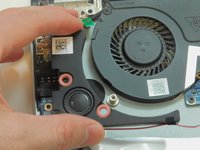
    • Move the speaker out of the way. It will stay attached to the motherboard. The cord connection cannot be disconnected.

    Ask FixBot

    Add Comment

  20. HP Envy 4-1105dx Keyboard Replacement: step 20, image 1 of 1
    • Pull back the black plastic covering over the northbridge.

    Ask FixBot

    Add Comment

  21. HP Envy 4-1105dx Keyboard Replacement: step 21, image 1 of 2 HP Envy 4-1105dx Keyboard Replacement: step 21, image 2 of 2
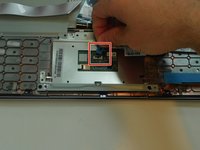
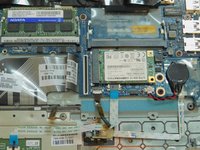
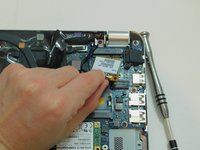
    • Using a Phillips #0 screwdriver, remove the 3.0 mm screw securing the wireless LAN adapter.

    • Detach the wireless LAN adapter from the board.

    Ask FixBot

    Add Comment

  22. HP Envy 4-1105dx Keyboard Replacement: step 22, image 1 of 2 HP Envy 4-1105dx Keyboard Replacement: step 22, image 2 of 2
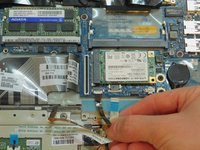
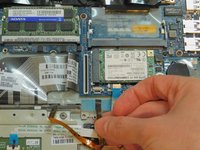
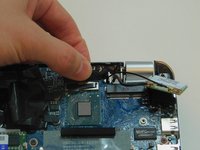
    • Using your fingers, locate the display panel cable under the hinge and disconnect it.

    Ask FixBot

    Add Comment

  23. HP Envy 4-1105dx Keyboard Replacement: step 23, image 1 of 2 HP Envy 4-1105dx Keyboard Replacement: step 23, image 2 of 2
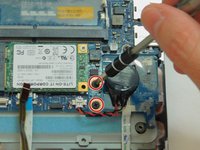
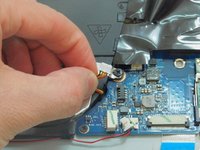
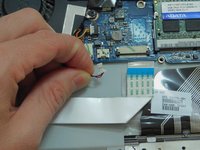
    • Disconnect the multicolored power connector for the USB/audio board by first probing it gently with a plastic spudger, then pulling it free.

    Ask FixBot

    Add Comment

  24. HP Envy 4-1105dx Keyboard Replacement: step 24, image 1 of 2 HP Envy 4-1105dx Keyboard Replacement: step 24, image 2 of 2
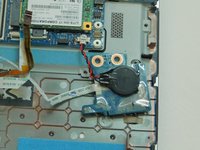
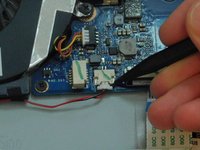
    • Disconnect the red and black power connector for the subwoofer by first probing it gently with a plastic spudger, then pulling it free with your fingernails.

    Ask FixBot

    Add Comment

  25. HP Envy 4-1105dx Keyboard Replacement: step 25, image 1 of 3 HP Envy 4-1105dx Keyboard Replacement: step 25, image 2 of 3 HP Envy 4-1105dx Keyboard Replacement: step 25, image 3 of 3
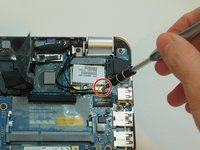
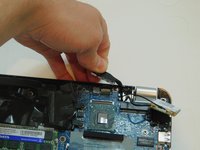
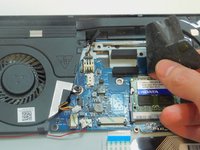
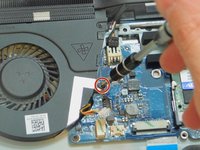
    • Peel back more of the black plastic to reveal the multicolored power connector for the cooling fan.

    • Disconnect the power connector for the cooling fan by probing it with the spudger, then pulling it free.

    Ask FixBot

    Add Comment

  26. HP Envy 4-1105dx Keyboard Replacement: step 26, image 1 of 2 HP Envy 4-1105dx Keyboard Replacement: step 26, image 2 of 2
    • Using a Phillips #0 screwdriver, remove the two 2.0 mm screws holding the right speaker in place.

    • Remove the right speaker.

    Ask FixBot

    Add Comment

  27. HP Envy 4-1105dx Keyboard Replacement: step 27, image 1 of 2 HP Envy 4-1105dx Keyboard Replacement: step 27, image 2 of 2
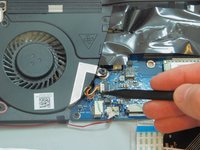
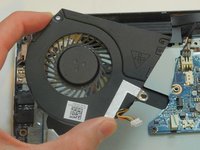
    • Using a Phillips #0 screwdriver, remove the 2.5 mm screw holding the cooling fan in place.

    • Lift out the cooling fan.

    Ask FixBot

    Add Comment

  28. HP Envy 4-1105dx Keyboard Replacement: step 28, image 1 of 2 HP Envy 4-1105dx Keyboard Replacement: step 28, image 2 of 2
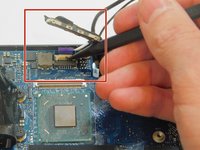
    • Using the plastic spudger, remove the power button cable. This is the small, purple ribbon cable at the back of the motherboard.

    Ask FixBot

    Add Comment

  29. HP Envy 4-1105dx Keyboard Replacement: step 29, image 1 of 3 HP Envy 4-1105dx Keyboard Replacement: step 29, image 2 of 3 HP Envy 4-1105dx Keyboard Replacement: step 29, image 3 of 3
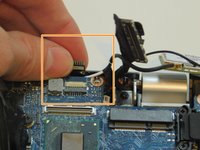
    • Using a Phillips #0 screwdriver, remove any remaining screws attaching the motherboard to the rest of the laptop.

    Ask FixBot

    Add Comment

  30. HP Envy 4-1105dx Keyboard Replacement: step 30, image 1 of 2 HP Envy 4-1105dx Keyboard Replacement: step 30, image 2 of 2
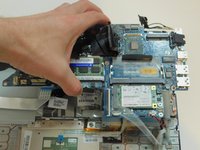
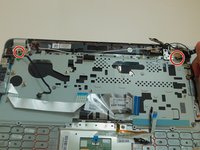
    • Gently lift out the motherboard and heat sink. If the motherboard has been fully disconnected from other components, it will lift free easily.

    • If the motherboard seems stuck, do not force it. Instead, return to previous steps to see if there is a connection or screw you have missed. Also check for tape, glue, or similar materials that may be attached to the motherboard.

    • Removing the motherboard before it has been fully disconnected may break not only the old motherboard, but connections or components that you will need to attach to the new motherboard. Do not rush this step.

    Ask FixBot

    Add Comment

  31. HP Envy 4-1105dx Keyboard Replacement, Keyboard: step 31, image 1 of 3 HP Envy 4-1105dx Keyboard Replacement, Keyboard: step 31, image 2 of 3 HP Envy 4-1105dx Keyboard Replacement, Keyboard: step 31, image 3 of 3
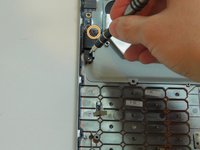
    • Unscrew the two 3 mm screws from the 2 silver metal hinges using a Philips #1 Screwdriver.

    • Unscrew the two 2.5 mm screws from the black metal anti-theft locking component using a Philips #1 Screwdriver.

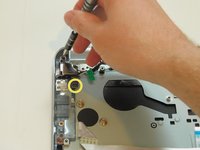
    • Unscrew the two 3.0 mm screws from the silver metal port using a Philips #1 Screwdriver.

    Ask FixBot

    Add Comment

  32. HP Envy 4-1105dx Keyboard Replacement: step 32, image 1 of 3 HP Envy 4-1105dx Keyboard Replacement: step 32, image 2 of 3 HP Envy 4-1105dx Keyboard Replacement: step 32, image 3 of 3
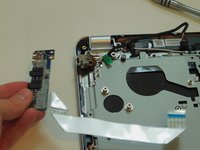
    • Unscrew the 2 3.0 mm screws holding the chip with the multiple ports using a Philips #1 Screwdriver.

    • Move the chip with multiple ports to the side.

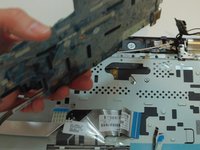
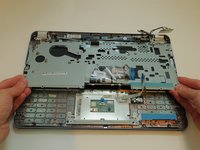
    • Use your fingers or a plastic or metal spudger tool to start prying up the metal case to reveal the keyboard.

    Ask FixBot

    Add Comment

  33. HP Envy 4-1105dx Keyboard Replacement: step 33, image 1 of 3 HP Envy 4-1105dx Keyboard Replacement: step 33, image 2 of 3 HP Envy 4-1105dx Keyboard Replacement: step 33, image 3 of 3
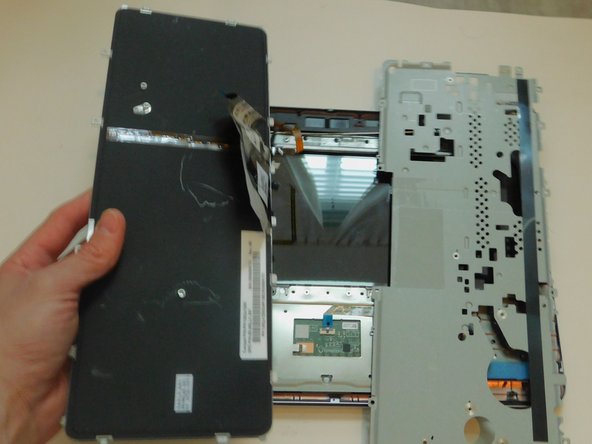
    • Separate the metal case from the keyboard by peeling off the tape that connects them.

    Ask FixBot

    Add Comment

Conclusion

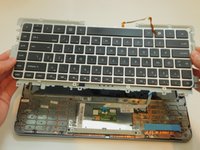
To reassemble your device, follow these instructions in reverse order.

Cancel: I did not complete this guide.

3 other people completed this guide.

KC Armstrong

Member since: 10/03/17

204 Reputation

2 Guides authored

3 Guide Comments

Thanks for the guide, it help me a lot with an other Hp Envy 14 model.

Nice mate

Pablo Tassinari - Reply Share

What technique is used on step 4 to remove the bottom? I need to remove mine but want to be careful not to break tabs or damage the edge.

Seems no one highlights this… its always unscrew then magically they show it with the bottom off.

Neccros - Reply Share

Hi Neccros,

It has been a while since I have performed that procedure (step 4). However, I remember that I used the plastic prying tool to loosen as many parts of the bottom that I could before using my hands. I don’t remember it being easy to damage the bottom as long as you loosen each part slowly and then pull with your hands slowly. If you feel too much resistance, stop prying and double-check you have removed all screws. I also recommend watching a youtube video where someone takes a laptop apart. That might help you visualize the process before you start. Best of luck!

KC Armstrong - Reply Share

Add Comment

View Statistics:

Past 24 Hours: 1

Past 7 Days: 13

Past 30 Days: 33

All Time: 3,969