
HP Envy 4-1030us CPU Fan Replacement

Christopher Luna and one other contributor
Last updated on Jan 4, 2018
Views: 843
View statistics:
- Past 24 Hours:
- 4
- Past 7 Days:
- 24
- Past 30 Days:
- 95
- All Time:
- 843
Comments: 1
1 comment on steps.
Completed: 0 1
No one has marked this guide "completed." Will you be the first?
1 person has marked this guide "completed." It's you — great job!
Favorites: 0 1
No one has favorited (and subscribed to) this guide. Will you be the first?
1 person has favorited (and subscribed to) this guide — and that's you!
Introduction
Go to step 1 ↓The CPU/processor's internal fan may need to be replaced when the system is experiencing heat related issues. The fan sits atop the heatsink, and is relatively easy to replace, just be sure to gently disconnect the small fan cabling before attempting to remove the fan.
When working with electronic components, we recommend wearing an electrostatic wristband, it is possible for the static electricity present on you to discharge onto one of the components, wearing one of these wristbands and clipping it to a piece of metal will prevent this from happening.
What you need
Tools


-
-
-
Using the Philips #0 screwdriver, remove the 12 7.5mm screws from the bottom cover.
 Ask FixBot
-
-
-
Using the plastic opening tool, carefully work the tool between the bottom cover and bottom chassis to loosen the connection.
-
Lift the bottom cover off of the system.
-
-
-
-
-
Using the Phillips #0 screwdriver unscrew the two 4.2mm screws fastening the CPU fan to the heatsink and motherboard.
-
-
-
-
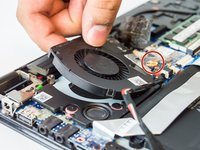
Carefully lift up the CPU fan to gain better access to the fan cable.
-
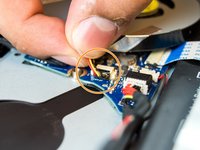
Disconnect the fan cable by pulling the cable away from the connector and remove the fan from the device.
-
-


To reassemble your device, follow these instructions in reverse order.

Team

USF Tampa, Team S1-G1, Thompson Fall 2017 Member of USF Tampa, Team S1-G1, Thompson Fall 2017
USFT-THOMPSON-F17S1G1
4 Members
72 Guides authored
