Free Shipping on Domestic Orders $75+

HP Elitebook 820 G1 Keyboard Replacement

What you need

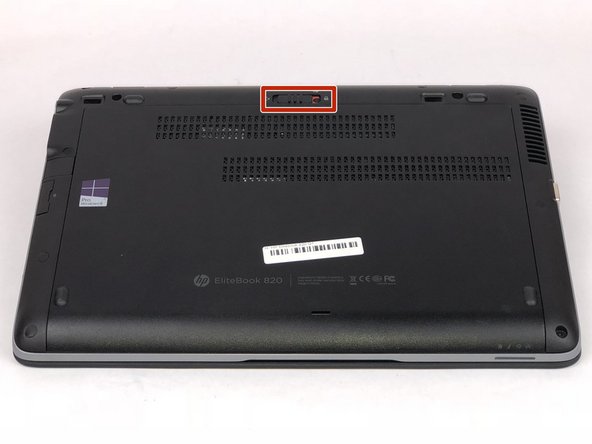
    1. HP Elitebook 820 G1 Keyboard Replacement, Battery: step 1, image 1 of 1
      • Ensure the laptop is completely powered off and power adapter is unplugged before removing the battery.

      • Turn over laptop so that the bottom is showing.

      • Unlock the latch.

      Ask FixBot

      Add Comment

    2. HP Elitebook 820 G1 Keyboard Replacement: step 2, image 1 of 1
      • Remove the back cover and you will then be able to see the battery.

      Ask FixBot

      Add Comment

    3. HP Elitebook 820 G1 Keyboard Replacement: step 3, image 1 of 1
      • Unlatch the two latches securing the battery in the case.

      Ask FixBot

      Add Comment

    4. HP Elitebook 820 G1 Keyboard Replacement: step 4, image 1 of 1
      • Use a plastic opening tool to lift and remove the battery.

      Ask FixBot

      Add Comment

    1. HP Elitebook 820 G1 Keyboard Replacement, Keyboard: step 5, image 1 of 1
      • Remove the two Phillips #0 screws securing the keyboard to the laptop.

      • Turn the laptop over and lift the display to reveal the keyboard.

      Ask FixBot

      Add Comment

    2. HP Elitebook 820 G1 Keyboard Replacement: step 6, image 1 of 1
      • Insert the plastic spudger between the keyboard and the housing.

      • Start at the corner.

      Ask FixBot

      Add Comment

    3. HP Elitebook 820 G1 Keyboard Replacement: step 7, image 1 of 3 HP Elitebook 820 G1 Keyboard Replacement: step 7, image 2 of 3 HP Elitebook 820 G1 Keyboard Replacement: step 7, image 3 of 3
      • 4 tabs are located at the top of the keyboard, which lock it in place.

      • Pry and twist the spudger along the top of the keyboard until each tab is released.

      Ask FixBot

      Add Comment

    4. HP Elitebook 820 G1 Keyboard Replacement: step 8, image 1 of 1
      • Pull back the keyboard from the top.

      • Be mindful of the fragile cables behind it.

      Ask FixBot

      Add Comment

    5. HP Elitebook 820 G1 Keyboard Replacement: step 9, image 1 of 3 HP Elitebook 820 G1 Keyboard Replacement: step 9, image 2 of 3 HP Elitebook 820 G1 Keyboard Replacement: step 9, image 3 of 3
      • Flip up the connecting flap on each of the three ribbon cables.

      • The small cable on the last picture ist only there, if you have a backlit keyboard. If you want to replace a keyboard without backlight, there will be no cable on your original keyboard.

      Ask FixBot

      Add Comment

    6. HP Elitebook 820 G1 Keyboard Replacement: step 10, image 1 of 3 HP Elitebook 820 G1 Keyboard Replacement: step 10, image 2 of 3 HP Elitebook 820 G1 Keyboard Replacement: step 10, image 3 of 3
      • Remove each of the three cables by gently pulling them from their respective connectors.

      Ask FixBot

      Add Comment

    7. HP Elitebook 820 G1 Keyboard Replacement: step 11, image 1 of 1
      • Remove the keyboard from the housing.

      Ask FixBot

      Add Comment

Conclusion

To reassemble your device, follow these instructions in reverse order.

Cancel: I did not complete this guide.

6 other people completed this guide.

Lauren Vance

Member since: 10/31/18

442 Reputation

2 Guides authored

Team

IUPUI, Team S1-G2, Harley Fall 2018 Member of IUPUI, Team S1-G2, Harley Fall 2018

IUPUI-HARLEY-F18S1G2

2 Members

24 Guides authored

2 Guide Comments

Good guide. Thanks!

But you missed step 1. Remove two screws that hold the keyboard in place

Chris Maschmeier - Reply Share

@eth0wookiee do you mean is Step #5 ?

kardjo - Reply Share

Add Comment

View Statistics:

Past 24 Hours: 3

Past 7 Days: 15

Past 30 Days: 59

All Time: 12,426