
HP EliteBook 840 G5 SSD Storage Replacement

Lucas Martos-Repath and 6 other contributors
Last updated on Nov 15, 2022
Views: 33K
View statistics:
- Past 24 Hours:
- 5
- Past 7 Days:
- 55
- Past 30 Days:
- 223
- All Time:
- 32,585
Comments: 11
7 comments on steps, 4 guide comments.
Go to guide commentsCompleted: 8 9
8 people have marked this guide "completed." Will you be next?
9 people have marked this guide "completed." Including you — great job!
Favorites: 0 1
No one has favorited (and subscribed to) this guide. Will you be the first?
1 person has favorited (and subscribed to) this guide — and that's you!
Introduction
Go to step 1 ↓If you are experiencing difficulties with the functionality of the solid-state drive (SSD storage) in your HP Elitebook 840 G5, this guide will provide you with clear steps on replacing your SSD storage. The replacement only requires the listed screwdriver and plastic opening kit under the "Parts" category of this guide. While this replacement is relatively simple, proceed with caution as the entire backing of your computer will be removed leaving the internal electrical components exposed during the SSD replacement.
What you need
Fix Kit
This kit contains all the parts and tools needed to complete this guide.

Parts


Tools


-
-
-
Use a Phillips #1 screwdriver to undo the five screws. The top three screws are 10 mm and the two side screws are 7 mm.
-
Unscrew the bottom three screws using the same screwdriver.
 Ask FixBot
-
-
-
Turn computer so that the hinged side is facing up.
-
Use the plastic opening tool to pry open the back plate.
-
Drag the plastic opening tool along the edge from left to right and use a second opening tool to pry open the top right corner.
-
Repeat the 3rd step for the other side.
-
Repeat on Left and Right sides of the system. There are two points in the middle (on the left and right sides of the center screw) that will release with slight lifting pressure.
-
-
-
-
-
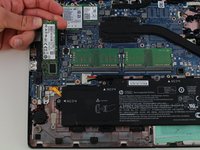
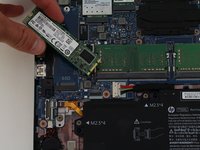
Using a Phillips #1 screwdriver, remove the single 2mm screw that holds the SSD storage in place.
-
-
-


To reassemble your device, follow these instructions in reverse order.
Cancel: I did not complete this guide.
8 other people completed this guide.

Team

Cal Poly, Team S25-G13, Maness Spring 2018 Member of Cal Poly, Team S25-G13, Maness Spring 2018
CPSU-MANESS-S18S25G13
4 Members
72 Guides authored
4 Guide Comments
This guide was very useful.
I have only one to-add: take care of the little SSD screw (at step 4), don’t let it fall to the motherboard. For me it gave a bit of spark and smell.
Before removing the SSD, should you not backup what's on that drive in order to reinstall it on the new SSD? Last question, can a replacement SSD be more than just 238 gb on this particular laptop?
Should also unplug the battery. Any M2.2280 should be fine.
