
HP 8 1401 Back Panel Replacement

Katie Presz and 2 other contributors
Last updated on Jun 27, 2019
Views: 558
View statistics:
- Past 24 Hours:
- 1
- Past 7 Days:
- 9
- Past 30 Days:
- 63
- All Time:
- 558
Comments: 0
No one has left comments on this guide. Will you be first?
Go to guide commentsCompleted: 0 1
No one has marked this guide "completed." Will you be the first?
1 person has marked this guide "completed." It's you — great job!
Favorites: 0 1
No one has favorited (and subscribed to) this guide. Will you be the first?
1 person has favorited (and subscribed to) this guide — and that's you!
Introduction
Go to step 1 ↓This guide is useful if you need to replace any of the parts inside the device. When moving the opening tool around the device, it might be necessary to pull a little to detach the two sides.
What you need
Tools


-
-
-
Using a Torx T4 screwdriver, remove the four 5 mm screws on the back panel.
 Ask FixBot
-
-
-
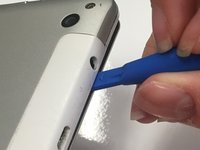
Insert the tip of a plastic opening tool in the seam between the front and back panels.
-
-
-
-
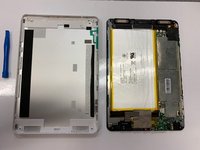
Slide the plastic opening tool around all edges of the device until the back panel detaches.
-
Lift off the back panel.
-
-


To reassemble your device, follow these instructions in reverse order. Align the front and back panels and press them together, then screw in the four screws.

Team

University of Alabama, Team S1-G1, Bedsole Spring 2019 Member of University of Alabama, Team S1-G1, Bedsole Spring 2019
UA-BEDSOLE-S19S1G1
4 Members
72 Guides authored
