
HP 15-g020dx Hard Drive Replacement

Yisong Zou and 4 other contributors
Last updated on Dec 31, 2019
Views: 1.9K
View statistics:
- Past 24 Hours:
- 2
- Past 7 Days:
- 11
- Past 30 Days:
- 77
- All Time:
- 1,882
Comments: 4
3 comments on steps, 1 guide comment.
Go to guide commentsCompleted: 3 4
3 people have marked this guide "completed." Will you be next?
4 people have marked this guide "completed." Including you — great job!
Favorites: 0 1
No one has favorited (and subscribed to) this guide. Will you be the first?
1 person has favorited (and subscribed to) this guide — and that's you!
Needs Better Images
Better photos will improve this guide. Help out by taking, editing, or uploading new ones!
Introduction
Go to step 1 ↓Does your hard-drive not have enough storage and you want to swap it for a larger storage hard-drive? Well, reading this guide will show how. To disassembly the hard-drive on this computer, it is very easy and will only take about 5 minutes. This guide helps you to replace the hard drive, which can also solve the problem that the computer is making too much noise.
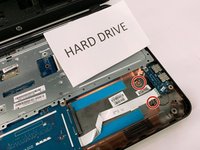
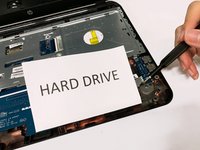
*The hard drive for this device is missing. We have substituted the drive with paper for demonstration. It should not be a problem for the reader to understand the steps, however, the specific measurements of hard drive screws have not been provided in this guide.
What you need
Tools


-
-
-
Flip the laptop over so that the bottom is facing you.
-
Slide the latch towards the center of the laptop so the unlock emblem appears.
 Ask FixBot
-
-
-
Place your finger on the left latch and slide it towards the center of the laptop to remove the battery.
-
-
-
-
-
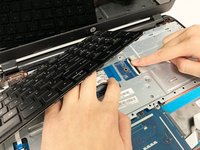
Take the keyboard and the section of the panel surrounding the keyboard apart.
-
-
-
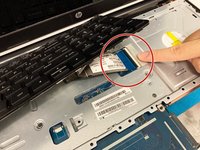
Lift the flip covering the connection port and remove the connecting strip to detach the keyboard from the motherboard.
-
-
-
-
-
Remove the two screws securing the hard drive to the device using the Phillips #0 screwdriver.
-
-





To reassemble your device, follow these instructions in reverse order.
Cancel: I did not complete this guide.
3 other people completed this guide.

Team

Duke University Pratt School of Engineering, Team S6-G4, Matos-Garner Fall 2019 Member of Duke University Pratt School of Engineering, Team S6-G4, Matos-Garner Fall 2019
DUKEPSE-MATOS-GARNER-F19S6G4
4 Members
60 Guides authored
1 Guide Comment
Be really careful when removing the top case, around the keyboard because there are a couple of really cheap ribbon cables. One connects the power button, another the trackpad. I have to buy a replacement cable and power button board now because I pulled the top case off too quickly and broke the connection at the power button board.
The plastic top case around the keyboard snaps onto the lower part of the case, with many, many tabs and doesn’t even need screws to stay together. You’ll have to wrestle with it, but don’t pull it too far from the lower case.
