
HP 15-ef1041nr Battery Replacement

Steve Bryjak and one other contributor
Last updated on Jun 15, 2026
Views: 348
View statistics:
- Past 24 Hours:
- 1
- Past 7 Days:
- 31
- Past 30 Days:
- 118
- All Time:
- 348
Comments: 0
No one has left comments on this guide. Will you be first?
Go to guide commentsCompleted: 0 1
No one has marked this guide "completed." Will you be the first?
1 person has marked this guide "completed." It's you — great job!
Favorites: 0 1
No one has favorited (and subscribed to) this guide. Will you be the first?
1 person has favorited (and subscribed to) this guide — and that's you!
Featured Student Guide
This guide has been the hard work of our awesome students and is found to be exceptionally cool by the iFixit staff.
Introduction
Go to step 1 ↓This guide shows how to replace the battery in the HP 15-ef1041nr laptop (HP 15-ef series) to restore proper power and portability. The battery supplies power when unplugged and may need replacement if the laptop won’t charge, drains quickly, or shuts down unexpectedly—see troubling shooting guide for confirmation. Before starting, power off and unplug the device, use ESD-safe practices, and disconnect the battery early to prevent damage. If the battery is swollen, handle it carefully and dispose of it at a proper e-waste facility.
What you need
Parts

Tools


-
-
-
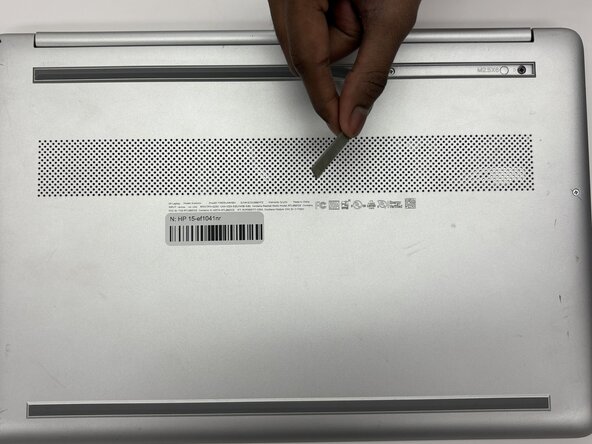
Use an opening tool to remove the two rubber feet on the lower case.
-
Place the rubber strips off to the side with the stickey side up.
 Ask FixBot
-
-
-
Use a Phillips #1 screwdriver to remove the following screws securing the lower case:
-
Six 2 mm x 6mm screws
-
Two 2.5 mm x 6 mm screws
-
-
-
Insert an iFixit opening tool into the seam betwen the keyboard area and bottom cover.
-
Using another iFixit opening tool, slide along the seam to unhook the clips.
-
Remove the lower case.
-
-
-
-
-
-
Remove the five 2 mm x 3 mm screws that secures the battery.
-
Use an opening tool to carefully lift the battery up.
-
At a 45 degree angle, pull the battery away from the motherboard.
-
-



To reassemble your device, follow the above steps in reverse order.
For optimal performance, after completing this guide, calibrate your newly installed battery.
Take your e-waste to an R2 or e-Stewards certified recycler.
Repair didn’t go as planned? Try some basic troubleshooting or ask our Answers community for help.

Team

Purdue University Northwest, Team 8-12, Dieterle Spring 2026 Member of Purdue University Northwest, Team 8-12, Dieterle Spring 2026
PNW-DIETERLE-S26S8G12
4 Members
72 Guides authored
