
HP 15-ba0709dx Hard Drive Replacement

Lydia Brown and 4 other contributors
Last updated on Jan 3, 2024
Views: 6.2K
View statistics:
- Past 24 Hours:
- 2
- Past 7 Days:
- 25
- Past 30 Days:
- 102
- All Time:
- 6,190
Comments: 1
1 guide comment.
Go to guide commentsCompleted: 5 6
5 people have marked this guide "completed." Will you be next?
6 people have marked this guide "completed." Including you — great job!
Favorites: 0 1
No one has favorited (and subscribed to) this guide. Will you be the first?
1 person has favorited (and subscribed to) this guide — and that's you!
Needs Better Images
Better photos will improve this guide. Help out by taking, editing, or uploading new ones!
Introduction
Go to step 1 ↓Follow this guide to replace the hard drive on HP 15-ba0709dx laptop. This repair may be needed if your computer is showing the symptoms such as freezing, slowing down, or corrupting files.
What you need
Tools


-
-
-
Flip the device over and locate the battery compartment.
-
Slide the battery release latch on the left and right side until the battery is detached from its slot.
-
A noticeable pop will be heard when the battery is fully released.
 Ask FixBot
-
-
-
-
-
Place the laptop on a clean, flat surface with the bottom side facing up.
-
-
-
Using a Phillips Head Screwdriver, remove the screws anchoring the bottom casing.
-
-
-
Locate the screws about 1 inch from the battery release tabs and use a Phillips Head Screwdriver to remove these screws.
-
-
-
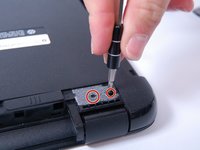
Locate the rubber friction pads on the top corners of the laptop. Pry the pads from the laptop and place them off to the side
-
Removing the friction pads will reveal two more anchoring screws.
-
-
-
-
-
-
Locate the square, blue hard drive
-
Unscrew the two screws holding it in place using a Philips screwdriver head, PH1. The screws will be 8 mm long with a 4 mm width head.
-
-









To reassemble your device, follow these instructions in reverse order.
Cancel: I did not complete this guide.
5 other people completed this guide.

Team

Texas Tech, Team S13-G3, Bennett Spring 2017 Member of Texas Tech, Team S13-G3, Bennett Spring 2017
TTU-BENNETT-S17S13G3
5 Members
60 Guides authored
