
HP 15-ay078nr Optical Drive Replacement

Bryce Getchell and 3 other contributors
Last updated on Dec 30, 2021
Views: 440
View statistics:
- Past 24 Hours:
- 1
- Past 7 Days:
- 20
- Past 30 Days:
- 67
- All Time:
- 440
Comments: 0
No one has left comments on this guide. Will you be first?
Go to guide commentsCompleted: 0 1
No one has marked this guide "completed." Will you be the first?
1 person has marked this guide "completed." It's you — great job!
Favorites: 0 1
No one has favorited (and subscribed to) this guide. Will you be the first?
1 person has favorited (and subscribed to) this guide — and that's you!
Introduction
Go to step 1 ↓The optical drive is how your HP 15-ay078nr laptop reads and writes to disks, like CDs or DVDs. This component is useful when playing a movie from a DVD, installing software from a CD, burning music to a CD, etc. The optical drive may need to be replaced if it will not eject disks, or can’t read/write to a disk. If the optical drive will not eject, ensure there is nothing stuck or jammed in the area, which could be preventing the action. If there is nothing noticeably jammed, further troubleshooting information about the optical drive can be found here to determine if it needs to be replaced.
Before you begin replacing the optical drive, make sure the device is powered off.
What you need
Tools


-
-
-
Orient the laptop so that the underside is facing up.
-
Rotate the device so that the CD slot is in the upper left corner.
 Ask FixBot
-
-
-
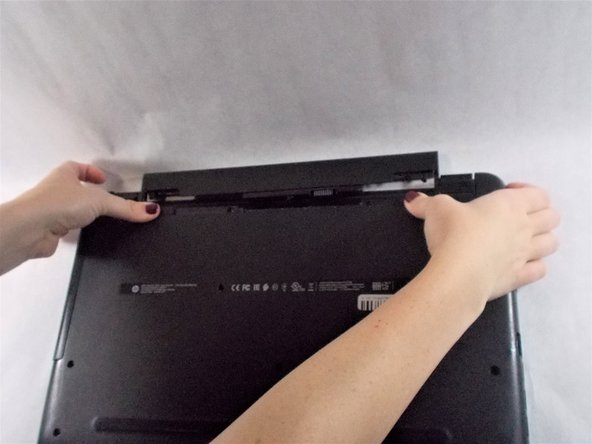
Using your fingers, push each battery latch simultaneously towards the middle.
-
Remove the battery from the laptop.
-
-
-
-
-
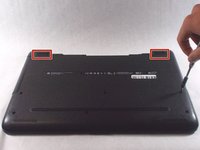
Pull off the two rubber feet on the underside of the device.
-
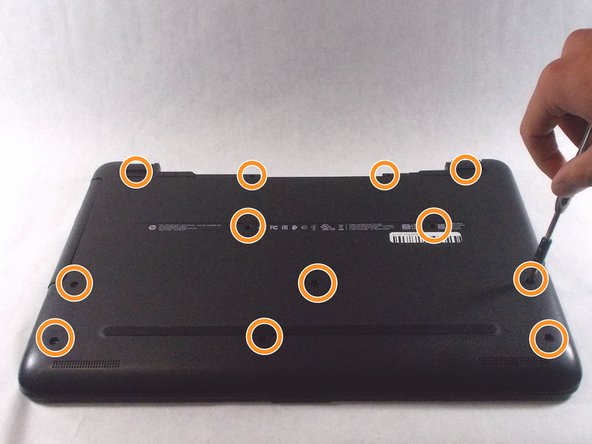
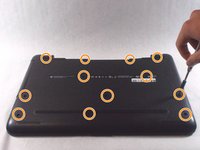
Remove the twelve 9.5 mm screws from the underside of the device using a Phillips #2 screwdriver.
-
-
-
Slide an opening pick around the edges between the back panel and the rest of the device to release the plastic retention clips that hold the panel in place.
-
-
-
-
-
-
Slide the optical drive outward through the cutout in the device back panel to remove it from the laptop.
-
-





To reassemble your device, follow these instructions in reverse order.

Team

UMass Dartmouth, Team 3-1, Sinclaire Fall 2021 Member of UMass Dartmouth, Team 3-1, Sinclaire Fall 2021
UMASSD-SINCLAIRE-F21S3G1
3 Members
84 Guides authored
