
Free Shipping on Domestic Orders $75+

HP 14-dq5043cl RAM Replacement

What you need

  1. HP 14-dq5043cl RAM Replacement, Lower Case: step 1, image 1 of 2 HP 14-dq5043cl RAM Replacement, Lower Case: step 1, image 2 of 2
    • For your safety, unplug all peripheries, discharge the battery below 25%, and power down your device before beginning disassembly.

    • Remove the two rubber feet on the lower case.

    • If you intend to reuse the rubber feet: Use a hairdryer or iOpener to lightly heat the feet to loosen the adhesive that secures them prior to removal. Take care not to stretch out the rubber.

  2. HP 14-dq5043cl RAM Replacement: step 2, image 1 of 1
    • Remove the six M2XL6 Phillips screws that secure the lower case.

  3. HP 14-dq5043cl RAM Replacement: step 3, image 1 of 3 HP 14-dq5043cl RAM Replacement: step 3, image 2 of 3 HP 14-dq5043cl RAM Replacement: step 3, image 3 of 3
    • Insert a nylon spudger into the seam between the lower case and chassis.

    • Pry around the entire perimeter until the lower case fully releases.

    • Remove the lower case.

  4. HP 14-dq5043cl RAM Replacement, RAM: step 4, image 1 of 3 HP 14-dq5043cl RAM Replacement, RAM: step 4, image 2 of 3 HP 14-dq5043cl RAM Replacement, RAM: step 4, image 3 of 3
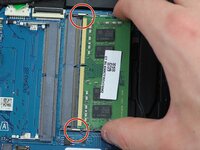
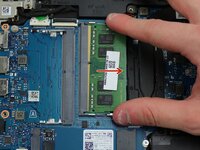
    • Two clips secure each RAM module in place, one on each side. Using your fingers, spread the clips away from the RAM module.

    • When released, the RAM modules will pop up at a slight angle.

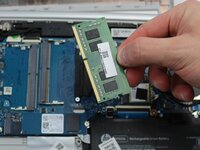
    • Slide the RAM module straight out to remove it.

Conclusion

To reassemble your device, follow the above steps in reverse order.
Take your e-waste to an R2 or e-Stewards certified recycler.
Repair didn’t go as planned? Try some basic troubleshooting or ask our Answers community for help.

Tristan Virgo

Member since: 02/19/25

543 Reputation

5 Guides authored

0 Guide Comments

Add Comment

View Statistics:

Past 24 Hours: 0

Past 7 Days: 1

Past 30 Days: 7

All Time: 155