
Free Shipping on Domestic Orders $75+

HP 14-dq0052dx Back Panel Replacement

What you need

  1. HP 14-dq0052dx Back Panel Replacement, Back Panel: step 1, image 1 of 1
    • Orient your laptop so that the vents are facing upwards.

  2. HP 14-dq0052dx Back Panel Replacement: step 2, image 1 of 1
    • Remove the rubber feet.

  3. HP 14-dq0052dx Back Panel Replacement: step 3, image 1 of 2 HP 14-dq0052dx Back Panel Replacement: step 3, image 2 of 2
    • Remove the four M2.0 x 6 mm screws using a JIS #1 screwdriver.

    • Remove the two M2.5 x 6 mm screws using a JIS #1 screwdriver.

    • Remove the two M2.0 x 4 mm screws using a JIS #1 screwdriver.

    • Use an iFixit opening tool to pry the back cover away from the laptop.

Conclusion

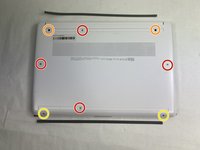
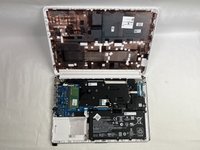
To reassemble your device, follow these instructions in reverse order.

Kristen Gismondi

Member since: 11/12/14

104,941 Reputation

266 Guides authored

Team

iFixit Member of iFixit

Staff

124 Members

25,088 Guides authored

0 Guide Comments

Add Comment

View Statistics:

Past 24 Hours: 2

Past 7 Days: 6

Past 30 Days: 54

All Time: 731