
GravityLight Dial Replacement

Michallynn Hoffman and 4 other contributors
Last updated on Jan 12, 2015
Views: 1.2K
View statistics:
- Past 24 Hours:
- 3
- Past 7 Days:
- 21
- Past 30 Days:
- 100
- All Time:
- 1,201
Comments: 0
No one has left comments on this guide. Will you be first?
Go to guide commentsCompleted: 0 1
No one has marked this guide "completed." Will you be the first?
1 person has marked this guide "completed." It's you — great job!
Favorites: 0 1
No one has favorited (and subscribed to) this guide. Will you be the first?
1 person has favorited (and subscribed to) this guide — and that's you!
Introduction
Go to step 1 ↓If the dial is stuck, then you will need to take the GravityLight apart to replace the dial. Also, you should replace the dial if you can turn it and the brightness does not change.
What you need
Tools

-
-
-
Flip the GravityLight on its back and place it on a sturdy surface.
-
Unscrew the three 2cm Phillips #00 screws on the back of the GravityLight’s body.
 Ask FixBot
-
-
-
Firmly grasp both parts of the GravityLight body and pull them apart.
-
-
-
-
-
Take the thinner of the two parts, the front piece, and place it face down on a sturdy surface.
-
-
-
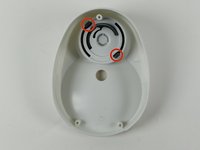
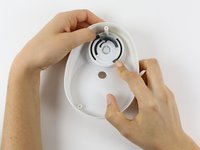
Use two hands to push the dial tabs inward, towards the center of the dial.
-
Push the tabs downward and through to the other side of the casing.
-
Flip the front panel over.
-
-
-



To reassemble your device, follow these instructions in reverse order.

Team

Cal Poly, Team 12-2, Forte Fall 2014 Member of Cal Poly, Team 12-2, Forte Fall 2014
CPSU-FORTE-F14S12G2
5 Members
84 Guides authored
