Free Shipping on Domestic Orders $75+

GoPro Hero 3 Silver Rear Housing Replacement

What you need

  1. GoPro Hero 3 Silver Rear Housing Replacement, Battery: step 1, image 1 of 2 GoPro Hero 3 Silver Rear Housing Replacement, Battery: step 1, image 2 of 2
    • Pull back on the tab on the back of GoPro to open the battery cover.

    Ask FixBot

    Add Comment

  2. GoPro Hero 3 Silver Rear Housing Replacement: step 2, image 1 of 1
    • Pull the battery out using the tab.

    Ask FixBot

    Add Comment

  3. GoPro Hero 3 Silver Rear Housing Replacement, Rear Housing: step 3, image 1 of 2 GoPro Hero 3 Silver Rear Housing Replacement, Rear Housing: step 3, image 2 of 2
    • Use the plastic opening tool to remove the faceplate.

    • There is some adhesive and clips so be careful and the faceplate should pop right off.

    Ask FixBot

    Add Comment

  4. GoPro Hero 3 Silver Rear Housing Replacement: step 4, image 1 of 2 GoPro Hero 3 Silver Rear Housing Replacement: step 4, image 2 of 2
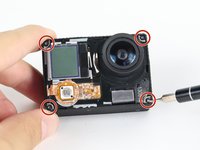
    • Now that the faceplate is off, it is time to remove the 4 screws on each corner.

    • Use the T4 tool bit from the iFixit toolkit in order to remove the 4 screws on each corner.

    Ask FixBot

    Add Comment

  5. GoPro Hero 3 Silver Rear Housing Replacement: step 5, image 1 of 2 GoPro Hero 3 Silver Rear Housing Replacement: step 5, image 2 of 2
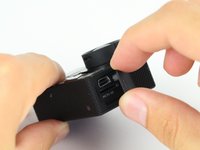
    • Note: Make sure you remove the door cover of the USB, mini HDMI, and SD port before. Separating the motherboard will be easier.

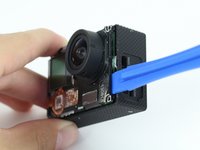
    • Using the plastic opening tool, slowly pry open the motherboard assembly.

    Ask FixBot

    Add Comment

  6. GoPro Hero 3 Silver Rear Housing Replacement: step 6, image 1 of 2 GoPro Hero 3 Silver Rear Housing Replacement: step 6, image 2 of 2
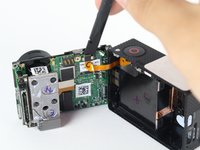
    • Use the spudger to gently pry off the connector of the housing to the motherboard.

    • You should now have the motherboard assembly and the housing separated.

    Ask FixBot

    Add Comment

  7. GoPro Hero 3 Silver Rear Housing Replacement: step 7, image 1 of 1
    • In order to replace the buttons. The entire housing has to be replaced.

    Ask FixBot

    Add Comment

Conclusion

To reassemble your device, follow these instructions in reverse order.

Cancel: I did not complete this guide.

One other person completed this guide.

Brian Alvarez

Member since: 04/02/15

1,439 Reputation

6 Guides authored

Team

Cal Poly, Team 24-7, Lancaster Spring 2015 Member of Cal Poly, Team 24-7, Lancaster Spring 2015

CPSU-LANCASTER-S15S24G7

3 Members

21 Guides authored

0 Guide Comments

Add Comment

View Statistics:

Past 24 Hours: 2

Past 7 Days: 4

Past 30 Days: 31

All Time: 2,830