
Gateway NE52214U Upper Case Replacement

Kelsey Rodrigues and 2 other contributors
Last updated on Dec 18, 2018
Views: 567
View statistics:
- Past 24 Hours:
- 2
- Past 7 Days:
- 17
- Past 30 Days:
- 57
- All Time:
- 567
Comments: 0
No one has left comments on this guide. Will you be first?
Go to guide commentsCompleted: 0 1
No one has marked this guide "completed." Will you be the first?
1 person has marked this guide "completed." It's you — great job!
Favorites: 0 1
No one has favorited (and subscribed to) this guide. Will you be the first?
1 person has favorited (and subscribed to) this guide — and that's you!
Introduction
Go to step 1 ↓Removing the upper case of the laptop is necessary if the case is significantly damaged since it is essentially to protecting the laptop's internal components. Upper case removal is also a necessary preliminary step for replacing many of these internal components. Remove battery before upper cover case.
What you need
Tools

-
-
-
Slide the tab to the left and hold the tab there.
-
While holding down the sliding tab, remove the battery from the device.
-
-
-
-
-
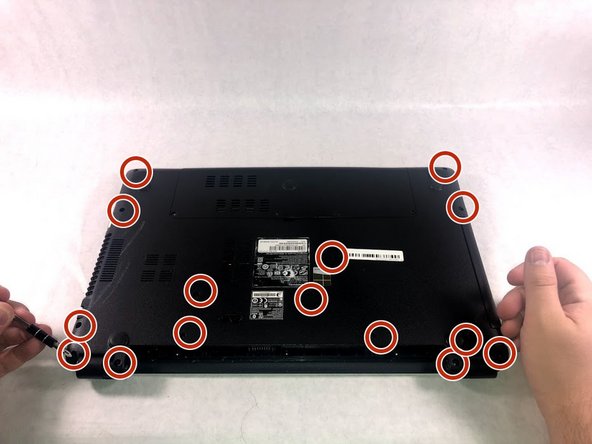
After removing the battery, remove 15 7mm screws using the Phillip #1 Screwdriver.
-
-
-
Lift the upper case cover off of the device. Use a prying tool along the edges if necessary.
-
-

 Ask FixBot




To reassemble your device, follow these instructions in reverse order.

Team

UMass Dartmouth, Team S1-G1, Simcock Fall 2018 Member of UMass Dartmouth, Team S1-G1, Simcock Fall 2018
UMASSD-SIMCOCK-F18S1G1
3 Members
60 Guides authored
