Introduction
If your controller's buttons are sticky or non-responsive and hindering play, then follow this replacement guide.
The buttons are a crucial part of a controller and are used to execute many actions in games. If broken, the buttons might feel sticky, loose, or even unresponsive.
Before using this guide, ensure that the buttons have been cleaned with rubbing alcohol wipes and that an air compressor is used to clean away any obstructions.
It is important to note that there are no official button kits for the GameSir X5 Lite, so any replacement will require 3D-printed parts or unofficial third-party buttons.
Before beginning, ensure that the GameSir X5 Lite is not connected to any device and is not being charged during the button replacement.
What you need
-
-
-
Use a Phillips #00 to remove the four 8 m screws on the back of the GameSir X5 Lite grips.
 Ask FixBot
-
-
-
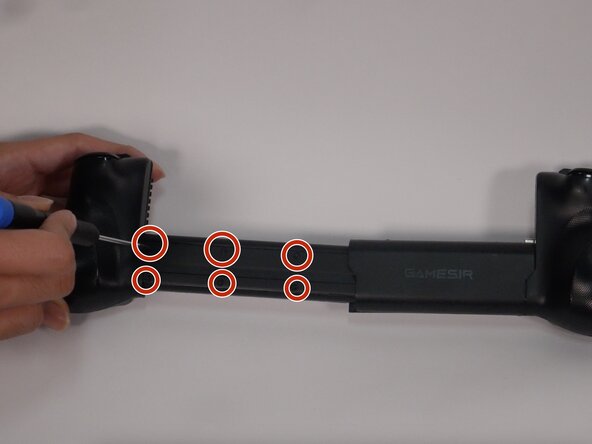
Extend the controller and remove the six 5 mm screws off the back of the extender using Phillips #00 screwdriver.
-
-
-
-
Insert an opening pick into the seam between the grips and the chassis pick to loosen the back cover to reach the end of the extender.
-
-
-
Pull the extender to reach the last two 5 ml screws using a Phillips #00 screwdriver.
-
Remove the last two 5 mm screws.
-
Remove the springs to separate the two sides of the controller by unscrewing the two 5 mm Phillips #00 screws.
-
-
-
Loosen the three 7 mm captive screws where the triggers are located using a Phillips 000 screwdriver, and remove one 7 ml screw that sits below the joystick.
-
-
-
Gently tilt the device over until the desired 1.14-inch buttons fall over, and replace them with your own.
-
-




To reassemble your device, follow the above steps in reverse order.
Take your e-waste to an R2 or e-Stewards certified recycler.
Repair didn’t go as planned? Try some basic troubleshooting or ask our Answers community for help.

Team

University of Texas at Arlington, Team 1-3, Aguilar Spring 2026 Member of University of Texas at Arlington, Team 1-3, Aguilar Spring 2026
UTA-AGUILAR-S26S1G3
4 Members
47 Guides authored
