Introduction
If the face buttons are damaged or not working, this guide will help you access and replace them. You will access the motherboard in the process and can also replace it if the controller is not working.
This guide requires a heat gun or hair dryer. For tips on using a heat gun safely and avoiding damage to your device, see this How to Use a Heat Gun to Soften Adhesive or the How to Use a Hair Dryer to Soften Adhesive guide.
Before you begin, power off the device and disconnect it from the charger.
What you need
-
-
Use a hair dryer or heat gun on the low setting to gently warm the center grip pad to soften the adhesive underneath.
-
Place the nozzle 2–3 inches above the device and keep moving it in small circles until the surface is warm and the adhesive has loosened.
 Ask FixBot
-
-
-
Insert the plastic opening tool into the edge of the center grip pad.
-
Once the edge is free, use your fingers to peel off the grip pad.
-
-
-
Use a Phillips #0 screwdriver to remove the three screws from the center front panel.
-
-
-
-
Remove nine screws from the motherboard using a Phillips #0 screwdriver.
-
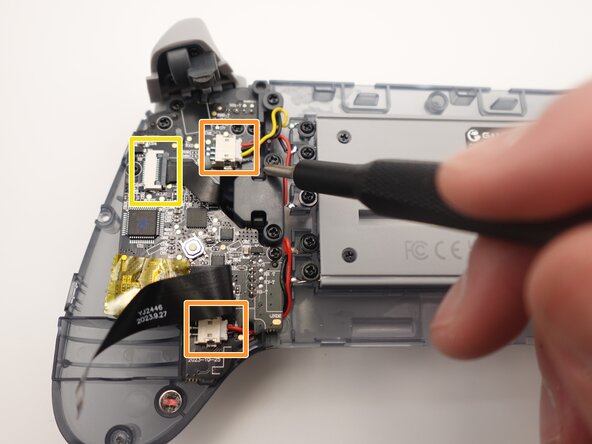
Squeeze the edges of the connector and pull it gently from its socket on the board.
-
Use a spudger or a clean fingernail to flip up the black locking flap—this is the unlocked position.
-
Use tweezers or your fingers to gently pull the cable from its socket.
-
-
-
Once the motherboard is removed from the area, you will have access to the face or action buttons.
-
Pull out the A, B, X, and Y buttons.
-


To reassemble your device, follow these instructions in reverse order. Take your e-waste to an R2 or e-Stewards certified recycler.

Team

UMass Dartmouth, Team 2-2, Bowman Fall 2025 Member of UMass Dartmouth, Team 2-2, Bowman Fall 2025
UMASSD-BOWMAN-F25S2G2
4 Members
5 Guides authored