Free Shipping on Domestic Orders $75+

Fujitsu Lifebook Stylistic Q584 MicroSD Card Replacement

What you need

    1. Fujitsu Lifebook Stylistic Q584 MicroSD Card Replacement, Back Case: step 1, image 1 of 1
      • Remove the white sticker covering the screws (if applicable).

      • Use the PH1 screwdriver to remove the four 2 mm screws from the the backside of the device.

      Ask FixBot

      Add Comment

    2. Fujitsu Lifebook Stylistic Q584 MicroSD Card Replacement: step 2, image 1 of 1
      • Insert the plastic opening tool along the seam of the back case.

      • Gently slide the plastic opening tool along the entire seam popping the clips free.

      Ask FixBot

      Add Comment

    3. Fujitsu Lifebook Stylistic Q584 MicroSD Card Replacement: step 3, image 1 of 1
      • Carefully lift the back case and remove the smartcard ribbon from the motherboard.

      Ask FixBot

      Add Comment

    1. Fujitsu Lifebook Stylistic Q584 MicroSD Card Replacement, Inner Back Shield: step 4, image 1 of 1
      • Remove the ten 3mm screws with a PH00 screwdriver from the shield.

      Ask FixBot

      Add Comment

    2. Fujitsu Lifebook Stylistic Q584 MicroSD Card Replacement: step 5, image 1 of 1
      • Remove the grey docking station port cover.

      Ask FixBot

      Add Comment

    3. Fujitsu Lifebook Stylistic Q584 MicroSD Card Replacement: step 6, image 1 of 1
      • Gently slide the plastic opening tool along the entire seam popping the clips free.

      Ask FixBot

      Add Comment

    4. Fujitsu Lifebook Stylistic Q584 MicroSD Card Replacement: step 7, image 1 of 1
      • Lift the shield away from the device and remove the fingerprint scanner's ribbon from the motherboard.

      Ask FixBot

      Add Comment

    1. Fujitsu Lifebook Stylistic Q584 MicroSD Card Replacement, Battery: step 8, image 1 of 1
      • Pull up the cord that connects the battery to the motherboard

      Ask FixBot

      Add Comment

    2. Fujitsu Lifebook Stylistic Q584 MicroSD Card Replacement: step 9, image 1 of 1
      • Remove seven 1mm screws using a PH00 screwdriver.

      Ask FixBot

      Add Comment

    3. Fujitsu Lifebook Stylistic Q584 MicroSD Card Replacement: step 10, image 1 of 1
      • Disconnect upper peripheral ribbons from motherboard.

      • Disconnect left peripheral ribbon from motherboard.

      Ask FixBot

      Add Comment

    4. Fujitsu Lifebook Stylistic Q584 MicroSD Card Replacement: step 11, image 1 of 1
      • Gently lift the battery from the casing.

      Ask FixBot

      Add Comment

    1. Fujitsu Lifebook Stylistic Q584 MicroSD Card Replacement, Motherboard: step 12, image 1 of 1
      • Remove three 3mm screws using a PH00 screwdriver.

      Ask FixBot

      Add Comment

    2. Fujitsu Lifebook Stylistic Q584 MicroSD Card Replacement: step 13, image 1 of 1
      • Remove all of the ribbon connector cables from the motherboard using an ESD-safe spudger.

      Ask FixBot

      Add Comment

    3. Fujitsu Lifebook Stylistic Q584 MicroSD Card Replacement: step 14, image 1 of 1
      • Gently pry up the motherboard.

      Ask FixBot

      Add Comment

    4. Fujitsu Lifebook Stylistic Q584 MicroSD Card Replacement: step 15, image 1 of 1
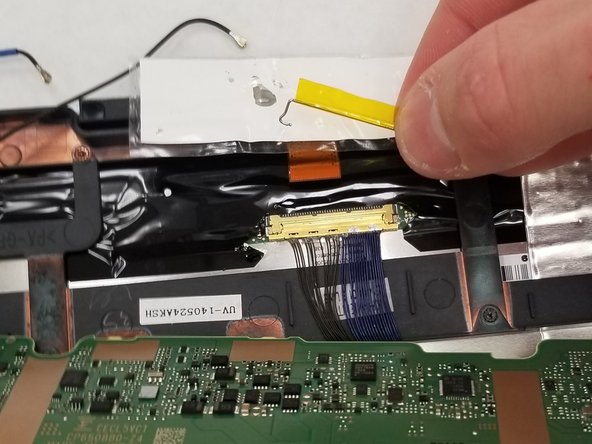
      • Gently lift the foil tape under the motherboard to reveal the connector.

      Ask FixBot

      Add Comment

    5. Fujitsu Lifebook Stylistic Q584 MicroSD Card Replacement: step 16, image 1 of 3 Fujitsu Lifebook Stylistic Q584 MicroSD Card Replacement: step 16, image 2 of 3 Fujitsu Lifebook Stylistic Q584 MicroSD Card Replacement: step 16, image 3 of 3
      • Remove the clip holding in the connector with an ESD-safe spudger.

      Ask FixBot

      Add Comment

    6. Fujitsu Lifebook Stylistic Q584 MicroSD Card Replacement: step 17, image 1 of 1
      • Remove the connector with an ESD-safe spudger.

      Ask FixBot

      Add Comment

    1. Fujitsu Lifebook Stylistic Q584 MicroSD Card Replacement, MicroSD Card: step 18, image 1 of 1
      • After removing the motherboard, use an ESD-safe spudger to pry up the MicroSD card from the slot.

      • Gently separate the MicroSD card from the device.

      Ask FixBot

      Add Comment

Conclusion

To reassemble your device, follow these instructions in reverse order.

Cancel: I did not complete this guide.

Casey

Member since: 03/25/19

283 Reputation

2 Guides authored

Team

IUPUI, Team S1-G1, Henning Spring 2019 Member of IUPUI, Team S1-G1, Henning Spring 2019

IUPUI-HENNING-S19S1G1

3 Members

9 Guides authored

1 Guide Comment

I have some OS problem can the SSD be replaced..?

Faiz Rahmathulla - Reply Share

Add Comment

View Statistics:

Past 24 Hours: 0

Past 7 Days: 7

Past 30 Days: 62

All Time: 959