
Flydigi Apex 4 Trigger Assembly Replacement

janavi and one other contributor
Last updated on Jun 10, 2026
Views: 648
View statistics:
- Past 24 Hours:
- 1
- Past 7 Days:
- 34
- Past 30 Days:
- 194
- All Time:
- 648
Comments: 0
No one has left comments on this guide. Will you be first?
Go to guide commentsCompleted: 0 1
No one has marked this guide "completed." Will you be the first?
1 person has marked this guide "completed." It's you — great job!
Favorites: 0 1
No one has favorited (and subscribed to) this guide. Will you be the first?
1 person has favorited (and subscribed to) this guide — and that's you!
Action Shots
Be an action hero! This guide needs images that better demonstrate how to perform specific actions.
Needs Better Images
Better photos will improve this guide. Help out by taking, editing, or uploading new ones!
Markup Mishap
This guide needs better markups. Help out by correcting or making some markup annotations.
Needs More Images
A few more images would make this guide's procedures crystal clear.
Introduction
Go to step 1 ↓The trigger assembly on the Flydigi Apex 4 is responsible for detecting analog input when the trigger is pressed. Over time, the trigger mechanism may wear out or become damaged, resulting in inconsistent inputs, a lack of response, or a trigger that feels physically loose. This guide will walk you through safely removing and replacing the trigger assembly. Before beginning the repair, ensure the controller is powered off and unplugged.
What you need
Tools
-
Spudger4.9
-
-


-
-
-
Ensure the controller is fully powered off before beginning.
-
Disconnect the USB-C cable if the controller is plugged in.
-
Remove any wireless adapter or dongle connected to your device.
 Ask FixBot
-
-
-
Remove the button caps and the magnetic faceplate of the controller.
-
Use a Phillips #00 screwdriver to remove the four screws securing the front of the controller to the frame.
-
-
-
Insert a plastic opening tool into the seam between the front and back shell along the bottom edge of the controller.
-
Gently run the opening tool along the seam to release the plastic clips holding the two halves together.
-
Work your way around all edges until the back shell is fully unclipped.
-
Carefully lift the back shell away from the front half and set it aside.
-
-
-
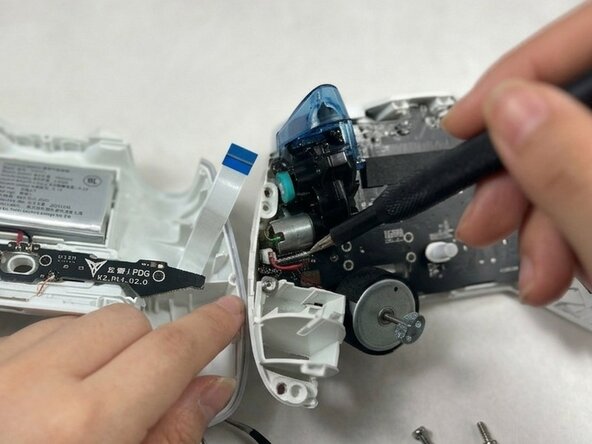
With the controller open, identify the trigger assembly on the side you are replacing.
-
-
-
-
Use a spudger or your fingernail to gently flip up the locking tab on the connector linking the trigger assembly to the main PCB.
-
Carefully pull the ribbon cable straight out of the connector.
-
-
-
Use a Phillips #00 screwdriver to remove the screws securing each trigger assembly.
-
Lift the trigger assembly straight up and out of the controller frame.
-
-




To reassemble your device, follow these instructions in reverse order. Take your e-waste to an R2 or e-Stewards certified recycler.

Team

UMass Dartmouth, Team 3-1, Shaddix Spring 2026 Member of UMass Dartmouth, Team 3-1, Shaddix Spring 2026
UMASSD-SHADDIX-S26S3G1
3 Members
24 Guides authored
