Free Shipping on Domestic Orders $75+

Fluorescent Light Ballast Replacement

What you need

  1. Fluorescent Light Ballast Replacement, Ballast: step 1, image 1 of 2 Fluorescent Light Ballast Replacement, Ballast: step 1, image 2 of 2
    • Shock Hazard. Before starting this procedure, make sure the room's circuit breaker is in the OFF position.

    • Turn off the light switch.

    • Remove light fixture cover according to the manufacturer's instruction guide.

    Ask FixBot

    Add Comment

  2. Fluorescent Light Ballast Replacement: step 2, image 1 of 1
    • Burn Hazard. Light bulbs may be hot. If light bulbs were turned on, wait at least 10 minutes before proceeding.

    • Remove the light bulbs by gently twisting each bulb counterclockwise.

    • Remove the light bulb from the light bulb socket.

    Ask FixBot

    Add Comment

  3. Fluorescent Light Ballast Replacement: step 3, image 1 of 3 Fluorescent Light Ballast Replacement: step 3, image 2 of 3 Fluorescent Light Ballast Replacement: step 3, image 3 of 3
    • Remove center cover to expose the wiring and ballast components.

    Ask FixBot

    Add Comment

  4. Fluorescent Light Ballast Replacement: step 4, image 1 of 3 Fluorescent Light Ballast Replacement: step 4, image 2 of 3 Fluorescent Light Ballast Replacement: step 4, image 3 of 3
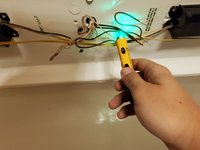
    • Shock Hazard. Check the fixture for voltage using the non-contact voltage reader according to the device’s instructions.

    • Shock Hazard. After removing wire nuts, do not touch the bare wires.

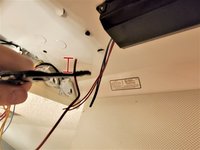
    • Remove wire nut by twisting it counterclockwise from the hot side (black or red wire) and the neutral side (white wire). Do not untwist wires.

    Ask FixBot

    Add Comment

  5. Fluorescent Light Ballast Replacement: step 5, image 1 of 2 Fluorescent Light Ballast Replacement: step 5, image 2 of 2
    • Make sure both measure wires are not touching anything else at bare portion.

    • Multimeter should measure at 0 volts.

    • Place the red lead on the bare metal of the black or red wire.

    • Place the black lead on the bare metal of the white wire.

    Ask FixBot

    Add Comment

  6. Fluorescent Light Ballast Replacement: step 6, image 1 of 1
    • Switch room's circuit breaker to ON position.

    • Turn light switch on and repeat step 5.

    • Shock Hazard. Electricity should now running through wires. Only touch wires with multimeter leads.

    • Make sure multimeter reads between 110-125 volts.

    • If the measured voltage is not between 110-125 volts, do not continue. Contact a qualified electrician for further service.

    • Turn off light switch.

    • Change room's circuit breaker to OFF position.

    Ask FixBot

    Add Comment

  7. Fluorescent Light Ballast Replacement: step 7, image 1 of 1
    • Take note of wire placement or take a picture of the entire fixture to later reference when reconnecting wiring.

    Ask FixBot

    Add Comment

  8. Fluorescent Light Ballast Replacement: step 8, image 1 of 1
    • Shock Hazard. Check the fixture for voltage using the non-contact voltage reader according to the device’s instructions.

    Ask FixBot

    Add Comment

  9. Fluorescent Light Ballast Replacement: step 9, image 1 of 1
    • Take a picture of the ballast's data plate or take note of the information on the data plate to make sure you have the correct replacement part.

    Ask FixBot

    Add Comment

  10. Fluorescent Light Ballast Replacement: step 10, image 1 of 2 Fluorescent Light Ballast Replacement: step 10, image 2 of 2
    • Disconnect all wires from the ballast.

    • Use a screwdriver to remove the ballast from the light fixture.

    • If necessary, cut the wires close to the ballast. The cut wires can be re-used later.

    Ask FixBot

    Add Comment

  11. Fluorescent Light Ballast Replacement: step 11, image 1 of 3 Fluorescent Light Ballast Replacement: step 11, image 2 of 3 Fluorescent Light Ballast Replacement: step 11, image 3 of 3
    • Use a screwdriver to install the new ballast to the light fixture.

    • Ballast packaging may have a wiring diagram or may be on the ballast itself.

    • Make sure you strip all wire ends with a wire stripper and use ANSI approved wire nuts on all wired connections.

    • Reconnect all wires according to your notes or picture, add wire nuts to bare wire ends and twisting clockwise.

    Ask FixBot

    Add Comment

    • Attach center cover over the wiring and ballast components.

    Ask FixBot

    Add Comment

    • Screw in light bulb by placing a light bulb in light bulb socket.

    • Gently twist light bulb clockwise until light bulb is firmly in place.

    • Repeat until all light bulbs are firmly in place.

    Ask FixBot

    Add Comment

    • Attach light fixture cover over light bulbs according to manufacturer's instruction guide.

    • Move the room's circuit breaker back to ON position.

    • Turn light switch on to make sure the light works.

    Ask FixBot

    Add Comment

Conclusion

Put the fixture back together by reversing the steps 1-3. Test the light to make sure it works. If it still does not function, contact a qualified electrician.

Cancel: I did not complete this guide.

One other person completed this guide.

0 Guide Comments

Add Comment

View Statistics:

Past 24 Hours: 8

Past 7 Days: 35

Past 30 Days: 145

All Time: 7,524