Free Shipping on Domestic Orders $75+

Fast Fix Screen Replacement

What you need

    1. Fast Fix Screen Replacement, Screen: step 1, image 1 of 3 Fast Fix Screen Replacement, Screen: step 1, image 2 of 3 Fast Fix Screen Replacement, Screen: step 1, image 3 of 3
      • Slide both battery latches to release cover.

      • Remove battery.

      Ask FixBot

      Add Comment

    2. Fast Fix Screen Replacement: step 2, image 1 of 2 Fast Fix Screen Replacement: step 2, image 2 of 2
      • Remove the M2.5 X 5mm phillips screw for the CD drive.

      • Remove the CD drive.

      Ask FixBot

      Add Comment

    3. Fast Fix Screen Replacement: step 3, image 1 of 2 Fast Fix Screen Replacement: step 3, image 2 of 2
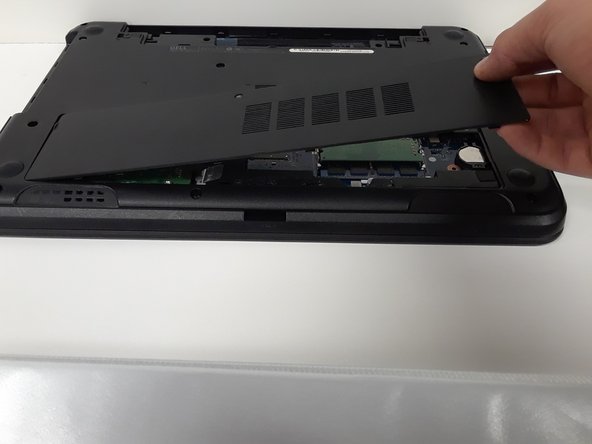
      • Loosen 2 screws on access door.

      • They cannot be removed

      • Remove the access door.

      Ask FixBot

      Add Comment

    4. Fast Fix Screen Replacement: step 4, image 1 of 1
      • Remove 12 M2.5 X 5MM Phillips bottom palm rest screws.

      Ask FixBot

      Add Comment

    5. Fast Fix Screen Replacement: step 5, image 1 of 3 Fast Fix Screen Replacement: step 5, image 2 of 3 Fast Fix Screen Replacement: step 5, image 3 of 3
      • Use a small screwdriver to press in the keyboard latches.

      • Remove the keyboard.

      • Unplug the keyboard cable at the ZIF connection.

      Ask FixBot

      Add Comment

    6. Fast Fix Screen Replacement: step 6, image 1 of 3 Fast Fix Screen Replacement: step 6, image 2 of 3 Fast Fix Screen Replacement: step 6, image 3 of 3
      • Remove the palm-rest cable by releasing the ZIF latch and pulling the wire out.

      • Remove 5 M2.5 X 5mm Phillips and 2 M2 X 3mm Phillips palm-rest screws.

      Ask FixBot

      Add Comment

    7. Fast Fix Screen Replacement: step 7, image 1 of 1
      • Use a small flat screwdriver to pry the palm-rest off of the computer.

      Ask FixBot

      Add Comment

    8. Fast Fix Screen Replacement: step 8, image 1 of 3 Fast Fix Screen Replacement: step 8, image 2 of 3 Fast Fix Screen Replacement: step 8, image 3 of 3
      • Remove the wireless antenna

      • Remove the LCD cable

      Ask FixBot

      Add Comment

    9. Fast Fix Screen Replacement: step 9, image 1 of 1
      • Remove the 1 M2.5 x 5mm Phillips left hinge screw and 2 M2.5 x 5mm Phillips right hinge screw.

      Ask FixBot

      Add Comment

    10. Fast Fix Screen Replacement: step 10, image 1 of 1
      • Pry off the LCD bevel using a small flat screwdriver.

      Ask FixBot

      Add Comment

    11. Fast Fix Screen Replacement: step 11, image 1 of 1
      • Remove the 4 M2 X 3mm Philips LCD screws.

      Ask FixBot

      Add Comment

    12. Fast Fix Screen Replacement: step 12, image 1 of 2 Fast Fix Screen Replacement: step 12, image 2 of 2
      • Unplug the screen cable and remove the screen.

      Ask FixBot

      Add Comment

Conclusion

To reassemble your device, follow these instructions in reverse order.

Cancel: I did not complete this guide.

5 other people completed this guide.

Carl Kangas

Member since: 10/01/17

236 Reputation

1 Guide authored

Team

2 Guide Comments

Hello good day, I have a question, I have managed to replace the screen and the computer started the first time without problems, but after I started it again the computer did not turn on the screen again, will you have any possible solution?

vikingo1ero - Reply Share

Hi, Did you ever fix this problem? I'm having the same issue.

Chris Terry - Reply Share

Add Comment

View Statistics:

Past 24 Hours: 1

Past 7 Days: 13

Past 30 Days: 65

All Time: 3,697