
Evercade EXP Battery Replacement

Ariana Travis and 3 other contributors
Last updated on Jun 19, 2026
Views: 689
View statistics:
- Past 24 Hours:
- 12
- Past 7 Days:
- 59
- Past 30 Days:
- 188
- All Time:
- 689
Comments: 0
No one has left comments on this guide. Will you be first?
Go to guide commentsCompleted: 0 1
No one has marked this guide "completed." Will you be the first?
1 person has marked this guide "completed." It's you — great job!
Favorites: 0 1
No one has favorited (and subscribed to) this guide. Will you be the first?
1 person has favorited (and subscribed to) this guide — and that's you!
Missing Steps
Oops! This guide is currently missing one or more important steps.
Featured Student Guide
This guide has been the hard work of our awesome students and is found to be exceptionally cool by the iFixit staff.
Introduction
Go to step 1 ↓If your Evercade EXP (model FG-HHEX-HHC-USA) is no longer holding a charge, powering on intermittently, or shutting down unexpectedly, the internal battery may be worn out or faulty. This guide will walk you through the steps required to safely remove and replace the battery in your device.
Before beginning, make sure the device is powered off and disconnected from any charging cables. Ensure the work environment is a clean, static-free environment and use the proper tools to avoid damaging internal components. Be cautious when handling the battery, as puncturing or bending it can be hazardous.
If you are unsure whether the battery is the issue, consider checking basic troubleshooting steps such as trying a different charging cable or power source before proceeding with replacement.
What you need
Tools


-
-
-
Lay the device on a flat surface, with the screen facing the sufrace.
-
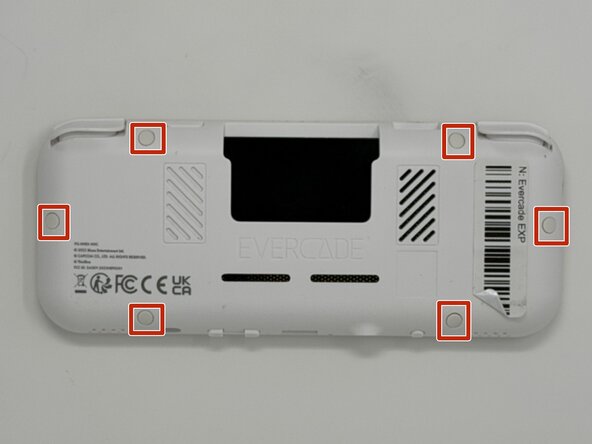
Using angled tweezers, remove the six rubber screw covers from the sockets.
 Ask FixBot
-
-
-
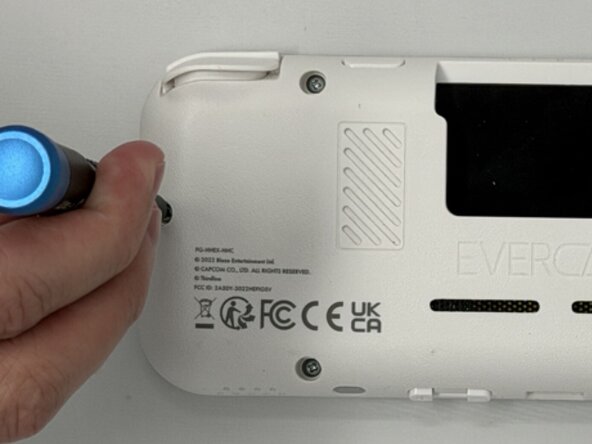
Using a Phillips #00 screwdriver, remove the six 8 mm screws on the lower case.
-
-
-
Flip the device so the screen is facing you.
-
Four hidden retaining clips hold the pieces together even near each corner of the screen.
-
Insert a Jimmy into the seam located between the faceplate and the shell.
-
Move the a Jimmy toward the screen until you find the first clasp. Move the handle of the jimmy tool up to pop the faceplate free from the clasp.
-
Repeat until for each of the four clasps to fully release the faceplate from the shell.
-
-
-
Flip the faceplate away from the shell carefully. The faceplate is still connected to the motherboard via a ribbon cable.
-
Flip up the locking flap securing the display ribbon cable, then use tweezers to disconnect the ribbon cable.
-
-
-
-
-
Use a Phillips #00 screwdriver to remove all ten 8 mm screws securing the motherboard.
-
-
-
Using angled tweezers, gently lift both speakers from the cavities they rest in.
-
-
-
-
Flip the motherboard to the outside of the console.
-
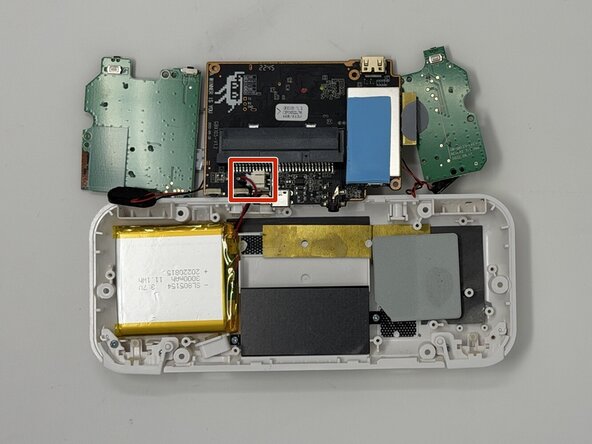
Remove the connector from the socket attached to the motherboard. The piece is held in place near the back of the socket. Apply downward pressure while pulling out to make the removal easier.
-
-
-
-
-
Use a hair dryer or a heat gun on low to apply heat to the back of the case while gently prying the battery out with an opening tool.
-
Set the battery aside for recycling.
-
-






To reassemble your device, follow the above steps in reverse order.
For optimal performance, after completing this guide, calibrate your newly installed battery.
Take your e-waste to an R2 or e-Stewards certified recycler.
Repair didn’t go as planned? Try some basic troubleshooting or ask our Answers community for help.

Team

Utah Tech University, Team 1-6, McMurrin Spring 2026 Member of Utah Tech University, Team 1-6, McMurrin Spring 2026
UTAHTECH-MCMURRIN-S26S1G6
3 Members
84 Guides authored
