
DualSense Controller v2 Middle Trim Replacement

Sam Omiotek and one other contributor
Last updated on Jul 15, 2025
Views: 2.6K
View statistics:
- Past 24 Hours:
- 6
- Past 7 Days:
- 34
- Past 30 Days:
- 148
- All Time:
- 2,598
Comments: 0
No one has left comments on this guide. Will you be first?
Go to guide commentsCompleted: 5 6
5 people have marked this guide "completed." Will you be next?
6 people have marked this guide "completed." Including you — great job!
Favorites: 0 1
No one has favorited (and subscribed to) this guide. Will you be the first?
1 person has favorited (and subscribed to) this guide — and that's you!
Introduction
Go to step 1 ↓Follow this guide to replace the middle trim piece on your Sony DualSense controller.
Note: This guide is for current DualSense controllers with FCC IDs that end with A. Check the back of your controller to verify your model. If yours ends in a 1, it is an early model and there will be internal differences. Follow these guides for the earlier version.
What you need
Tools

-
-
-
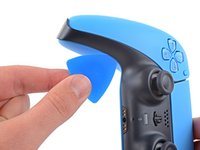
Insert an opening pick underneath the middle trim at the bottom-right corner of the controller to release the clips securing it to the case.
 Ask FixBot
-
-
-
Slide the opening pick along the lower-right edge of the middle trim to release the clips securing it to the case.
-
-
-
Insert an opening pick underneath the middle trim at the bottom-left corner of the controller to release the clips securing it to the case.
-
-
-
Slide the opening pick along the lower-left edge of the middle trim to release the clips securing it to the case.
-
-
-
-
Use your fingers to lift up the bottom edge of the middle trim to release the remaining clips.
-
Lift the middle trim over the joysticks to remove it.
-
-














To reassemble your device, follow these instructions in reverse order.
Take your e-waste to an R2 or e-Stewards certified recycler.
Repair didn’t go as planned? Try some basic troubleshooting, or ask our Answers community for help.
Cancel: I did not complete this guide.
5 other people completed this guide.

