This translation was generated by a machine and has not been reviewed by a person yet. Speak this language? Review it.
-
-
-
Ideally, you would use a screwdriver with removable driver bits, as the laptop has screws of different sizes.
 Ask FixBot
-
-
-
Then we will have to unscrew a screw near the Wi-Fi card location.
-
We turn the laptop over and on the back of the underside we see two tabs, the first (red arrow #1) unlocks the dead battery, slide it toward the front as indicated. The second (red arrow #2) slides toward the opposite side.
-
-
-
We must remove the lid to continue disassembly of the other components.
-
First we must unscrew and remove all the screws indicated by the red circles. (keep careful track of which screws go where throughout the disassembly to make reassembly easier. you might wish to tape them to the lid so they aren't lost or confused with others for example. With the screws out, the lid should now pull off.
-
-
-
With the lid open, we will remove the cooling fan from the laptop.
-
First of we will disconnect the lead from the cooling fan to the PCB. the red rectangle #1
-
After that we'll unscrew the 3 screws securing it; in the photo indicated by the red line/circles #2.
-
-
-
This part about cleaning the cooling fan is optional, but recommended.
-
To do this, take the fan we just took out and remove the 4 smaller screws indicated by the red circles. Pry open the cover and clean it, for example, with a toothbrush.
-
-
-
After removing the cooling fan, proceed to remove the heatsink.
-
To begin, we will unscrew the 4 screws, circled in red, that are securing it in place.
-
Lifting carefully and pulling gently toward the opposite side of the laptop at the 'top' in this photo. (we are pulling the radiating fins on the other end of the heatsink assembly out of their housing and do not want to damage or bend the fins.) Aixecar, by the way, means to "lift" in this case.
-
-
-
We have come to one of the most delicate parts, removing the processor.
-
It is not difficult, but you must do it carefully. Using a flat blade screwdriver will turn the black screw/latch 1/2 turn so the black "tip" that both indicates "Locked/Unlocked" and keeps it from turning to far in either direction now points to the Unlocked side. (The small open and closed locks to either side).
-
Grasp it with your fingers on the sides and very carefully lift it out.
-
-
-
Now is the RAM's turn.
-
To remove the memory we push the white tabs as indicated by the arrows simultaneously to release the latch mechanisms. Translator's note: Be as gentle as you can with all the plastic latches and connectors. This is an old machine and the plastic becomes inelastic and brittle wit age.
-
When you open the latches as indicated, the RAM sticks will 'pop up' a bit and be easy to grasp and remove from their diagonal position.
-
-
-
-
As the title says, we will now remove the Wi-Fi card from the laptop.
-
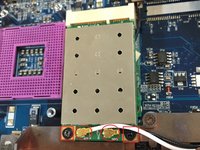
The first step is to disconnect the 2 antenna leads (black and white) that are connected to it (red circles). Then unscrew the 2 screws (red squares).
-
The Wi-fi card will do the same thing the RAM did, 'popping up to rest at an angle and all you have to do is pick it up and set it aside.
-
-
-
Let's remove the keyboard.
-
We will use a flat blade screwdriver and we will do the same movement as in the photo, being very careful not to break it. (translator note: prying with a thinner tool if necessary farther out to the side will be less likely to damage the keyboard)
-
-
-
We have almost finished the teardown; the next-to-last step is to remove the hard drive.
-
To do this, turn the laptop over and remove 2 screws.
-
Upon opening the cover, you will find a space reserved for the hard drive; inside, you must remove another 2 screws.
-
Once they are removed, slide it to the left and take it out.
-
-
-
Finally, the last step of the disassembly is to remove the DVD / CD ROM reader.
-
Next to where we removed the Wi-Fi card we will find this screw which we will must unscrew it and push down.
-
-
-
We begin the assembly by installing the DVD / CD ROM reader.
-
It's not too complicated, we take the reader and put it in its proper location.
-
Then we replace the screw near the Wi-Fi card's spot.
-
-
-
Let's go with the hard drive.
-
We put the hard drive in place and we slide it in the direction of the red arrow. (Back into the SATA connector). Then replace the two screws (red circles).
-
Finally, place the cover and the two screws (red circles).
-
-
-
We will install the keyboard.
-
Take the keyboard and replace it ensuring all the tabs are inserted correctly.
-
-
-
It's the Wi-fi card's turn.
-
First, set it in place, then replace the 2 screws and then reconnect the 2 antenna leads (black and white). (Translator's note: center them then press carefully downward, DO NOT use excessive force, instead rely on repositioning and trying again)
-
-
-
Now it's time to mount the RAM stick.
-
Like with the Wi-Fi card we will do the same procedure, put the RAM stick in place (making sure it is sitting as far into the socket as it can) then just press down a little and it will make a "click", this means it has been installed correctly.
-
-
-
We return to one of the most fragile and delicate components, the processor.
-
Let's handle the processor very carefully by the sides without damaging the pins. We look for the triangle that indicates it goes in the upper right corner.
-
Once in place, use a flat blade screwdriver and turn it a full turn counter-clockwise so that it is properly locked.
-
-
-
After installing the processor is the turn of the heatsink which goes on top of the processor.
-
We place it correctly being very careful not to damage it.
-
Once placed, screw the 4 screws. (Personally, I'd add some thermal grease first, but I'm only translating... mostly)
-
-
-
We're almost finished, let's go with the fan.
-
Put the fan in its proper place.
-
Connect the fan leads to the motherboard.
-
Replace the 3 screws.
-
-
-
The penultimate step, the protective cover.
-
Replace the cover.
-
Ensure that all the tabs are correctly positioned without breaking them.
-
Replace the screws... (But literally it says to screw it.)
-
-
-
Finally, the battery to power the laptop.
-
Replace the battery.
-
Return the latch sliders to the original positions. (as in the photo)
-
-




To reassemble your device, follow these instructions in reverse order.
Cancel: I did not complete this guide.
2 other people completed this guide.
Special thanks to these translators:
100%


These translators are helping us fix the world! Want to contribute?
Start translating ›

