Free Shipping on Domestic Orders $75+

Disassembling Olympus Pen E-PL7

What you need

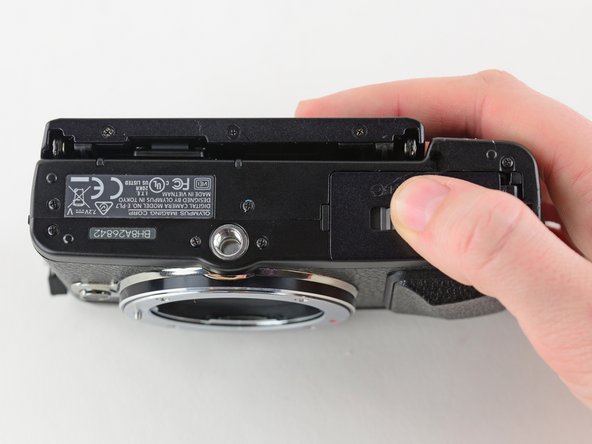
    1. Disassembling Olympus Pen E-PL7, Battery: step 1, image 1 of 2 Disassembling Olympus Pen E-PL7, Battery: step 1, image 2 of 2
      • Turn the camera upside down.

      • Push the grey tab to the right to open the battery compartment.

      • Pull out the battery.

      • The battery is not shown in these photos.

      Ask FixBot

      Add Comment

    1. Disassembling Olympus Pen E-PL7, Back Case: step 2, image 1 of 1
      • Use a Phillips #00 screwdriver to remove the six 2 mm screws on the bottom of the camera.

      Ask FixBot

      Add Comment

    2. Disassembling Olympus Pen E-PL7: step 3, image 1 of 1
      • Remove the two 4 mm reverse threaded Phillips screws from the bottom of the camera.

      • Reverse threaded screws tighten counter clockwise and loosen clockwise.

      Ask FixBot

      Add Comment

    3. Disassembling Olympus Pen E-PL7: step 4, image 1 of 1
      • Remove the two 4 mm Phillips screws under the HDMI port cover.

      Ask FixBot

      Add Comment

    4. Disassembling Olympus Pen E-PL7: step 5, image 1 of 1
      • Use a Phillips #00 screwdriver to remove the 5 mm screw near the left hand grip.

      Ask FixBot

      Add Comment

    5. Disassembling Olympus Pen E-PL7: step 6, image 1 of 1
      • Use a Phillips #00 screwdriver to remove the 5 mm screw near the right hand grip.

      Ask FixBot

      Add Comment

    6. Disassembling Olympus Pen E-PL7: step 7, image 1 of 1
      • Flip open the LCD.

      • Use a Phillips #00 screwdriver to remove the 2 mm screw beneath the LCD assembly.

      Ask FixBot

      Add Comment

    7. Disassembling Olympus Pen E-PL7: step 8, image 1 of 1
      • Use a Phillips #00 screwdriver to remove the four 6.3 mm screws from the lens mount.

      Ask FixBot

      Add Comment

    8. Disassembling Olympus Pen E-PL7: step 9, image 1 of 1
      Tool used on this step:
      Tweezers
      $4.99
      Buy
      Ask FixBot

      Add Comment

    9. Disassembling Olympus Pen E-PL7: step 10, image 1 of 1
      • Use tweezers to remove the inner metal ring.

      Ask FixBot

      Add Comment

    10. Disassembling Olympus Pen E-PL7: step 11, image 1 of 2 Disassembling Olympus Pen E-PL7: step 11, image 2 of 2
      • Use tweezers to remove the two springs lying beneath the inner metal ring.

      Ask FixBot

      Add Comment

    11. Disassembling Olympus Pen E-PL7: step 12, image 1 of 1
      • Use a Phillips #00 screwdriver to remove the three 5 mm screws.

      Ask FixBot

      Add Comment

    12. Disassembling Olympus Pen E-PL7: step 13, image 1 of 1
      • Remove the two 4 mm Phillips screws.

      Ask FixBot

      Add Comment

    13. Disassembling Olympus Pen E-PL7: step 14, image 1 of 3 Disassembling Olympus Pen E-PL7: step 14, image 2 of 3 Disassembling Olympus Pen E-PL7: step 14, image 3 of 3
      • Press and hold the lens release button while using tweezers to remove the lens hook.

      • Use tweezers to remove the spring underneath the lens hook.

      Ask FixBot

      Add Comment

    14. Disassembling Olympus Pen E-PL7: step 15, image 1 of 3 Disassembling Olympus Pen E-PL7: step 15, image 2 of 3 Disassembling Olympus Pen E-PL7: step 15, image 3 of 3
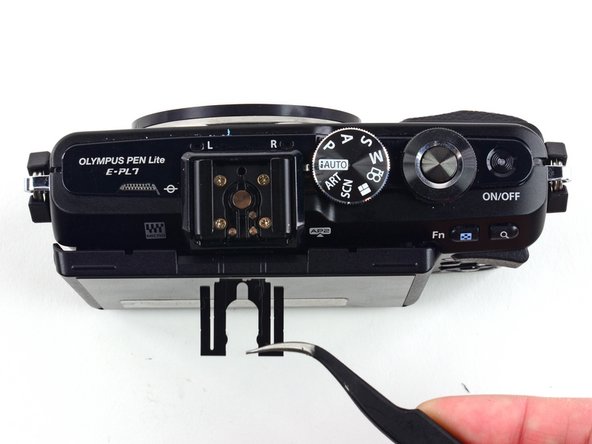
      • Use tweezers to remove the metal clip from the external flash mount.

      Ask FixBot

      Add Comment

    15. Disassembling Olympus Pen E-PL7: step 16, image 1 of 1
      • Use a Phillips #00 screwdriver to remove the four 4 mm screws from the external flash port.

      Ask FixBot

      Add Comment

    16. Disassembling Olympus Pen E-PL7: step 17, image 1 of 2 Disassembling Olympus Pen E-PL7: step 17, image 2 of 2
      • Remove the second external flash clip with tweezers.

      Ask FixBot

      Add Comment

    17. Disassembling Olympus Pen E-PL7: step 18, image 1 of 2 Disassembling Olympus Pen E-PL7: step 18, image 2 of 2
      • Remove the external flash port casing to expose five more screws.

      Ask FixBot

      Add Comment

    18. Disassembling Olympus Pen E-PL7: step 19, image 1 of 1
      • Use a Phillips #00 screwdriver to remove the two 6.4 mm screws.

      • Remove the 2 mm Phillips screw.

      Ask FixBot

      Add Comment

    19. Disassembling Olympus Pen E-PL7: step 20, image 1 of 1
      • Remove the two 3.8 mm Phillips screws from the sides of the external flash connector.

      Ask FixBot

      Add Comment

    20. Disassembling Olympus Pen E-PL7: step 21, image 1 of 1
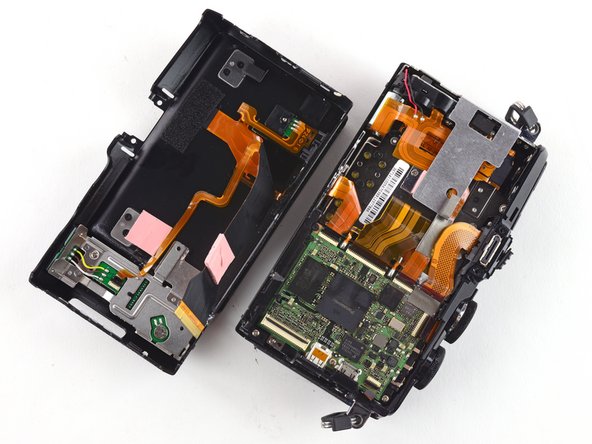
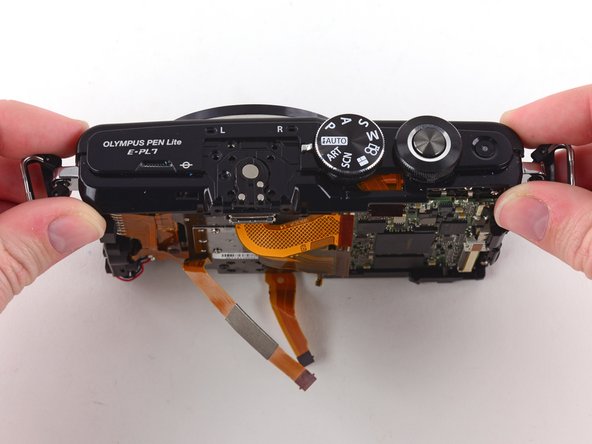
      • Gently pull the back case away from the camera.

      • Do not attempt to remove the back case, as it is attached to the camera by a ribbon cable.

      Ask FixBot

      Add Comment

    21. Disassembling Olympus Pen E-PL7: step 22, image 1 of 3 Disassembling Olympus Pen E-PL7: step 22, image 2 of 3 Disassembling Olympus Pen E-PL7: step 22, image 3 of 3
      • To remove the ribbon holding the back case to the camera, use the pointed end of a spudger to flip back the top bar on top of the ZIF connector.

      Ask FixBot

      Add Comment

    22. Disassembling Olympus Pen E-PL7: step 23, image 1 of 3 Disassembling Olympus Pen E-PL7: step 23, image 2 of 3 Disassembling Olympus Pen E-PL7: step 23, image 3 of 3
      • Use tweezers to pull the ribbon out of the connector.

      • Remove the back case.

      Ask FixBot

      Add Comment

    1. Disassembling Olympus Pen E-PL7, Disassembling Olympus Pen E-PL7: step 24, image 1 of 1
      • Use a Phillips #00 screwdriver to remove the two 1.6 mm screws near the left hand grip.

      Ask FixBot

      Add Comment

    2. Disassembling Olympus Pen E-PL7: step 25, image 1 of 2 Disassembling Olympus Pen E-PL7: step 25, image 2 of 2
      • Once the screws are removed, use two fingers to remove the metal clip.

      Ask FixBot

      Add Comment

    3. Disassembling Olympus Pen E-PL7: step 26, image 1 of 1
      • Remove the 2.2 mm Phillips screw near the left hand grip, holding a second metal plate in place.

      • Remove the 1.8mm Phillips screw.

      Ask FixBot

      Add Comment

    4. Disassembling Olympus Pen E-PL7: step 27, image 1 of 1
      • Once the screws are removed, use two fingers to remove the metal plate.

      Ask FixBot

      Add Comment

    5. Disassembling Olympus Pen E-PL7: step 28, image 1 of 1
      • Remove the two 4.1 mm Phillips screws near the right hand grip.

      Ask FixBot

      Add Comment

    6. Disassembling Olympus Pen E-PL7: step 29, image 1 of 1
      • Use a spudger to remove the three indicated ribbon cables from their ZIF connectors on the motherboard.

      Ask FixBot

      Add Comment

    7. Disassembling Olympus Pen E-PL7: step 30, image 1 of 3 Disassembling Olympus Pen E-PL7: step 30, image 2 of 3 Disassembling Olympus Pen E-PL7: step 30, image 3 of 3
      Tool used on this step:
      Tweezers
      $4.99
      Buy
      • Use tweezers to remove the plastic cover from the two ZIF connectors in the upper left corner of the motherboard.

      • Disconnect both ribbon cables.

      Ask FixBot

      Add Comment

    8. Disassembling Olympus Pen E-PL7: step 31, image 1 of 3 Disassembling Olympus Pen E-PL7: step 31, image 2 of 3 Disassembling Olympus Pen E-PL7: step 31, image 3 of 3
      • Desolder the large ribbon cable from the motherboard at the solder points on either side of its ZIF connector

      • Learn more about soldering with iFixit's Soldering Technique Guide.

      Ask FixBot

      Add Comment

    9. Disassembling Olympus Pen E-PL7: step 32, image 1 of 3 Disassembling Olympus Pen E-PL7: step 32, image 2 of 3 Disassembling Olympus Pen E-PL7: step 32, image 3 of 3
      • Remove the 5.2 mm Phillips screw from the top of the right hand grip.

      • Remove the top plate.

      Ask FixBot

      Add Comment

    10. Disassembling Olympus Pen E-PL7: step 33, image 1 of 2 Disassembling Olympus Pen E-PL7: step 33, image 2 of 2
      • Remove the sensor assembly from the front case.

      Ask FixBot

      Add Comment

    11. Disassembling Olympus Pen E-PL7: step 34, image 1 of 1
      • Remove the two 4.3 mm screws from the front of the sensor assembly.

      • Remove the 6.8 mm screw.

      Ask FixBot

      Add Comment

    12. Disassembling Olympus Pen E-PL7: step 35, image 1 of 1
      • Remove the four 1.9mm Phillips screws from the back of the sensor assembly.

      • Remove the 14.5mm Phillips screw.

      • Remove the 3.3mm Phillips screw.

      Ask FixBot

      Add Comment

    13. Disassembling Olympus Pen E-PL7: step 36, image 1 of 3 Disassembling Olympus Pen E-PL7: step 36, image 2 of 3 Disassembling Olympus Pen E-PL7: step 36, image 3 of 3
      • Use a Phillips #00 screwdriver to remove the 1.7 mm screw securing the tripod mount to the ribbon cable.

      • Use tweezers to remove the small copper ring underneath the screw.

      Ask FixBot

      Add Comment

    14. Disassembling Olympus Pen E-PL7: step 37, image 1 of 3 Disassembling Olympus Pen E-PL7: step 37, image 2 of 3 Disassembling Olympus Pen E-PL7: step 37, image 3 of 3
      • Desolder the red and black wires from the back upper right corner of the sensor assembly.

      Ask FixBot

      Add Comment

    15. Disassembling Olympus Pen E-PL7: step 38, image 1 of 3 Disassembling Olympus Pen E-PL7: step 38, image 2 of 3 Disassembling Olympus Pen E-PL7: step 38, image 3 of 3
      • Pull the sensor frame away from the sensor assembly.

      Ask FixBot

      Add Comment

    16. Disassembling Olympus Pen E-PL7: step 39, image 1 of 1
      • Remove the 4.4 mm Phillips screw securing the motherboard to the battery compartment.

      • Remove the 3.8 mm Phillips screw.

      • Remove the 3.7mm Phillips screw.

      Ask FixBot

      Add Comment

    17. Disassembling Olympus Pen E-PL7: step 40, image 1 of 1
      • Remove the three 3.3 mm Phillips screws at the top of the motherboard.

      Ask FixBot

      Add Comment

    18. Disassembling Olympus Pen E-PL7: step 41, image 1 of 1
      • Remove the 3.4 mm Phillips screw from the left side of the motherboard.

      Ask FixBot

      Add Comment

    19. Disassembling Olympus Pen E-PL7: step 42, image 1 of 1
      • Remove the motherboard.

      Ask FixBot

      Add Comment

    20. Disassembling Olympus Pen E-PL7: step 43, image 1 of 2 Disassembling Olympus Pen E-PL7: step 43, image 2 of 2
      • Remove the battery compartment by hand.

      Ask FixBot

      Add Comment

    21. Disassembling Olympus Pen E-PL7: step 44, image 1 of 1
      • Use a Phillips #00 screwdriver to remove the three 2.3 mm screws from the base of the LCD screen.

      Ask FixBot

      Add Comment

    22. Disassembling Olympus Pen E-PL7: step 45, image 1 of 2 Disassembling Olympus Pen E-PL7: step 45, image 2 of 2
      • Fully extend the LCD.

      Ask FixBot

      Add Comment

    23. Disassembling Olympus Pen E-PL7: step 46, image 1 of 3 Disassembling Olympus Pen E-PL7: step 46, image 2 of 3 Disassembling Olympus Pen E-PL7: step 46, image 3 of 3
      • Remove the two 2.2 mm Phillips screws located on the back of the LCD screen.

      • Use tweezers to remove the top bracket.

      Ask FixBot

      Add Comment

    24. Disassembling Olympus Pen E-PL7: step 47, image 1 of 3 Disassembling Olympus Pen E-PL7: step 47, image 2 of 3 Disassembling Olympus Pen E-PL7: step 47, image 3 of 3
      • Use a Phillips #00 screwdriver to remove the four 1.4 mm screws from the back of the LCD screen.

      • Remove the LCD ribbon cable with a pair of tweezers.

      • The cover may simply fall off after the screws have been removed.

      Ask FixBot

      Add Comment

    25. Disassembling Olympus Pen E-PL7: step 48, image 1 of 3 Disassembling Olympus Pen E-PL7: step 48, image 2 of 3 Disassembling Olympus Pen E-PL7: step 48, image 3 of 3
      • Carefully lift the LCD screen up and away from the assembly.

      • Do not attempt to fully remove the screen, as it is attached to the assembly by a ribbon cable.

      Ask FixBot

      Add Comment

    26. Disassembling Olympus Pen E-PL7: step 49, image 1 of 2 Disassembling Olympus Pen E-PL7: step 49, image 2 of 2
      • Use tweezers to remove the plastic covering the LCD ribbon cable.

      Ask FixBot

      Add Comment

    27. Disassembling Olympus Pen E-PL7: step 50, image 1 of 3 Disassembling Olympus Pen E-PL7: step 50, image 2 of 3 Disassembling Olympus Pen E-PL7: step 50, image 3 of 3
      • Use the flat end of a spudger to flip back the black bar on the ZIF connector.

      Ask FixBot

      Add Comment

    28. Disassembling Olympus Pen E-PL7: step 51, image 1 of 2 Disassembling Olympus Pen E-PL7: step 51, image 2 of 2
      • Gently pull the ribbon cable out with tweezers.

      Ask FixBot

      Add Comment

    29. Disassembling Olympus Pen E-PL7: step 52, image 1 of 1
      • Remove the LCD Screen.

      Ask FixBot

      Add Comment

    30. Disassembling Olympus Pen E-PL7: step 53, image 1 of 2 Disassembling Olympus Pen E-PL7: step 53, image 2 of 2
      • Pull the ribbon cable through the hole in the LCD assembly.

      Ask FixBot

      Add Comment

    31. Disassembling Olympus Pen E-PL7: step 54, image 1 of 1
      • Remove the four 2.4 mm Phillips screws from the inside of the back case.

      Ask FixBot

      Add Comment

    32. Disassembling Olympus Pen E-PL7: step 55, image 1 of 2 Disassembling Olympus Pen E-PL7: step 55, image 2 of 2
      • Pull the LCD assembly away from the back case.

      Ask FixBot

      Add Comment

    33. Disassembling Olympus Pen E-PL7: step 56, image 1 of 1
      • You have successfully disassembled the Olympus Pen E-PL7!

      Ask FixBot

      Add Comment

Conclusion

To reassemble your device, follow these instructions in reverse order.

Cancel: I did not complete this guide.

9 other people completed this guide.

Kelsea Weber

Member since: 11/12/15

21,491 Reputation

32 Guides authored

2 Guide Comments

Step 23. You should not be using pointed tweezers here. Or on any of the ribbon cables. They put pressure on the tip only only and could damage across tracks on the ribbon cable. Small long nose pliers with smooth jaws or even small pliers again with smooth jaws. Also for assembly the tweezers would be useless in many ribbon cable reinsertion positions. BTW they are nice tweezers but not for ribbon cables.

jimspc1 - Reply Share

I have an EPL-7 in good condition, however, the on/off button has ceased working. It was a slow transition to not working. What could it be and should I spend the 200.00 dollars Olympus wants to service it? Thanks!

Ben Prisk - Reply Share

Add Comment

View Statistics:

Past 24 Hours: 6

Past 7 Days: 38

Past 30 Days: 161

All Time: 14,938