
Digiland DL1168A Front/Rear Camera Replacement

Payton Boshears and 3 other contributors
Last updated on Jun 25, 2025
Views: 437
View statistics:
- Past 24 Hours:
- 1
- Past 7 Days:
- 9
- Past 30 Days:
- 51
- All Time:
- 437
Comments: 0
No one has left comments on this guide. Will you be first?
Go to guide commentsCompleted: 0 1
No one has marked this guide "completed." Will you be the first?
1 person has marked this guide "completed." It's you — great job!
Favorites: 0 1
No one has favorited (and subscribed to) this guide. Will you be the first?
1 person has favorited (and subscribed to) this guide — and that's you!
Needs Better Images
Better photos will improve this guide. Help out by taking, editing, or uploading new ones!
Introduction
Go to step 1 ↓Use this guide to replace the front or rear camera on your Digiland DL1168A tablet. If your device is experiencing issues such as blurry images, failure to open the camera app, or complete camera malfunction, replacing the faulty camera module may resolve the problem. This guide will walk you through the process step-by-step with detailed instructions and photos to ensure a safe and successful repair. Before starting, make sure your tablet is powered off and fully disconnected from any power source to avoid electrical damage or injury.
What you need
Tools


-
-
-
Using an opening tool, begin softly prying open device by first inserting it in between the front and back panels.
-
Continue prying the edges while moving around the device's perimeter until the back can be easily removed.
 Ask FixBot
-
-
-
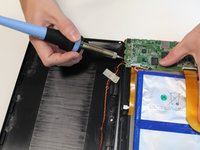
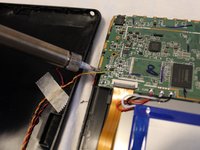
Desolder the four wires connecting the rear case to the motherboard.
-
Disconnect the wires from the motherboard.
-
Remove the rear case from the device.
-
-
-
-
Tool used on this step:Tweezers$4.99
-
Use tweezers to remove the cover that keeps the camera lens in place.
-
-
-




To reassemble your device, follow these instructions in reverse order.

Team

Grand Valley State University, Team S1-G1, DeVasto Fall 2019 Member of Grand Valley State University, Team S1-G1, DeVasto Fall 2019
GVSU-DEVASTO-F19S1G1
4 Members
48 Guides authored
