Free Shipping on Domestic Orders $75+

Dexcom G6 Receiver Battery Replacement

Views: 5.3K

View statistics:

Past 24 Hours:
2
Past 7 Days:
16
Past 30 Days:
86
All Time:
5,336
Comments: 15

5 comments on steps, 10 guide comments.

Go to guide comments
Completed: 4

4 people have marked this guide "completed." Will you be next?

Favorites: 0

No one has favorited (and subscribed to) this guide. Will you be the first?

Time Required: No estimate
Difficulty: Difficult
Community-Contributed Guide

An awesome member of our community made this guide. It was not created by iFixit staff.

Bullets!

Better coordination with markups and the color/type of bullets will help make this guide more clear!

Dexcom G6 Receiver Battery Replacement

What you need

Tools

    1. Dexcom G6 Receiver Battery Replacement, Display and Front Bezel: step 1, image 1 of 1
      • Unscrew the 6 Torx T5 screws from the back of the device

      Ask FixBot

      Add Comment

    2. Dexcom G6 Receiver Battery Replacement: step 2, image 1 of 2 Dexcom G6 Receiver Battery Replacement: step 2, image 2 of 2
      • Use a spudger to lift up the screen assembly ribbon cable flap, then remove the ribbon cable.

      • Screen Information: Model AM0310R-04 Lot # NHT18080052

      Ask FixBot

      Add Comment

    1. Dexcom G6 Receiver Battery Replacement, Charging Port: step 3, image 1 of 1
      • Using a spudger, unplug the Charging Port connector from the motherboard.

      Ask FixBot

      Add Comment

    2. Dexcom G6 Receiver Battery Replacement: step 4, image 1 of 1
      • Remove the 2 silver Torx T5 screws holding the charging port down.

      Ask FixBot

      Add Comment

    3. Dexcom G6 Receiver Battery Replacement: step 5, image 1 of 1
      • Remove the Charging Port Assembly from the motherboard.

      Ask FixBot

      Add Comment

    1. Dexcom G6 Receiver Battery Replacement, Motherboard: step 6, image 1 of 1
      • Remove the silver Torx T5 screw holding the motherboard down.

      Ask FixBot

      Add Comment

    2. Dexcom G6 Receiver Battery Replacement: step 7, image 1 of 2 Dexcom G6 Receiver Battery Replacement: step 7, image 2 of 2
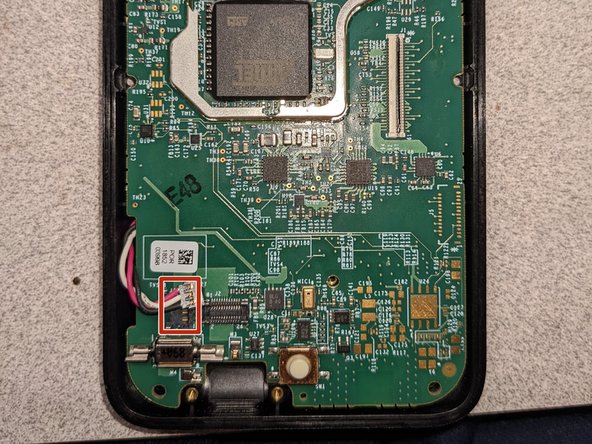
      • Using a spudger, carefully remove the battery connector on the left side of the motherboard.

      Ask FixBot

      Add Comment

    3. Dexcom G6 Receiver Battery Replacement: step 8, image 1 of 1
      • Using a spudger, carefully pry up the motherboard to remove it.

      Ask FixBot

      Add Comment

    1. Dexcom G6 Receiver Battery Replacement, Battery: step 9, image 1 of 3 Dexcom G6 Receiver Battery Replacement, Battery: step 9, image 2 of 3 Dexcom G6 Receiver Battery Replacement, Battery: step 9, image 3 of 3
      • Use heat to soften the adhesive holding the battery down.

      Ask FixBot

      Add Comment

      • Carefully use one or more opening picks to remove the adhesive holding the battery down, then remove the battery.

      Ask FixBot

      Add Comment

Conclusion

To reassemble your device, follow these instructions in reverse order.

Cancel: I did not complete this guide.

4 other people completed this guide.

Andrew S

Member since: 07/30/21

15,633 Reputation

8 Guides authored

10 Guide Comments

Where do you get battery? Dexcom won't sell it.

Richy - Reply Share

I'm not sure you can get this same battery somewhere else (I haven't performed a battery change myself, just took it apart for demonstration). I'll get back to you if I can figure out a way to use another battery.

Andrew S - Reply Share

@richy14330 The connector type is JST ACHR-03V.

Andrew S - Reply Share

Still looking ... Where to get a battery for this receiver? What type of battery is it ?

Julian Payne (Xfactor) - Reply Share

I don't think you can get a replacement battery for this device anywhere. It is a 950 mAh 06220 battery made by Jhih Hong Technology. The model number seems to be BAT000023 and the type is 1ICP4/44/59.

Andrew S - Reply Share

Add Comment

View Statistics:

Past 24 Hours: 2

Past 7 Days: 16

Past 30 Days: 86

All Time: 5,336