Introduction
Like any laptop, the Dell XPS 15 9500's fans keep crucial components cool and functional. If your laptop's performance has become increasingly sluggish, or you notice that you could probably fry an egg on the heatsink, odds are there's an issue with your fans.
First, check if the fans are spinning while your laptop's powered on. If they're spinning, check the blades for any buildup of dust or debris, and clean them appropriately.
If the fans aren't spinning whatsoever, they've likely reached the end of their lifespan, and it's time to replace them.
Before beginning, power off and unplug your laptop.
What you need
-
-
-
Remove the eight 3.0 mm screws from the bottom panel with a T5 Torx screwdriver.
 Ask FixBot
-
-
-
Gently wedge an opening tool in the gap between the base panel and chassis, and pry vertically around the perimeter until it releases from the chassis.
-
Lift the base panel up and away from the chassis.
-
-
-
-
-
-
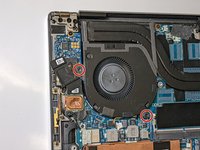
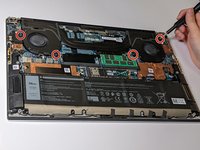
Use a Phillips #00 screwdriver to remove the two 4.0 mm screws screws from each fan (four screws total).
-
-




To reassemble your device, follow these instructions in reverse order.
Cancel: I did not complete this guide.
One other person completed this guide.

Team

UC Santa Barbara, Team A-1, Bator Winter 2022 Member of UC Santa Barbara, Team A-1, Bator Winter 2022
UCSB-BATOR-W22SAG1
4 Members
48 Guides authored
