Repair Guides
Learn how to fix just about anything with our step-by-step guides.
App
Your pocket repair helper.
FixBot
The friendly AI repair assistant.
Repairability
Learn why fixable products make sense.
Teardowns
Get a sneak peek inside the latest gadgets.
Answers Forum
Share solutions and get help from a friend.
Find Your Community
Find teams, events, and fellow fixers.
Help Out
Help make repair knowledge free and accessible for everyone.
Right to Repair
Learn about the Right to Repair movement and how to be an advocate.
Featured
Quality parts and tools backed by our lifetime guarantee.
Tools
Shop our wide selection of precision tools.
Parts
Shop parts backed by our quality guarantee.
iPhone Batteries
Batteries tested and guaranteed plus a kit with everything you need.
Free Shipping on Domestic Orders $75+
Take screw covers off with a metal spudger
Take the six screws out with the bit driver.
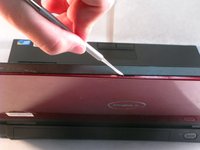
Pop the black plastic panel off with the metal spudger. There are three spots where you should leverage it so that the panel does not break.
Remove the plug on the bottom of the screen.
Remove the two screws on the bottom of the computer screen.
Remove the tape and the LCD plug/connector from the back of the screen.
Remove the three screws on the left and right of the screen.
Remove the screen from the metal side frames.
To reassemble your device, follow these instructions in reverse order.
Cancel: I did not complete this guide.
with 1 other contributor
Member since: 08/26/15
431 Reputation
4 Guides authored
Badges: 7
+4 more badges
WCU-VIRTUE-F15S1G4
4 Members
Choose a size and copy the code below to embed this guide as a small widget on your site / forum.
Past 24 Hours: 0
Past 7 Days: 7
Past 30 Days: 27
All Time: 1,080